
If you’re playing Elden Ring: Nightreign and not diving into Remembrance Quests, you’re missing out on some of the best content the game has to offer. Seriously, this isn’t just a side feature. It’s how you unlock deep lore, exclusive skins, relic slots, and even secret endings. Each Nightfarer (your playable classes/characters) comes with their own backstory, told through a multi-part Remembrance questline. It’s a slow burn, but one that pays off hard, especially if you’re into builds, lore, or just want to flex in style. I’ve been running with Executor, and the amount of extra story, gear, and unique rewards I’ve gotten just from sticking with him is honestly wild.
How to Unlock and Complete Remembrance Quests
Once you beat your first Night Lord boss, a whole new layer of gameplay opens up: Remembrance Mode. These quests are essentially character-specific flashbacks that slowly uncover your Nightfarer’s personal story. They’re not handed to you, though, you’ll need to earn access to them by playing and progressing with the character you’re using.
You start from Chapter 1 in the Remembrance Journal. To unlock future chapters, you’ll need to keep using the same Nightfarer, complete quests, and take down Night Lords. Some characters need more grind than others (looking at you, Guardian), but they all follow the same structure.

How to Unlock Remembrance Quests
Here’s the kicker: To unlock a Remembrance, you must defeat a Night Lord while playing as the specific Nightfarer.
Let’s say you want to experience Revenant’s story, you’ll need to take down Gladius or another Night Lord with Revenant. Once that’s done, you can go to the Roundtable Hold, open the Journal, and “Begin Remembrance” should now be available.
If it’s not showing up, don’t freak out. Try defeating another Night Lord. Some characters are picky like that and need a couple boss wins to trigger the quest.

Realm of Remembrance Explained
When you activate a Remembrance, you’re transported into a slightly altered version of the game world. It’s hazy and dreamlike, like you’re reliving the past. Core gameplay systems remain the same, but now you’re on a personal mission.
Head to the Priestess (her map icon will glow with an exclamation point). She’ll start things off with dialogue and assign you a task, usually tied to your character’s past, like fighting a clone of yourself or hunting a group called The Condemned.
You can pause Remembrance mode anytime from the Journal and return to normal play. But while active, it’ll prioritize character-specific story progression and objectives.

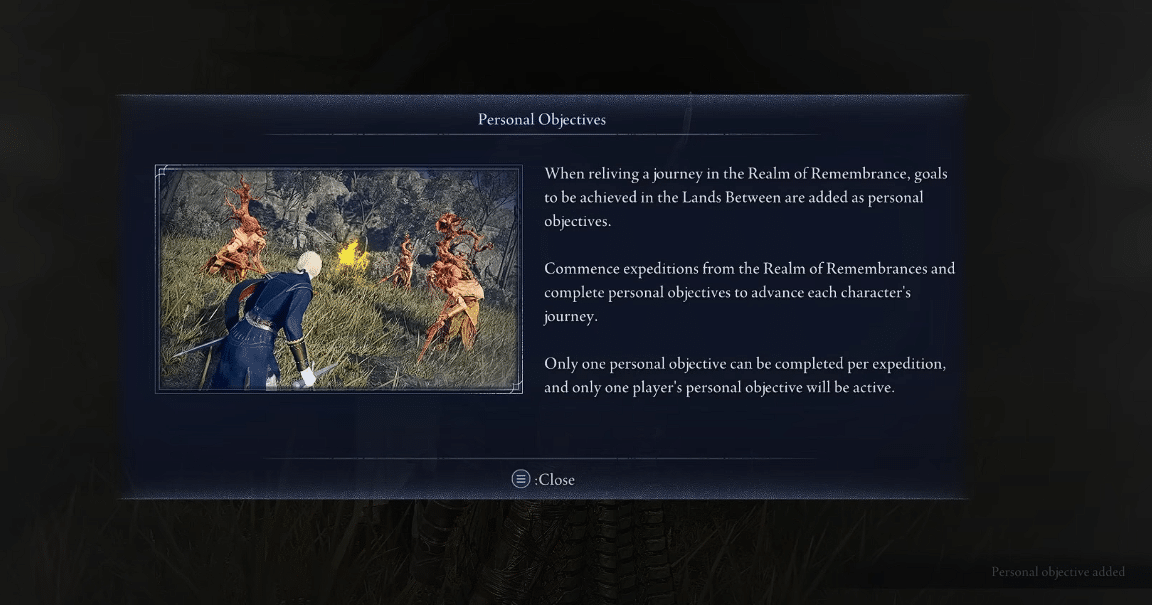
Completing Personal Objectives
Every Remembrance has “Personal Objectives,” and they’re how you advance chapters.
Important rules to know:
- Only one personal objective can be completed per expedition.
- In co-op, only one player’s objective is active, and it’s selected at random.
- Objectives vary, some are duels, some involve exploration or mini-bosses.
For example, I had to fight a mirror version of Iron Eye. It was basically a 1v1 boss fight in the middle of a Night Lord Hunt match. Not super hard, but very satisfying.
Once you complete the task, the game will say something like “Vanquished the Invader” and your journal will update with new info.
Turn in the Objective, Unlock the Portal
After finishing the objective, return to the Roundtable. The Priestess will appear again, marked on your map. Talk to her, hand over the quest item (like the Traitor’s Letter), and she’ll give you some character-specific lore.
Then, a portal will appear beside her. Step through it, and the Remembrance chapter concludes.
Why You Should Absolutely Do These
Let’s talk rewards, because there’s a lot more than just story bits:
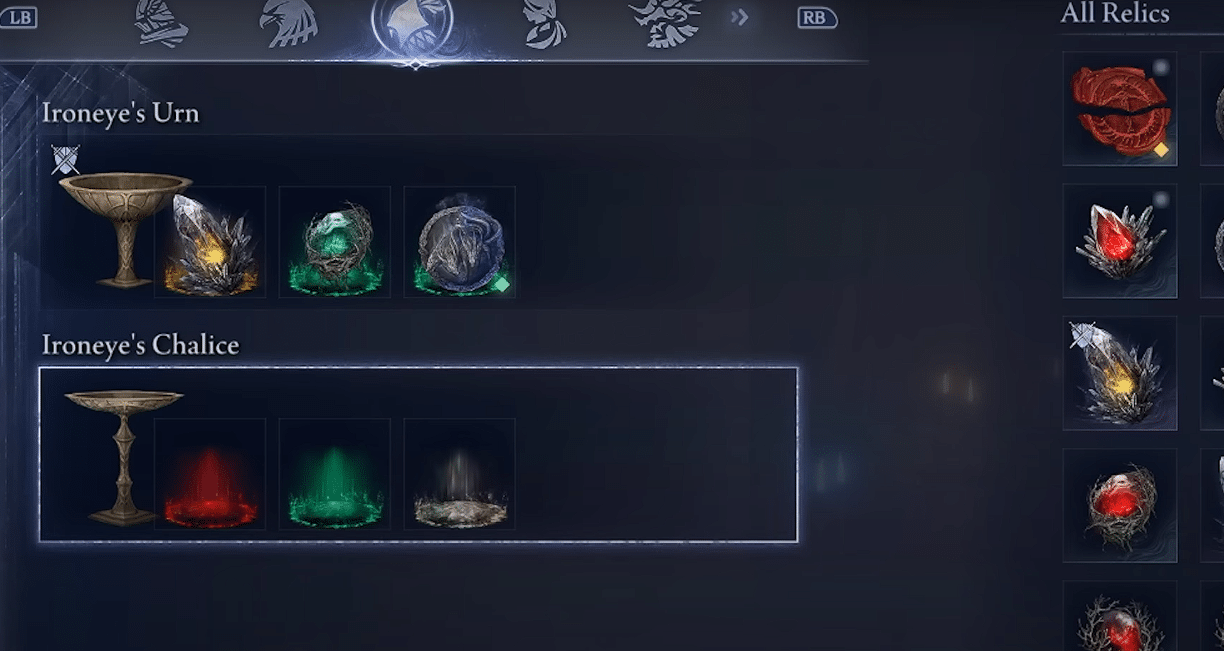
- Chalices – Used in your Relic loadout to customize builds
- Relic Vessels – Character-specific and color-coded to boost your synergy. If you check your Relic tab, you’ll notice that different Chalices support different color relics:
- White slots are flexible (any color).
- Green only for green relics.
- Red only for red relics, etc.
- Exclusive Skins – Unique Remembrance “Garbs” for each Nightfarer
- Secret Endings – Only accessible after completing specific characters’ Remembrance questlines
Think of Remembrance as your key to true endgame content. Without them, you’re locking yourself out of powerful relic combos, sweet cosmetics, and the deepest parts of the game’s lore.
Additional Chapters & Late-Game Unlocks
After you finish one chapter, check your Journal again, you might see new ones unlocked, like “Page 6” or “Chapter 3.”
But if nothing shows up? That usually means you need to:
- Defeat four Night Lords
- Unlock the Revenant
Only then do certain characters (like Duchess or Raider) get their next Remembrance unlocked. FromSoft really went full Soulsborne here, progression is vague, but deliberate.
All Remembrance Quests (Personal Objectives Cheat Sheet)
| Remembrance | Chapters & Objectives |
|---|---|
| Wylder | 1: Run expeditions 2: Collect Memory Fragments or defeat Tricephalos 3: Find whetstone in Limveld (Reward: Slate Whetstone) 4: Collect more Memory Fragments 5: Talk to Iron Menial (Reward: Wylder’s Chalice) 6: Defeat 4 unique Nightlords 7: Find Silver Tear in Limveld (Reward: Silver Tear) 8: After completing 3rd Remembrance Quest |
| Guardian | 1: Run expeditions 2: Collect Memory Fragments 3: Defeat a Nightlord 4: Find Cracked Golem in Limveld (Reward: Stone Stake) 5: Defeat a Nightlord 6: Eliminate Wandering Merchant (Reward: Guardian’s Chalice) 7: Pay 10,000 Runes for tome (Reward: Third Volume) 8: After Chapter 7 |
| Duchess | 1: Unlock with Old Pocketwatch 2: Collect Memory Fragments 3: Talk to Nightfarers & get Golden Dew (Reward: Golden Dew) 4: Defeat a Nightlord 5: Talk to Wylder and Iron Menial (Reward: Duchess’ Chalice) 6: Duel Revenant (Reward: Crown Medal) |
| Recluse | 1: Defeat a Nightlord 2: Defeat Golden Hippopotamus (Reward: Recluse’s Chalice) 3–4: Obtain Vestige of Night (Reward: Vestige of Night) 5: Defeat 4 different Nightlords 6: Obtain Bone-Like Stone (Reward: Bone-Like Stone) 7: Defeat Night Aspect 8: TBD |
| Ironeye | 1: Collect Memory Fragments 2: Collect more Memory Fragments 3: Expeditions or defeat a Nightlord 4: Defeat Night Huntsman, deliver letter (Rewards: Ironeye’s Chalice, Cracked Sealing Wax) 5: Expeditions and Nightlord 6: Defeat Darkdrift Knight (Reward: Edge of Order) |
| Raider | 1: Defeat Tricephalos 2: Defeat Onestrike Gladiator (Reward: Torn Braided Cord) 3: Collect Memory Fragments 4: Defeat Elder Lion (Reward: Raider’s Chalice) 5: Defeat 2nd Nightlord 6: Defeat 3rd Nightlord 7: Defeat White Horn (Rewards: Black Claw Necklace, Raider’s Remembrance Skin) 8: After Chapter 7 |
| Executor | 1: Run expeditions 2: Find Flower in Limveld (Rewards: Executor’s Chalice, Blessed Flowers) 3–4: Collect Memory Fragments, defeat Caligo 5–6: Defeat Erdtree Avatar, get Golden Sprout (Rewards: Golden Sprout, Executor Skin) 7: After Chapter 6 |
| Revenant | 1: Defeat Nightlord and obtain Blade Fragment (Reward: Small Makeup Brush) 2–4: Collect Memory Fragments 5: Defeat Corrosion (Reward: Revenant’s Chalice) 6: Defeat a Nightlord 7: Defeat Contaminant (Rewards: Revenant’s Remembrance Skin, Old Portrait) 8: After Chapter 7 |
Wrap-Up & Final Thoughts
This system surprised me in the best way. It’s like Elden Ring meets character-driven storytelling, and I’m genuinely hooked. The first time I saw my Executor’s cutscene, I was like, “Wait, you’re telling me this guy has actual trauma?!”
Remembrances gave me a reason to stick with one Nightfarer, and honestly? I wouldn’t play any other way now. One time, it took me around 15 hours to beat Gladius with two randoms, but I’m glad the game opens up with more side content like this. Super satisfying.
Just keep in mind:
- Queue times for boss-specific Remembrances are still a bit rough. Expect long matchmaking delays, especially solo.
- Communication helps in co-op, coordinate whose objective you want to run.
- Check back to the Roundtable often. That Journal menu updates more than you’d expect.


