If you like RPG games on Roblox then you will find Pilgrammed pretty interesting. And the best thing? It is free to play! The game lets you explore a big world with multiple unique locations. You can also try to get good armor and weapons in Pilgrammed.
On the occasion of April Fool’s Day, the developers added Whelk Seas to the game. One of the things you can do in Whelk Seas is collect all the hidden Keys. This guide will assist you in getting all the Keys.
Complete Whelk Island Keys Guide
As all the 5 Keys are located in Whelk Seas, make your way there. To do so, use the portal which you can easily find in the default spawn location.

This portal will take you to Roberto’s Island. On the island, there is Dock that is located at the back. It is shown in the image below. I will use this Dock throughout the guide as a reference point for helping you reach the different locations you need for getting the Keys.

Key #1: Roberto Key
To get this key, talk to Roberto to get his quest. Roberto can be found at the spawn location of Robert’s Island.

The quest requires you to beat up 10 Ruffians. You can find the Ruffian Camp directly in front of Roberto.

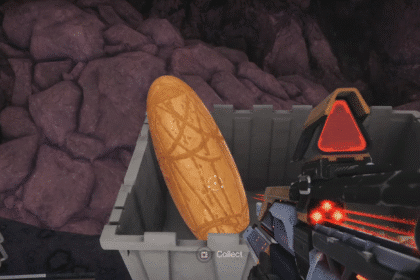
After defeating 10 Ruffians, go back to Roberto. You will receive the Roberto Key after telling Roberto that you beat up the bandits.
Key #2: Ring Key
For this key, go to the Graham’s Peak which is located ahead of the Ruffian Camp across the ocean.

After you get inside Graham’s Peak, there is a Red Portal that says Top Floor. Go inside this portal and you will be teleported to the top of Graham’s Peak.

Once you are at the top, you will notice there is a huge Golden Ring followed by other Golden Rings that span downwards.

Your task here is to go through each Golden Ring one by one in the order they are arranged. You must not miss a single ring otherwise you need to start again. You can use the Rent-a-parachute given to you to make this easier. After going through all the Golden Rings, you will come across a final Green Ring. Go through that as well.

After passing through the Green Ring, you will get the Ring Key.
Note: If you do not receive the key, it means you missed going through one of the Rings and you need to try again.
Key #3: Who Key
You will have to fight a boss for this ring. The boss is located at the Wondrous Factory. To get to Wondrous Factory, go to the Dock and head in the direction shown in the image below.

You will reach Wondrous Factory in about a minute. Make your way inside the factory.

The boss is called Who Is This and has 1000 HP as shown below.

After defeating Who Is This, you will get the Who Key.
Key #4: Coder Key
Getting this key is a bit tricky as you need to find a 6 Digit Code. Clues for the Code are located inside the Wondrous Factory where you had to fight the Who Is This boss.
To get the Code, look for Pictures on the walls inside the Wondrous Factory with text written at the bottom right corner as shown below. You need to find 6 Pictures like this. Each Picture will give you a single digit of the Code. The image below says, “8 is 6th”. What this means is the 6th digit of the Code is 8.

Once you find all 6 digits of the code, you need to make your way to the Coder. The Coder is located at Battered Wilderness. Once again, go to the Dock and head in the direction of the arrow shown in the image below.

You should be able to reach Battered Wilderness in about a minute or two. Once there, you have to climb to the top of the building at the center.

You can use the Steel Structures to get to the top, there are a total of 3 Steel Structures that you need to climb.
Note: You can be attacked by other players in this area so keep that in mind if you see other players roaming around the area.

Upon reaching the top, you will come across The Coder NPC. Interact with The Coder and enter the Code you figured out from the digits you got in Wondrous Factory.

Once you enter the Correct Code, you will receive the Coder Key.
Key #5: 50 Bandits Key
This is the last key that you need to get. It is found in Vernice, Go the Dock and simply head in the direction of the arrow shown in the image below to reach Vernice.

You need to defeat 50 Bandits. No, it does not mean 50 separate bandits. 50 Bandits is the name of a single enemy. The problem is, he is trapped inside a prison. And to free him, you need to first defeat the Anti-Thief Guard.

50 Bandits will come out of his cell once the Anti-Thief Guard is defeated. Now, fight 50 Bandits and defeat him as well. You will get the 50 Bandits Key once you successfully beat him up.
Where To Use Keys
Congratulations on getting all the Keys. Now, you might be wondering what to do with these Keys. In order to use the Keys, head to Reaper’s Grove. If you do not know how to get there, make your way to the Dock. And then, go in the directions shown in the image below.

You will come across Reaper’s Grove pretty soon as it is not that far.

Go inside Reaper’s Grove and move in a straight direction inside the cave until you reach the area shown below.

Go in the direction of the arrow (shown above) and you will reach an area with a Throne.

Get close to the Throne and you will be able to interact with the Note lying on top of it.

You will be asked about the Keys. Since you got all the Keys, you will be given a dialog option “Let’s go”. Upon clicking on it, you will be teleported to the City Hill Zone where you have to fight a boss.
Boss Fight
The boss you will be fighting is called Captain Whelk. And you can not defeat him in a traditional way by just attacking him with your weapon. The only way to defeat him is by answering the Trivia Questions he gives you.

Each Trivia Question will have a Statement (such as Which is the tallest?) and 2-5 Orbs with text written underneath. One of those Orbs will be the Correct Answer to the question Statement. If you get the correct answer, Captain Whelk will take damage. But if you get the wrong answer, you will take damage instead.
After defeating Captain Whelk, you will get the ending cutscene and this is it for the Keys of Whelk Seas.
If you think you have seen everything on Whelk Seas, then you are wrong. There are 6 Easter Eggs hidden on the island that you can find. However, those Easter Eggs are quite tricky to find which is why I suggest checking this guide out: All Whelk Seas Easter Eggs Location Guide.