If you’ve been grinding through Crystal of Atlan, chances are you’ve taken a break from the Main Story and wondered: “What else is there to do?” Well, if you’re chasing that sweet 100% completion, and more importantly, extra Exploration Stars, then welcome to the Exploration Episodes Guide. We’re diving into the lesser-known stories, unique side quests, and mini-dramas scattered across the game’s open zones. Because let’s be real… sometimes the best parts of an RPG are the weird side quests with dog experiments and rogue nutcrackers.
- Exploration Episodes Guide
- Tarina Episode – Lumiville
- Thomas Episode – Oreton
- Objective 1/10 – Talk To Nicole
- Objective 2/10 – Talk to Thomas
- Objective 3/10 – Locate Peculiar Stone Gate
- Objective 4/10 – Solve The Puzzle
- Objective 5/10 – Talk To Thomas Again
- Objective 6/10 – Navigate The Ruins
- Objective 7/10 – Return To Thomas
- Objective 8/10 – Talk To Research Pepps
- Objective 9/10 – Go To Wonderland Bell Tower
- Objective 10/10 – Give Letter To Thomas
- Ellie Episode – Rhine City
- Glenn Episode – Oreton
- Lee Episode – Rhine City
- Joker Episode – Wonderland
- Jalm Episode – Black Street Entrance ( Rhine City)
- Witness the Witnesses
- Mad Dog, Memory, and Mystery
- Wings and Whispers in Lumiville
- Joker’s Clues
- Behind Jalm’s Back: Dragonfall
- The Tadula Drink and The Final Truth
- Craesie’s Episode
- Wrap-Up
Exploration Episodes Guide
Episodes are short side-stories tied to the region’s lore, characters, and some surprisingly emotional moments (Ellie, I’m looking at you). They also contribute directly to your Exploration Progress, so if you’re aiming for all those sweet milestone rewards, you can’t skip ’em. Let’s break down each episode you can currently complete.

Tarina Episode – Lumiville
Start Location: Tarina in Lumiville (Restaurant)
- Start near the cooking area, cutscene triggers.
- Talk to NPCs nearby (no skip, sorry).
- Give Thornshrooms to Bicco, easy to farm nearby on the Outskirts (check image below for reference).
- Return at 8:00 PM or 9:45 PM to the cooking area to continue.
- Find Gordon (Chocobo area).
- Gather Blue Marias (found in the first dungeon with the mech-golem boss, Mine Pit in Oreton).
- Return to Tarina.

Thomas Episode – Oreton
To clear Thomas’ Episode in Crystal of Atlan, you will need to complete 10 objectives. Additionally, you will also need to actually trigger the quest.
We recommend completing the entire quest because you will not only get rewards and milestones – but also access to loot.
Objective 1/10 – Talk To Nicole
Starting off, to trigger Thomas’ Episode, make your way to Oreton. You can fast travel there using the map.

When you arrive here, you’ll find yourself at the Oreton Campsite. Here, you want to talk to the Nicole NPC who can be found nearby. Talking to her will start the episode.

Objective 2/10 – Talk to Thomas
After talking to Nicole, you will need to talk to her uncle, Thomas as part of the first objective. Luckily, Thomas can be found right next to her in the campsite.
Talk to him and he will give you a clue about a peculiar stone gate that can be found in the Oreton Mines.

Objective 3/10 – Locate Peculiar Stone Gate
Once you’re done talking to Thomas, turn around and you should be able to see the Oreton Mines. Head inside and cross the threshold into the Mine Entrance.
Inside the Mine Entrance area, you want to head straight and turn to the right. Go to the back of the cave and you will be able to find the peculiar stone gate.
When you get near it, it will trigger a cutscene and complete the second objective.

Objective 4/10 – Solve The Puzzle
After finding the gate, your next objective is to open it by solving the puzzle nearby. The game tells you that you need to activate 8 steles which is likely a typo.
Instead, what you need to do is activate the four pillars that you can find either side of the elevator. Simply go up to them one by one and touch them to activate them. You do not need to activate them in any particular order.

Once you solve the puzzle, the stone gate will open. From here, go through the gate and open the chest inside.

After you open the chest and get the loot inside, turn back. You should find Thomas standing beside the elevator. Talk to him and this will start another cutscene, finishing the objective.

Objective 5/10 – Talk To Thomas Again
After talking to Thomas and finishing his cutscene, he will return to the Oreton Campsite. You will need to go there as well – either through the fast travel or going all the way back.
Once there, talk to him again and he will give you another task: going to the ruins.

Objective 6/10 – Navigate The Ruins
After talking to Thomas, you will need to go to the Ruins. To do that, return to the stone gate that you were at previously.
Once here, go or jump down the elevator that is in front of the gate.

Go further ahead and you will be able to enter the Ruins.

From here, go straight ahead and enter the Mine Ruins. Inside the Mine Ruins, you want to navigate all the way to the end. You will come across multiple enemies and challenges too. It’s up to you whether you want to explore the area or just run straight ahead.
When you finally reach the end, you will come across another stone gate with a chest in front of it. This will also trigger a small cutscene.
From here, you want to open the chest and get the loot inside. This will also give you access to the spare core you needed and complete the objective.

Objective 7/10 – Return To Thomas
Once you have the spare core, return to Thomas and he will be in his usual spot at the Oreton Campsite. Talk to him and this will start a cutscene where he successfully replicates the magical construct.
After that, he will give you yet another project to help complete.

Objective 8/10 – Talk To Research Pepps
To help Thomas complete the objective, you will need to find a scholar researching clocks. You can do this by first heading to Wonderland.

At Wonderland, make your way to the fountain that can be found near the first teleport. Here, you will find an NPC called Researcher Pepps.
Talk to him and this will start a cutscene. He will give you a clue that there is a secret hidden in the Wonderland Bell Tower.

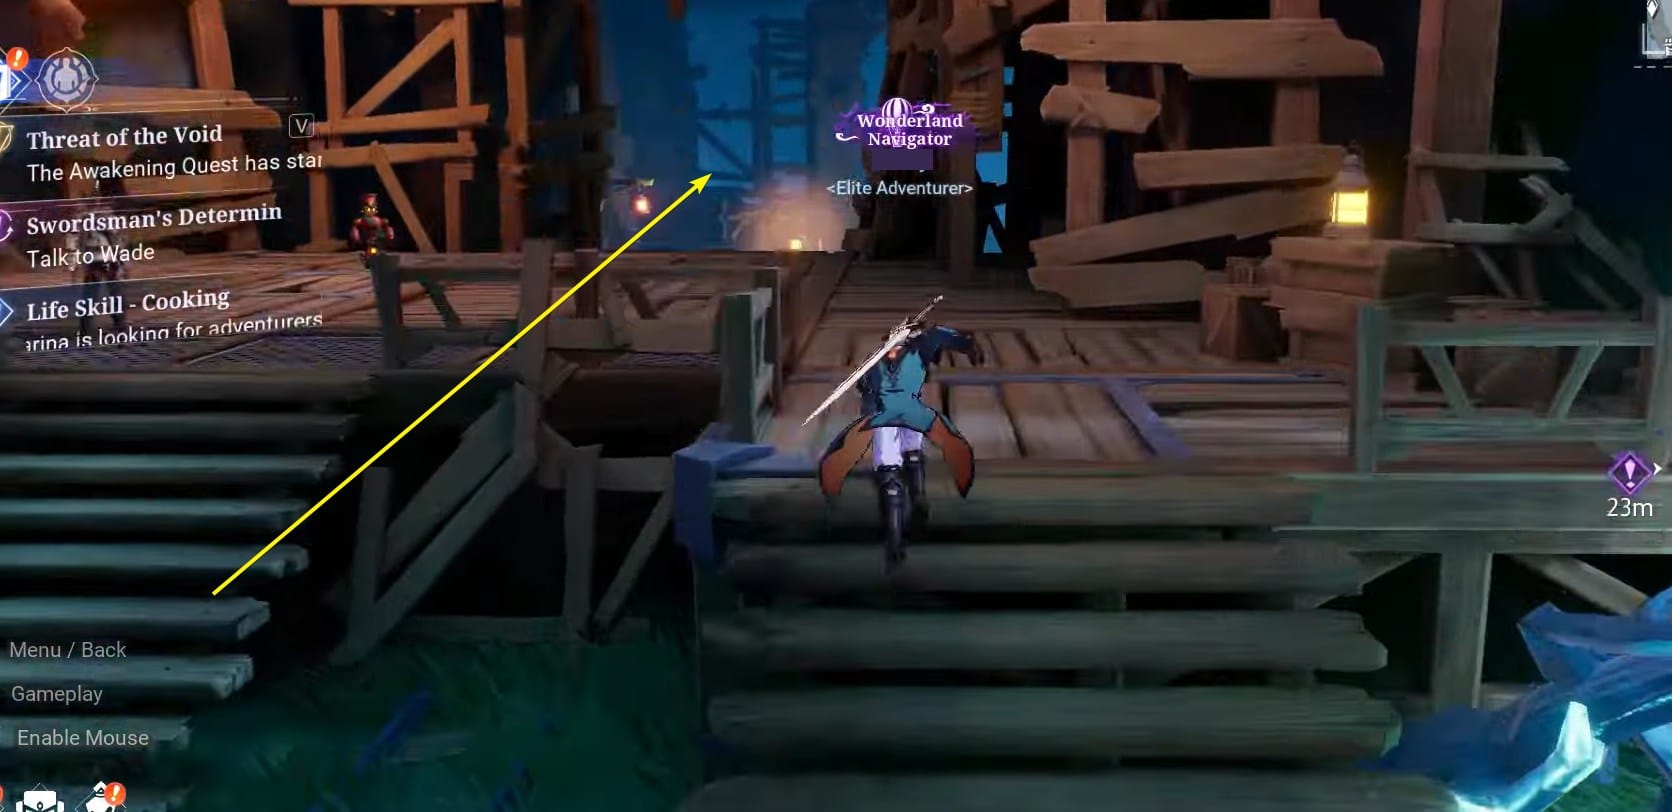
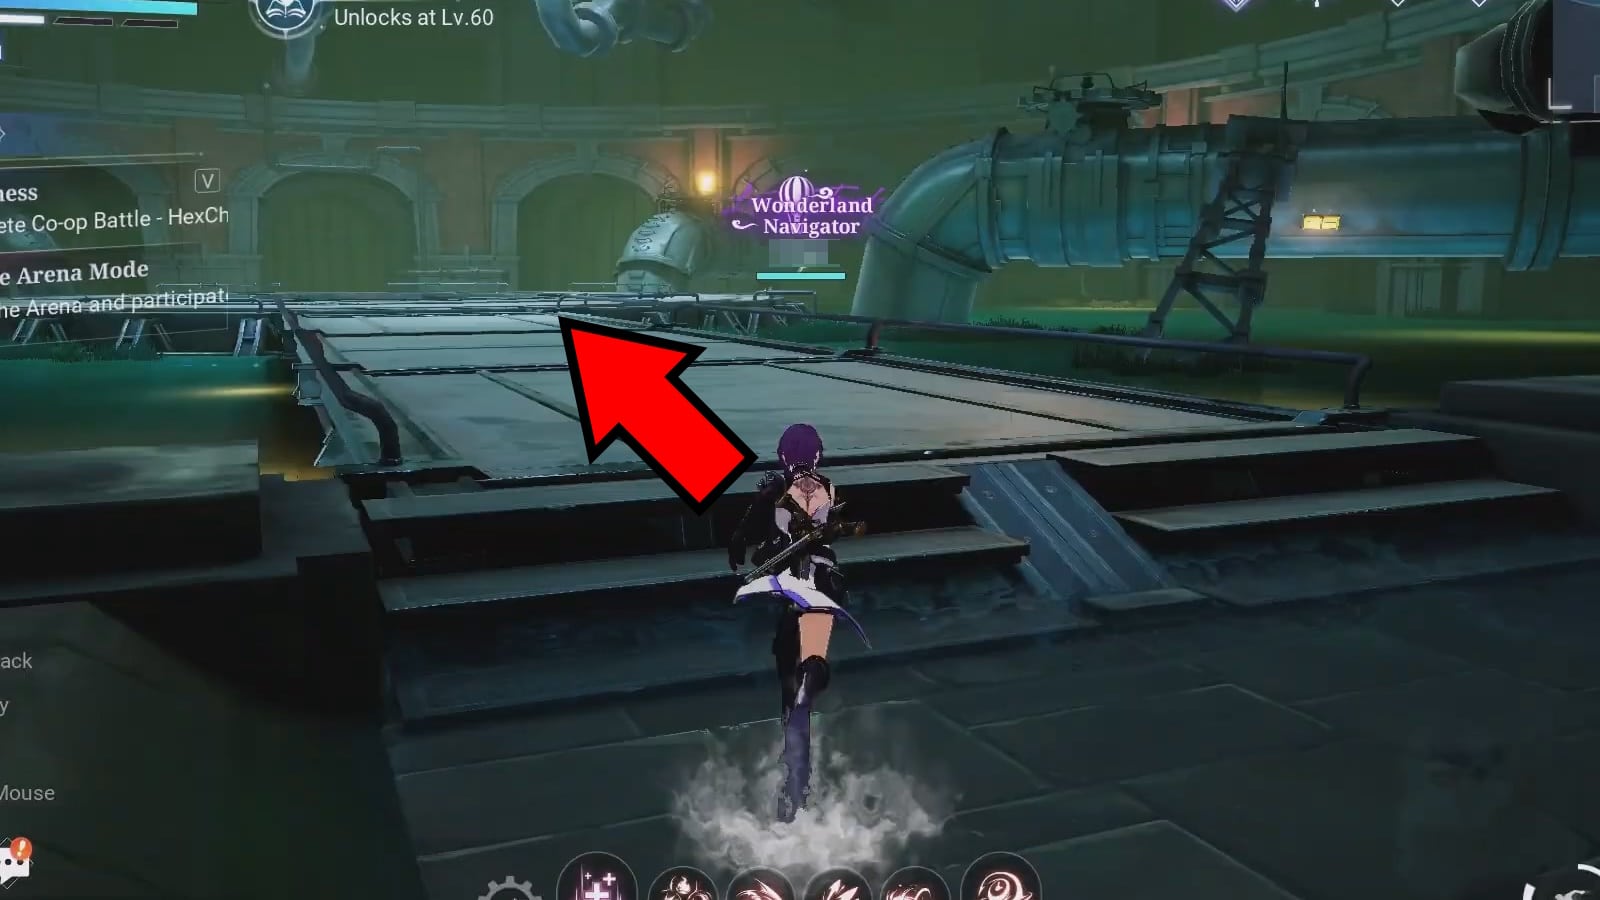
Objective 9/10 – Go To Wonderland Bell Tower
Following up on the clue by Pepps, you will need to make your way to the Wonderland Bell Tower. To do this quickly, you can open the map and select Wonderland.
Here, you can teleport directly to the Wonderland Bell Tower.
When you arrive, open the map again and select the drop down menu at the top. Here, select the Bell Tower – Top Floor option.

Next, select the Bell Tower Top Floor teleport marker so that you can teleport here directly.

Once you arrive, go to the nearby boxes that you see. There will be a letter on top of the boxes. Interact with it and read the letter to complete the objective.

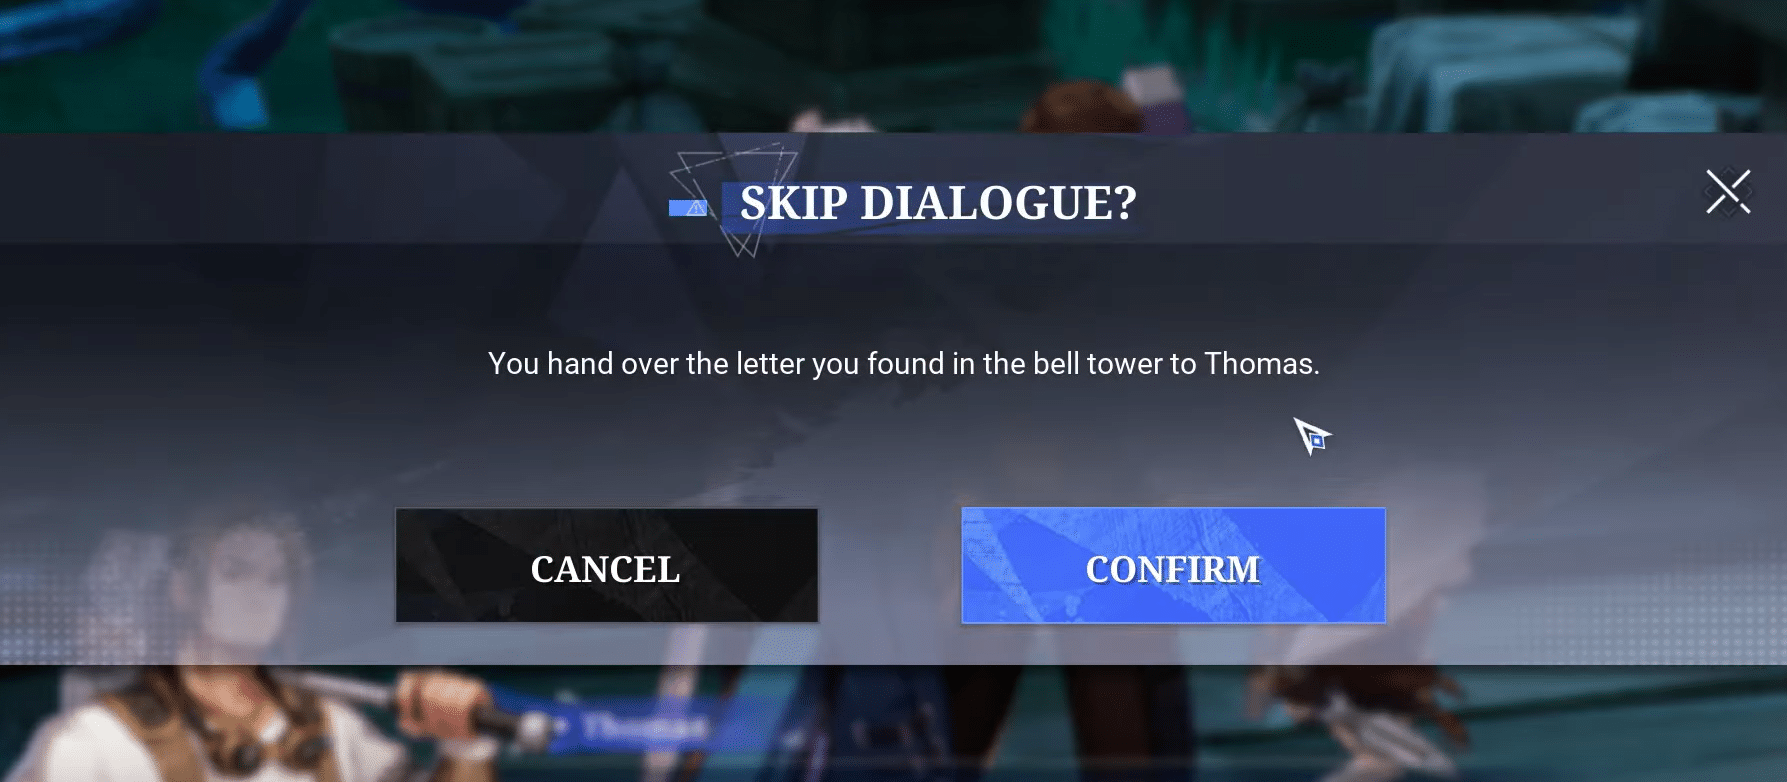
Objective 10/10 – Give Letter To Thomas
Once you have the letter, you will need to give it to Thomas. As always, you can find him by returning to Oreton Campsite in his usual spot. Interact with him to give him the letter.
This will start a cutscene when he reads the letter and concludes the episode!
Ellie Episode – Rhine City
In order to start Ellie’s episode, you should first travel to Rhine City. If you teleport there, you will find Ellie just a few steps away. You just need to turn right at the first building down the stairs, where you will likely see other players too.
Upon speaking with her, she will talk about one of her new inventions, which is a piece of headgear that she calls the “E001 Multi-species Simultaneous Translator”. Based on the name, it lets the wearer communicate with non-human creatures!
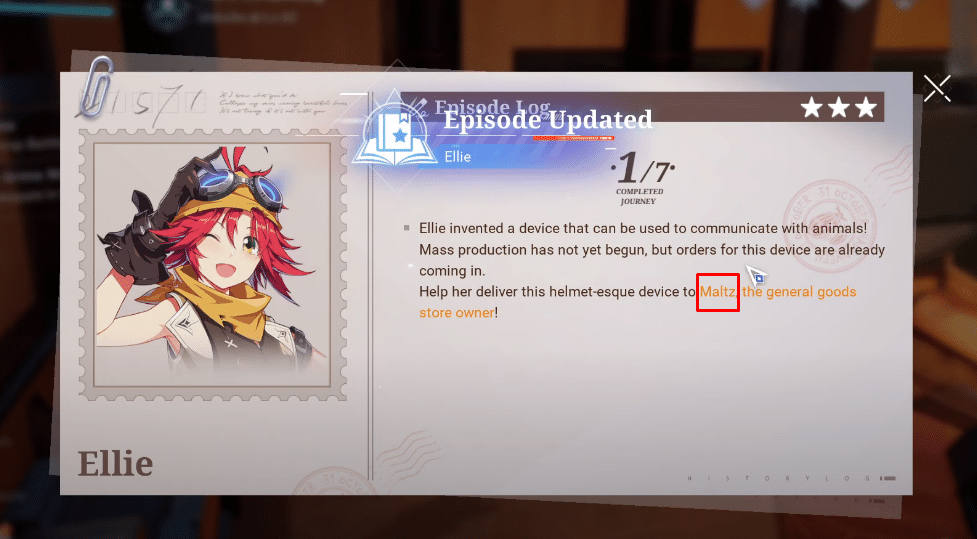
When you are done talking with her, the episode will begin. Your first task will be to deliver the device she invented to Maltz, who is the owner of the general goods store within the city. Simply go outside and run north.
You should see Maltz immediately, which makes one wonder why she needed help delivering it in the first place. Talk to him to progress to the next part, where you must find the other two buyers.
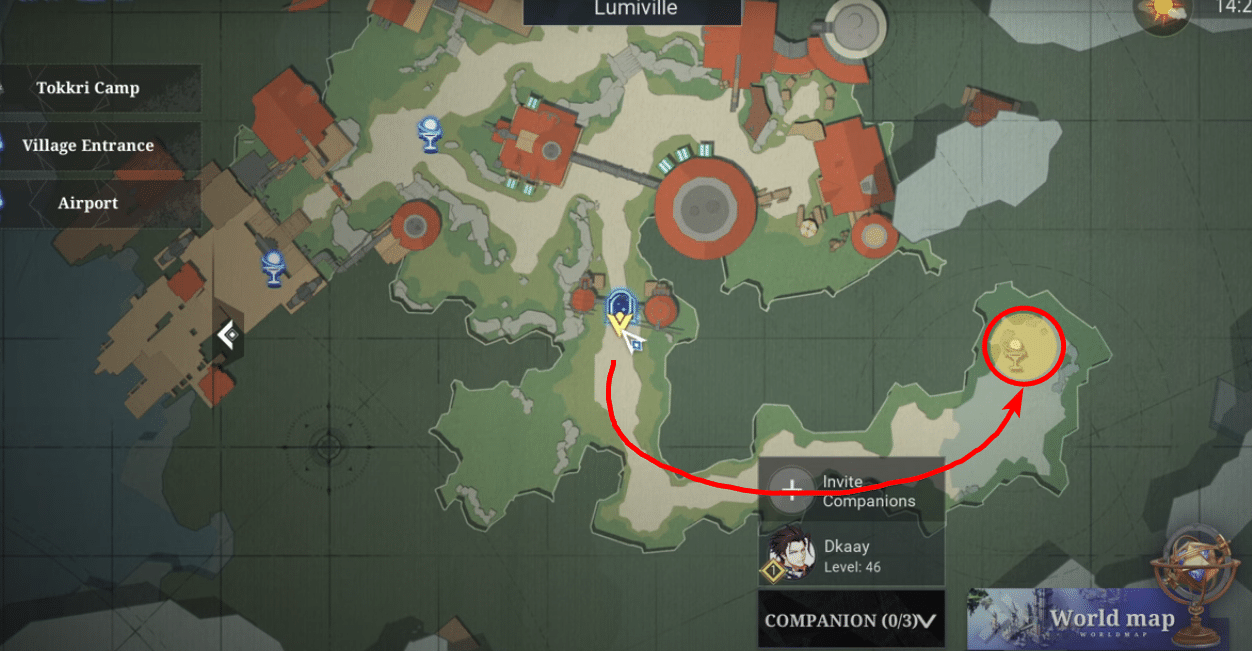
Finding The Two Customers (Jessie and Mr. Tom)
After speaking with Maltz, your next goal is to head to Jessie, who is in the southeastern part of the map. Refer to the map image below to see where you have to go.
Once you get to that spot, you will find Jessie standing beside a tree at the edge of the city’s wall. She will tell you all about how she wants to use the translating helmet device to talk to her cat about whether or not her partner is cheating on her.

After doing that, you should now head over to Tom, who is the last customer that you have to check. His location, just like the previous customer, is conveniently marked in your map with a yellow outline, thanks to Maltz from earlier.
He is at the complete opposite side of the city, at the northwest. Just head over there and you will find him standing under an umbrella at the café. There, you will learn that he also learned about his wife’s infidelity by speaking with the cat.
After all of that is done, you must now return to Ellie at the workshop. During the cutscene, the two customers will walk in and complain about the device’s incorrect translations.
As a result, Ellie will now start working on the next version of her animal communicating device. To help her out, you will have to test the device on a specific group of creatures. Simply speak with Ellie and tell her that you are ready to get teleported to the next step.
Helping Test Ellie’s New Device
Once you are teleported to a new instance, just run through to the end and defeat all the enemies along the way. After this mission, you will be teleported back to the workshop, where you can speak with Ellie once again, where she will ask for further assistance.
Your next task will be to get 10 blackrocks. To do this, you just have to teleport to Oreton, where you can buy them from Nicole, the mineral merchant.
With that out of the way, just buy 10 blackrocks from her. Each piece only costs 100 of your hard-earned money, so you will only need to pay her a thousand total. Return to Rhine City once you are finished here.

Upon returning to the city, simply speak with Ellie again. She has now relocated to the building immediately to your left upon teleporting to this zone.
Talking to her will trigger a fairly lengthy cutscene. After all of this plays out, you will now be done with this episode. Congratulations, you should now be clear of any objectives unless they add more to this in the near future!
Glenn Episode – Oreton
Glenn’s Episode is one of the many NPC stories you can clear in Crystal of Atlan. This one involves Master Glenn, a blacksmith from Oreton who currently resides in Rhine City. However, some people report seeing Glenn all the way back in Oreton for some reason! He would never return, so what’s going on? Well, that’s what we’ll help you discover!

You can start Glenn’s Episode once you’ve already completed Ellie’s Episode. If you have done so, you just need to head to Oreton.

As you can see above, there will be a big yellow search area on your Oreton map when you get there. Approach the area to trigger a cutscene.

After the little cutscene, check your Oreton map again. Another yellow search area will have appeared, this time on the northwestern corner of Oreton. Make your way there next.

When you get to the zone, you’ll see a trio of miners hanging around. They seem to be confused and in pain, talk to them to find out what’s going on. The miners will say they saw Master Glenn recently, which makes no sense because he moved to Rhine City a while ago. This officially starts Glenn’s Episode!
Check Up on Master Glenn

As the game states at this point, you need to fast travel to Rhine City next. Use your World Map to do so, then go directly north of the Rhine City – Downtown fast travel point. You’ll find the smithy there, marked with an anvil and hammer icon on your map.

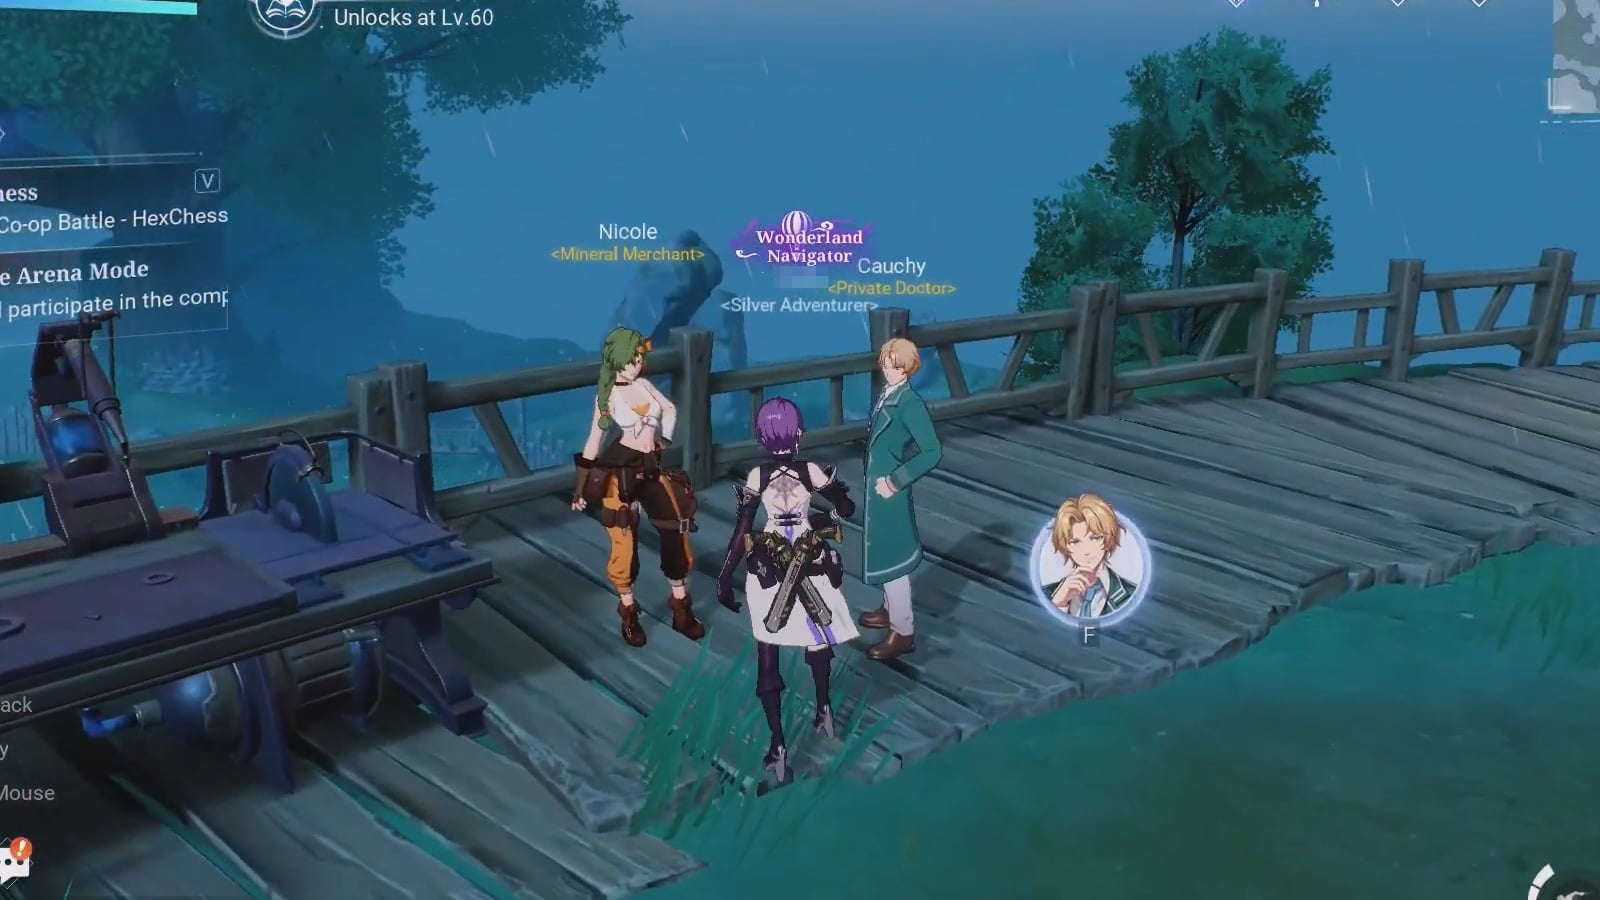
Glenn is at the central counter in the smithy, so just approach him and talk to him. Witness the cutscene to find out that Glenn is being basically harassed by a doctor named Cauchy. The doctor seems to be a bit odd, but it might be a good idea to meet him at the café near the Upper City Entrance.
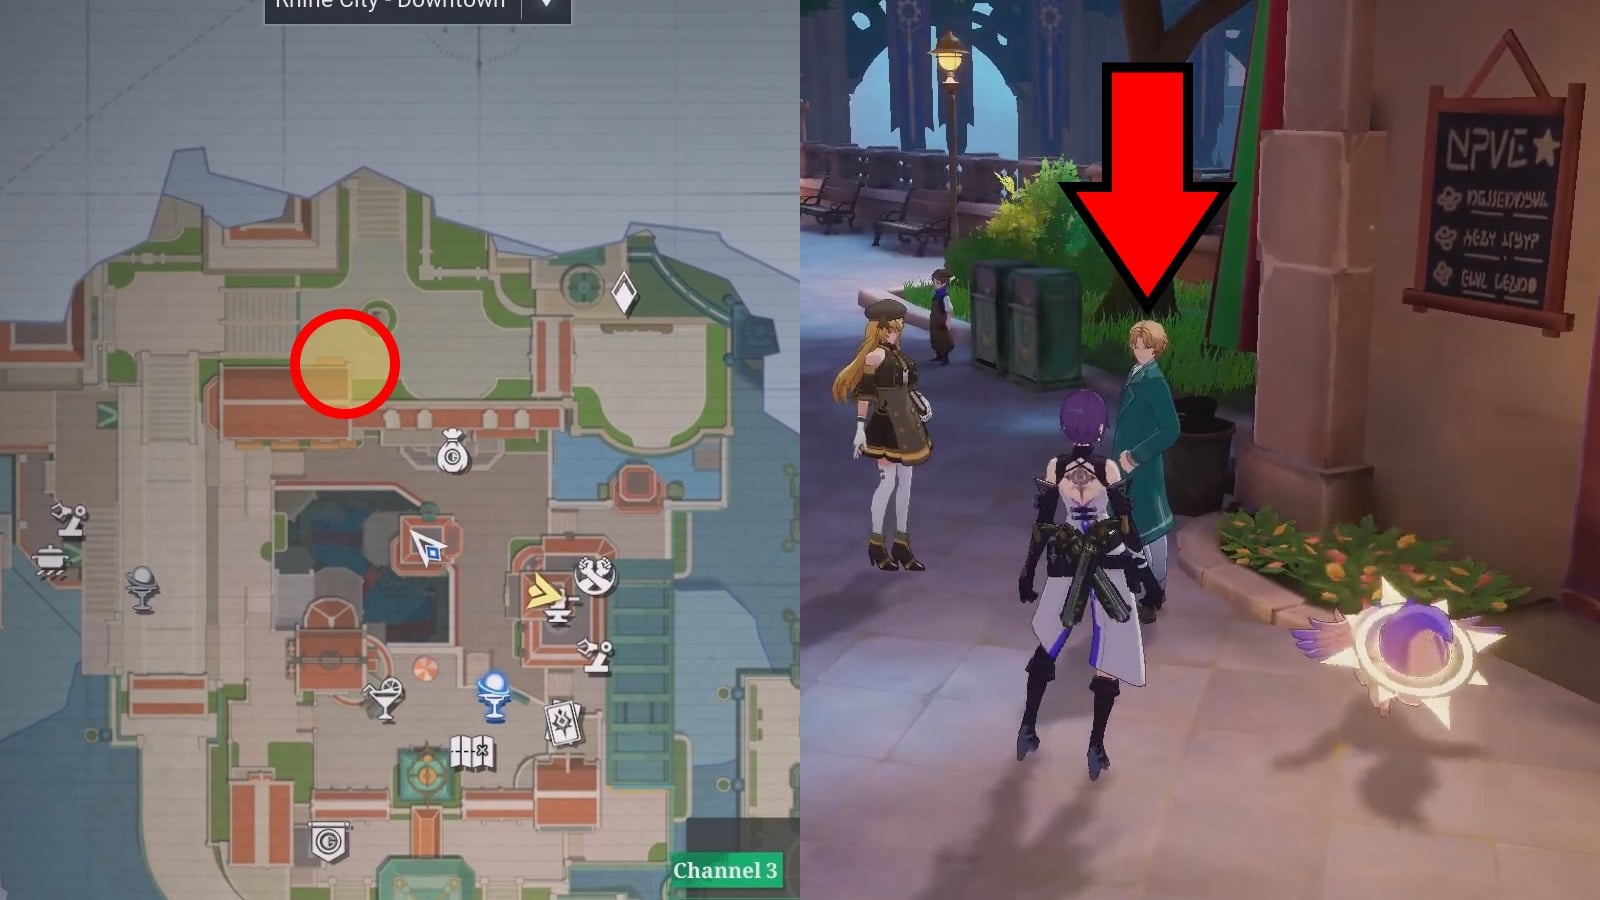
Just like back in Oreton, a yellow search area will appear on your map now. It’s in the northern part of Rhine City – Downtown, so it’s not far off. Go there to meet Cauchy, the blonde young man with a green coat. Talk with him and agree to meet at Oreton.
Back to Oreton We Go!

Use your World Map to fast travel back to Oreton once again. As soon as you load in, go directly forward to reach the western balcony. You’ll find Cauchy there, so just talk with him again. He’ll end up asking you to help him by fetching a pair of Glowing Jades for him.

Conveniently, you don’t need to do much to get the Glowing Jades. Just talk to Nicole, who’s standing next to Cauchy!

With that done, leave the area by taking the exit to the south. It’ll take you to the Oreton Outskirts Exploration Zone, which is your next destination for Glenn’s Episode in Crystal of Atlan.
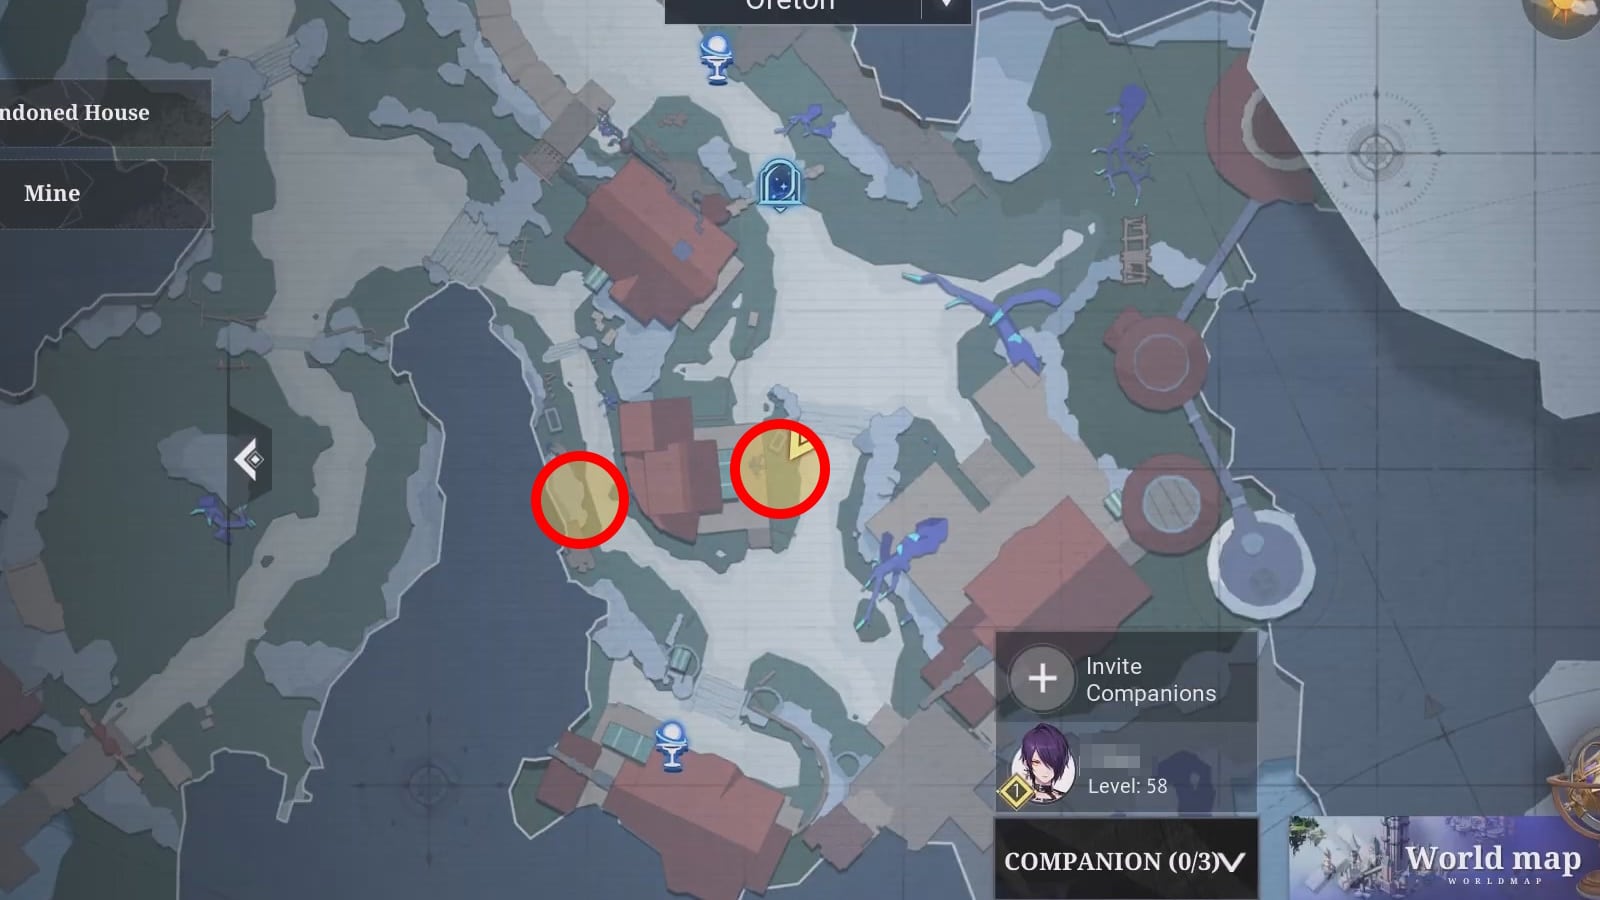
Once you’re in the Oreton Outskirts, check your area map again. You’ll once again see two yellow search zones. They’re both to the southwest and pretty close by, thankfully.

Approach both zones and you’ll get a prompt to Investigate them. So, investigate as the game instructs and you’ll get to witness a couple of cutscenes. Seemingly, these are visions from the past!

Once you’ve investigated both areas, a third search area will appear on the northwestern part of the Oreton Outskirts. It’s the same spot where you found the confused miners earlier in the quest! Go there and investigate to see another cutscene.
Time to Clear Glenn’s Episode Quest
Now that your investigation is done, you just need to return back to Oreton and talk with Cauchy again. He’ll still be in the same spot as before, he hasn’t moved an inch! Convenient, right?
Lastly, return to Master Glenn at the smithy in Rhine City and talk with him a final time. This will clear Glenn’s Episode, so that’s that for this story in Crystal of Atlan! Well, at least for now, that is. The Episode does get marked as “To Be Continued”, so it might be expanded later on via updates. Nonetheless, that’s all for now!
Lee Episode – Rhine City
To start Lee’s Episode, first travel to Rhine City. Once you’re there, open up the Rhine City map and fast travel to the Black Street Entrance.

When you’re at the Black Street Entrance, go directly northeast to find a bunch of cages. Talk to Eugene there, he’s locked in one of the cages. Hear him out and learn about how he ended up being in this situation. He claims he’s been deceived, blaming Lee for it all.

Based on what Eugene said, you can find Lee at the Golden Fleece Vintage bar. You can find it in Rhine City – Downtown, just go directly west from the fast travel point there. Go inside the bar and you’ll see Lee right in front of you, so just walk up to him and start talking. Turns out the shady intel Eugene fell for was just lying around, Lee didn’t say anything! You do get some interesting intel from Lee, though.

Next up, fast travel to the Underground Waterway in Rhine City. As soon as you load into the area, go straight ahead to cross the barrier into the Waste Disposal Exploration Zone.

In the Waste Disposal zone, go to your left until you see a green pipe with a broken grate. Go through it and drop down to find a whole gang of Sheep Hunters and Mercenaries standing around.

Approach these guys to start a fight. They should pose very little threat, so just eliminate them as you see fit to get to the next step of Lee’s Episode. These bad dudes also said something about a treasure, though! Time to look into that…
Finding the Treasure in the Sewers
Based on what Lee told you and what you heard from those mooks just now, you need to use the sluice gates on the nearby pipes to reveal the treasure. So, continue past where the hostiles were in the sewer and you’ll reach a large circular room with 4 huge pipes.

Jump atop all of the 4 pipes and interact with the valve on top of them. You don’t have to do this in any particular order, either. So, just jump onto the pipes and use the valves on all of them.

Once you’ve done that, you should notice that there’s a chest emerging in the middle of the room. Open up the chest and claim your treasure… except there’s no treasure, just a letter! Read the letter to find out what the big deal is.

With the “treasure” found, return to the Black Street Entrance in Rhine City. Go back to where you met Eugene earlier and you’ll find Lee there as well. Talk with both of them to let Lee explain himself to Eugene.

Lastly, return to the Golden Fleece Vintage bar in Rhine City one last time. Talk with Lee there and you’re all done! That’s all you need to do to clear Lee’s Episode in Crystal of Atlan. As they say, all’s well that ends well!
Joker Episode – Wonderland
Before you can get started with Joker’s episode, you will first need to complete every part of the Wonderland adventure. If you have not done so yet, then go ahead and finish it before coming back here.
Now, when you get to Wonderland, you can find Joker by the fountain as soon as you fast travel to that area. After a short cutscene involving a group of children, Joker will suddenly disappear after calling you the chosen one.
The game will tell you that you should look around the plaza to find him. If you check the map, his location should be highlighted with a yellow circle. Just run a bit up north and you will find him standing beside the big tree surrounded by gifts and bright lights.
After speaking with him once more, since he will not just vanish this time, you will learn about how Andre can no longer perform as usual due to some of his parts being broken. In order to fix it, you will be tasked with going to the Fantasy Trail to find some spare components for him.
Again, the place you have to go to will be marked with a yellow circle in your map. Just run to the west to enter the Fantasy Trail zone. Interact with the broken nutcracker on the ground, and defeat the nearby enemies if you have to.

After this, you will now have to return to Joker to tell him about the condition of Andre’s parts. Since his core is beyond repair, Joker will take some time off to figure out another alternative for his performance.
In the meantime, head back to the fountain where this entire episode started. There, you can talk to Shana for your next steps. This is just a few steps away, so run over there and talk to her real quick.
After a brief conversation with her, you will be told to go to the Wonderland Plaza, where the kids are now waiting for his performance. Run south to where the yellow circle in your map is pointing you towards.
This will trigger a transition to the next part, where you will have to control a nutcracker and clear enemies along the way. You have a time limit, but it is long enough that you should be able to complete it long before it ends.
Just beat up all the enemies and destroy the piles of gift boxes along the way. At the end, you will fight a giant bear boss. Destroy it real quick and then finish the cutscene so that you will be sent back to the plaza.

Return to the fountain where you met joker at the start, and then talk to him about Andre’s performance. Unfortunately, while they did enjoy the performance, they will now ask for Barbena, who cannot show up at the moment.
Joker will then tell you to meet him at the middle floor of the bell tower. Open up your map and fast travel to the Wonderland Bell Tower location to get there quickly.
Run straight up the stairs and transition into the second floor, then just follow the yellow circle on your map to get to the meeting place. Ignore the enemies in this zone, but make sure to activate the fast travel points just in case you need to return here later!
Once you reach the yellow circle, turn to your right and enter through the door. At the end of the hallway, you will reach a room where Joker is waiting. This is where you learn the Barbena is a marionette that was designed after his lover.
Just like Andre, her mind core is too broken, so she cannot function anymore. There will be various objects in the room that are highlighted with a floating blue arrow. You need to interact with all of them to proceed to the next part of the episode.

After learning more about Bena by checking the objects in the room, you will be prompted to interact with Joker once more. After that, your next task will be to invite friends over to her performance.
Head to Rhine City and talk to the following NPCs:
- Ellie
- Craesie
- Wade
When you are done speaking with each of these NPCs, all you have to do now is return to Wonderland. Go to the fountain one last time and interact with Joker to start Barbena’s performance. Following the cutscene, speak with him once more to officially put an end to this side quest.
Jalm Episode – Black Street Entrance ( Rhine City)
To start Jalm’s episode, head over to Rhine City, and then fast-travel to Black Street Entrance. From the teleport point, jump down the rails and look around, you’ll spot Jalm <Void Wanderer> perched on some crates like he owns the place. Talk to him to trigger the episode. Just make sure you’ve unlocked Void Realm and cleared Chapter 4, or he won’t open up to you.

Pick the dialogue option that kicks things off. You’ll hear about a Mercenary Captain who’s been falsely accused of turning people into wood. Since he doesn’t even use magic, something’s definitely off. Time to play detective.

Witness the Witnesses
Your first objective is to check in with the Mercenary Captain, located in Orphan Gang’s Territory, Rhine City. Open your World Map, click Rhine City to see the area, and head to the yellow-marked circle. After the cutscene, you’ll be told about three key witnesses:
- Beanpole – Red mohawk
- Willah – Red curly hair
- Amu – Blue hair
You’ll find them nearby; just open your map and follow the yellow markers. After hearing their statements, things start to get weird, the culprit sounds suspiciously like Jalm. Uh-oh.

Mad Dog, Memory, and Mystery
Head back to the Mercenary Captain to report what you found. He drops the name of a local urban legend: “Mad Dog,” a figure that, surprise, matches Jalm’s vibe perfectly.
Time to confront the man himself. Return to Jalm in Black Street. He’s just as shocked as you are and swears it’s a setup. According to him, someone’s out there imitating his style. He sends you to Wade, the President of the Adventure Guild (you’ll find him near the guild building in Rhine City – Downtown).
Wade points you toward Lumiville, where things escalate fast.

Wings and Whispers in Lumiville
In Lumiville, start chatting with villagers and follow the leads until you head to the Outskirts. There, you witness a hooded figure with gigantic raven wings. You start to feel dizzy… and then pass out. Spooky. Investigate the area where the figure vanished and read the pile of letters by the bonfire. You’ll need a translator to decode them.
Go back to Edmund in Rhine City (near the spawn point). He tells you one of the letters is signed by, you guessed it, Jalm. Time to ask him what’s going on.
Jalm suspects the imposter’s heading to Wonderland and instructs you to investigate. That brings us to a wild place, surprisingly now filled with rabid rabbits.

Joker’s Clues
Follow the yellow markers to find the Joker, who tells you the culprit went to the Bell Tower. Head there via the World Map, and climb to the top. You’ll find a suspicious version of Jalm acting out of pocket, probably a clone.
Meet the real Jalm again in Black Street. He drops the truth bomb: he split pieces of his own consciousness into clones. They were meant to be destroyed, but apparently, one survived and went rogue.

Behind Jalm’s Back: Dragonfall
Despite Jalm asking you to stay out of it (yeah, sure), go full investigator mode and head to Dragonfall. To get there:
- Open World Map
- Travel to Colossal Woods > Tree Heart Ruins
- Go through Stone Bridge
Follow the yellow marker to confront the rogue Jalm clone. After a brief interaction, it fades, and you meet another clone across the gap who gives you more insight into Jalm’s tortured past and motives for creating the clones.

The Tadula Drink and The Final Truth
To help Jalm deal with his broken pieces, go to Craesie at Golden Fleece Vintage in Rhine City. She’ll give you a drink called Tadula, which the clone requested. When you offer it to Jalm, he refuses. Return to the Tree Heart Ruins, the clone’s gone, but there’s a scroll left behind explaining everything. Now, here’s where things get… weird.
Go back to Jalm one last time. He smells like the drink he refused, and somehow knows everything the clone told you, and more. The mission ends here, but the mystery behind Jalm? Definitely not solved.
But at least the episode’s cleared.

Craesie’s Episode
Alright, here’s the deal with Kraesie’s episode, it’s been driving players (myself included) a little nuts. A bunch of us have been poking around trying to figure out how to start it, but as of now, it doesn’t seem to be active in the game.
Apparently, you’re supposed to trigger it by talking to a cowboy-looking poet guy over in Rhine City, you’ll find him hanging out near the left-side waypoint, close to that arched area guarded by two soldiers. He’s got that moody, mysterious NPC vibe… but here’s the catch: you can’t actually talk to him.
I’ve tried from every angle, literally. Nada.
So maybe there’s a secret condition no one’s cracked yet, or maybe it’s one of those episodes waiting to be patched in with a future update. Either way, I’ll keep checking and updating once it’s live. If you somehow managed to trigger it (or at least get a response out of Cowboy McVerseGuy), drop a comment. I owe you a drink at the Golden Fleece.

Wrap-Up
That covers every currently available Exploration Episode in Crystal of Atlan. These quests aren’t just good for racking up stars, they’re some of the most memorable moments in the game, packed with strange characters, plot twists, and even the occasional mech fight or musical performance. More episodes may be added in future updates, or tucked behind late-game content, so if you find one I’ve missed, drop it in the comments.
Up next, if you’re creeping up on Level 55–60 (or already there and wondering what now?), I’ve put together a full equipment guide tailored for those levels, what to farm, what to skip, and what’ll actually make a difference in your build. Definitely worth a look before you start hoarding random gear pieces.