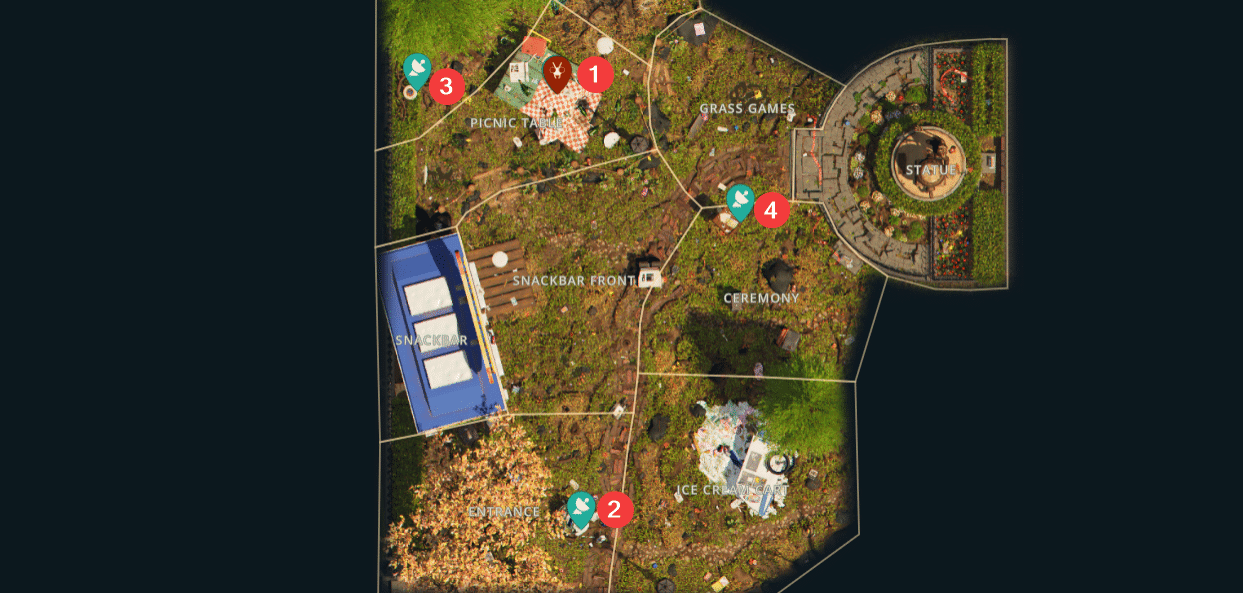
If you’ve ever stared up at the Picnic Table wondering how the heck to get on top of it, or nearly passed out from toxic gas while rummaging around a Garbage Can 🗑️, then congrats, you’ve probably already encountered one of Grounded 2’s O.R.C. Transmitters. These towering devices are part of the Signals and Stashes and Wait, There’s More! missions, and they’re as dangerous to reach as they are crucial to your story progression.
I’ll walk you through every single O.R.C. Transmitter location, including the two early-game ones and the trickier, quest-specific two. I’ll also share some personal tips, missteps (looking at you, Garbage Can), and survival tricks I wish I knew earlier. Let’s get you climbing, dodging, and hacking your way through Brook Hollow Park.
All O.R.C. Transmitter Locations
These spindly towers, called O.R.C. Transmitters, are scattered around the map and usually guarded by nasty O.R.C.-enhanced bugs, think robot bugs on steroids 💀. You’ll first deal with two of them in Signals and Stashes, then two or three more in Wait, There’s More! later on. They’re often placed in hard-to-reach, hostile, or hazardous spots, so prep accordingly.
🐜 Don’t have a mount yet? I highly recommend checking out my Red Soldier Ant Buggy guide, it covers all the locations, requirements, and step-by-step instructions. Super helpful when tackling all the O.R.C. Transmitters in Grounded 2!
TL;DR: Just want the quick rundown? Here you go. For detailed routes, tips, and video clips, check the full section below! 👇
| # | Location & Mission | 📍 Transmitter Location | 🧗 How to Get There |
|---|---|---|---|
| 🥪 1 | Picnic Table (Signals and Stashes) | On top of the podium at the center of the tablecloth | Climb picnic blanket ramps → through Fridge Cooler → up the middle ramp |
| 🗑️ 2 | Garbage Can (Signals and Stashes) | On a hotdog holder at the top of the Trash Can | Use a Gas Mask → enter via west-side branch → banana peel → climb paper and trash spiral to the top |
| 🌲 3 | Pine Hill (Wait, There’s More!) | Inside a cave at the southwestern edge of Pine Hill | Head south near mushrooms → enter cave → climb branches to elevated platform |
| 🎙️ 4 | Ceremony (Wait, There’s More!) | Top of a wooden shelf above the lectern area | Climb into first compartment → spiderweb gap → jump rusty nails → up the mic stand to the top |
Picnic Table – Signals and Stashes Mission
📍Location: On top of the Podium in the corner of the tablecloth
Region: Picnic Table
This is the first transmitter you’ll likely find, and it’s one of the easier ones—though it still involves some tricky climbing and a surprise trip through a freezing fridge. ❄️🧊
How to Get There
- Start from the Snack Bar and ascend the eastern blanket ramps.
- Cross either the web bridges (left) or the croquet mallet path (right), both have bugs 🐞.
- Head through the Fridge Cooler next to the briefcase. Yes, it’s cold, but if you sprint, you’ll be fine. There’s also a Milk Molar inside if you feel like grabbing a bonus. 🍼
- Walk up the final blanket ramp to the center of the table. You’ll find the transmitter waiting on top of the podium, guarded by an O.R.C. Ladybug.
Tip: I wasted way too much time trying to climb the blanket like a doofus—just go through the fridge. You’ll take a bit of damage, but it’s way faster.
Garbage Can – Signals and Stashes Mission
📍Location: On top of a hotdog holder on top of the Trash Can
Region: Entrance
Ah, the infamous trash dive. The real challenge here isn’t the climbing—it’s surviving the toxic gas ☠️.
What You Need
- Gas Guard Effect from:
- A Gas Mask (crafted with a weevil nose, stinkbug part, etc.)
- Or a Gastro Goo Smoothie (if you’re the smoothie-chugging type 🥤)
How to Get There
- Head to the west side ledge overlooking the garbage bin.
- Cross a branch leading inside, then hop onto a banana peel 🍌.
- Turn around and jump up to some crumpled paper, then follow the rubbish spiral upwards.
- At the top, deal with the O.R.C. Cockroach 🪳, activate the transmitter, and try not to gag.
Note: I didn’t bring a gas mask the first time. Bad idea. You will choke.
Pine Hill – Wait, There’s More! Mission
📍Location: Southwestern corner of Pine Hill, inside a cave path
Region: Pine Hill / Hedge
This one’s tucked away, but the path is fairly straightforward once you find the cave entrance.
How to Get There
- Follow the quest marker near some mushrooms 🍄 in the south.
- Climb up the branches inside the cave, it’s a winding but obvious path.
- You’ll find the transmitter on a platform guarded by O.R.C. Bombardier Beetles 💣🪲.
Tip: Bring a high-stun L2 weapon. These beetles hit hard and often come in pairs.
Ceremony – Wait, There’s More! Mission
📍Location: Top of the wooden shelf, above the lectern
Region: Northern Ceremony
This is the most vertical climb of them all. You’ll be scaling a giant wooden bookshelf, weaving through compartments, and hopping across rusty nails.
How to Get There
- Find the shelf structure near the Ceremony’s northern edge.
- Climb into the first compartment, go through the spiderweb, and look for the gap in the wall.
- Work your way around to the second compartment, then jump across rusty nails to the third.
- Climb the microphone stand, and you’ll reach the transmitter—guarded by an O.R.C. Blue Butterfly.
Warning: This boss hits like a truck and can knock you off the ledge. Use ranged attacks if possible.
Wrap-Up: You’re Now the O.R.C. Signal Slayer
Tracking down all five O.R.C. Transmitters in Grounded 2 is no walk in the park, even though technically, it is. Whether you’re hacking into rooftop devices, spelunking through candy stashes 🍬, or risking frostbite in the name of science, every one of these locations brings a unique traversal and combat challenge.
Once all transmitters are hacked, make sure to report back to Sloane at any Ranger Outpost to wrap up your mission. You’ll walk away with story progress, loot, and probably a healthy fear of Trash Cans. 💀🗑️ Still missing some Optical Disks? Check out our complete guide to all Optical Disk locations in Grounded 2, including map images, step-by-step directions, and helpful tips to grab every last one.
