Juke’s Towers of Hell (JToH) is a fun Roblox game that’s all about climbing up to the top of a tower either solo or with friends. The game doesn’t have much to do besides climbing towers, which is where the fun begins. These towers can be either made by the developers themselves or are custom made by fans of the game.
One such tower called Steeple of Triple Black Diamonds is currently the most played tower in the game because of how hard it is. In this guide, I will be showing you how to beat this tower so you can brag to your friends about beating it.
How To Beat Steeple of Triple Black Diamonds Guide
Steeple of the Triple Black Diamonds is a hard tower to climb up. While it has a regular length and mild punishment, the difficulty spike goes crazy as you progress.
Not to mention that the sightreadability is completely abysmal and you also need high endurance to get through this map. But despite all of that, you can still beat this tower, it’s just really difficult.
Floor 1
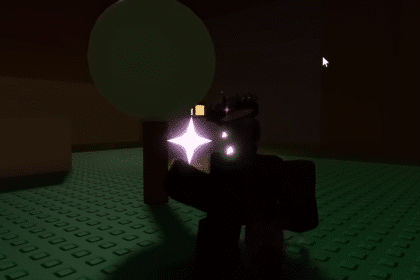
When you start the tower, you will have to interact with the board here and wait for the dialogue to finish. The path won’t continue until you do so.

Once the dialogue is done, you can now continue moving forward. Again, the tower is extremely hard to see, so you will need to either increase the brightness in the game or pray to whatever deity you worship in hopes that you can land on something solid.

While you’re jumping around, go and look for the cannon. Approach the cannon and touch it. This will send you to the next area where you need to go.

When you reach the next area, take the path to the right and you will have to climb up a path. At the top, you will find blocks that acts like swings or ropes. What you need to do is jump on the highlighted blocks and swing to the next block, which you will continue doing until you land on solid ground.
You will need to time it right to avoid falling down into the void, which is fine as you will respawn back to where you are.

When you reach the next area, go inside and you will find yourself in a room with mechanical gears moving around you. Go up to this gear and keep moving forward while moving to the left. This will allow you to drop to the mechanism below.

Jump over the mechanism until you land on the other side with the X. Stand in front of it and move forwards. This will move the mechanism forward as well.

Eventually, the mechanism will stop moving. You need to be quick for this one, because the mechanism will start moving back to its original position. Quickly jump on the mechanism and move to the wall you can climb up.

Shortly after, you will have to make an impossible jump to get to the yellow block on the other side of a wall. To do this, you will need to do a U shaped jump. This is achievable by jumping to the right and moving your camera around, allowing you to maneuver where your character lands.
You don’t need to land on the yellow block, by the way. But you do need to land close to it so that you can use the line to zipline to the next location.

Shortly after continuing the path, you will reach a part where you will need to jump onto a pipe that’s pretty far. This is also pretty achievable. Same as the U shape jump, you will need to do an L shape jump. Just make sure to move your camera in an L shape to get to the pipe.
While on the pipe, make sure to spam jump to get to next area. Do not hold jump, as it will not help.

We’re close to the second floor now. All you need to do at this point is to move left along the wall and move forward to climb up. You will also need to jump on another pipe as well, so don’t forget to spam jump on it again.

Floor 2
At the start of floor 2, you will have to jump on pipes again. These pipes, like the others beforehand, will all disappear for a split second. Keep spamming jump to and continue moving forward.

You will then reach a part where you need to climb up a wall and drop to the ground next to you. You will have to be careful here, as you will fall into the void below. Just keep moving forward while going left and you will be able to grab the handles.

The next segment will have you land on a platform with no way forward. You will actually need to move forward in front of the X on the wall to push the ground and open a hole in the ground, revealing a line you can zipline with.

At the end of the zipline, you will have to jump to the platform and climb up.

At the top, you will have to go across a conveyor to reach the second conveyor. Quickly move across the first conveyor and to the second. Be ready to jump again to the wall, because you will have no ground to help catch you when you fall.
When you’re hugging the wall, you will need to do some parkour stuff. Quickly jump to the right and move your camera around so that you can control the momentum of your character to land on the platform on the other side.

At the platform, you will have to move it forward by pushing against the X on the wall. When it stops moving, jump on the pipes on the left and keep jumping again while you’re moving forward.

When you reach the next platform after jumping over the pipes, jump on this block that looks like it can be used to move forward. The block will then move forward to another part of the floor.

At the new platform, you’re going to need to get slippery for this. You will need to squeeze between the gaps of the wall and the platform to go down. You need to be careful for this, because one wrong move will send you falling down.
The goal is to jump to the yellow block behind you and zipline. Once you are confident you have a good position, jump back to the yellow block to zipline. But don’t do that just yet!

Before you jump, you need to be ready because shortly after you’re on the zipline, you will need to jump to the platform to the right and climb up. This needs to be quick because if you are too slow, you will fall into the void.

At this section, there will be a ghost that will show you what you need to do in order to proceed. Follow the ghost’s movements to proceed to the next area.

At the next part of the floor, you will once again need to shimmy down between the platform on the wall to jump to the swing behind you. Again, make sure you are in a confident position before jumping behind you.
Once you are on the swing, you will have to reach the yellow block above you to get to the next area.

This next part is going to require you to maneuver your camera around to again. Stand at the edge of the platform and jump to the left. While doing so, move your camera so you can move your character to the platform behind the wall.

At this section, you need to do an L shaped jump to get to the swing that’s behind the wall. When you land on the swing, swing to the next platform.

Here, you will need to press the button on the ground to continue. However, this causes the conveyors to start speeding up. If you fall on these conveyors, you will end up on the platform with the button. You won’t die, but you will have to start all over. You need to utilize structures that appear to continue moving forward.

When you reach this point, you will need to jump off of the structure and to the ramp below. This will be a hard target to land on, so make sure to calculate your trajectory accordingly.

Once at the ramp, you will then need to jump on the conveyor belt next to the ramp.

At the end of the conveyor belt is another conveyor belt that will move you backwards. Before that happens though, you will need to jump to the next ramp and use the momentum from the conveyor belt to launch you forward.

Once on the ramp, climb up and you will need to stand on the conveyor. Wait until you are below the swing before jumping backwards and on the swing.

As you swing, make sure you aim for the platform on the left. Jump to the platform and then jump to the yellow block in front, which will take you to floor 3.

Floor 3
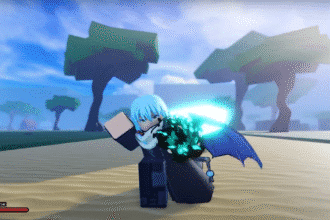
On floor 3, everything is bright and no longer dark, which will help you more. When you spawn into the floor, head to the edge of the platform and jump to the zipline.

Once you get off the zipline, you will see a giant yellow door with an X on it. Touch the door and go inside. Inside the building, look for an X on the ground. This is a trampoline that will boost you up into the air. Jump on it and make sure to reach for the brown block that will zipline you to the next area.

Once you land on the next platform, you will have to climb up the wall and bounce on the black bounce pad. You can do this by climbing up and sliding off to the left and falling into the bounce pad.

After landing from the bounce pad, you will have a ghost guide you on what to do. Make sure to follow its every steps and movements.

When you reach this part, you’ll need to be fast in moving. As soon as you step on the conveyor, be prepared to jump to the right, right on top of the structure with a button on top. Make sure you land on the button to activate it, as it is important.

After jumping on the button, jump on the conveyor and this time, jump at the end to hit the bounce pad, which will take you to a zipline.

Continue moving forward but be careful around these platforms with exclamation points on them. Once you step on them, they will turn transparent, making you fall down to the ground. So you need to be fast and jump to the wall across from it.

Here, you will need to push against the X on the wall until it stops moving. Once it does, you will need to be quick and make a C jump around the wall. Similar to the L shape and U shape jump, a C shape jump requires you to jump and make a C with the camera. Do this and you will land on a pipe, which you will need to spam jump once again to avoid falling down.

Keep moving forward and you have to jump on a spinning platform. This will require timing and aim. Jump on the platform and keep climbing up.

As you continue, you will find a conveyor and a swing at the bottom. Do not drop down to the swing, as the momentum from being on the conveyor will send you flying to the side. Instead, wait for the conveyor to bring you to another conveyor at the end. When you reach that conveyor, that’s when you jump, as the momentum will bring you straight to the swing.

This next part requires you to be quick. When you jump off the swing, you will be taken to an area with a zipline at the end. When you reach the last zipline, you will need to immediately jump off the zipline as quick as you can, as it will drop you when you reach the end of the zipline.

In this next part, you will need to jump down on a button. However, the platform it’s on has an exclamation point, meaning that it will disappear as soon as you step on it. What you need to do here is jump down on the button to activate the other platforms, then going around the corner by doing an L shaped jump.

Nearing the end of the floor, you will encounter this tricky obstacle. This one requires timing and a little bit of luck. When you reach the edge, jump to the left and count to 1, then move forward. If you do it right, you will be able to walk up a ramp and ride the conveyor to the next floor.

Floor 4
At the start of floor 4, you’ll need to do a couple of L shaped jumps. This won’t be too hard, but be careful as the second L shaped jump has moving platforms.

Once inside the castle, you’ll be introduced to a new mechanic called bombs. These bombs will help you open the doors with blast marks on them. You can get one by stepping on a button. Once you do, you will need to pick it up and bring it to the door to blow it up.

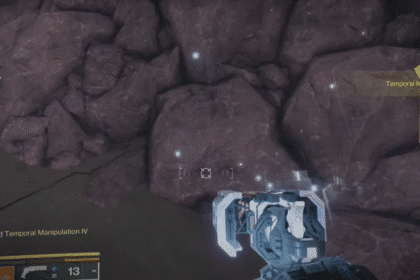
As you continue, you will reach a part where you will have to jump down a conveyor that’s going down. This will need to be done quickly, as the conveyor will force you into the depths if you aren’t quick.
When you land on the conveyor, quickly jump to the right where you can see a ledge. Once you land on the ledge, you can squeeze through a gap to continue moving through the map.

As you continue moving forward, you will come across a conveyor bringing you to a wall. While it might not be obvious, you will need to squeeze through the gap between the pillars. You can do this by simply moving right continuously.

Keep moving forward until you reach the block that lets you zipline across the castle.

Eventually, you will reach the outside of the castle. Step on this platform and move forward, which will cause the platform to take you to the next part of floor 4.

This next part is going to be a doozy, as the wall you will be climbing is actively moving side to side. The trick here is to jump to the next platform when the wall is moving towards you.
If you are on the left side of the wall, jump when it moves right and vice versa. Make sure you can see the platform first before jumping to anything.

Eventually, you will enter the castle once again. While on this platform, go to this structure and in the middle of it, there is a small gap that you can fit into. The trick here is to walk backwards up the structure, which you can then jump off of when you reach the top and move forward with the X.

When the X stops, get off and you will need to do a lot of L shaped jumps on this part. Use your camera to look around the corners and see if you can find the platforms before doing L shaped jumps to get to them.

As you move forward, you will find a room with shelves and a button at the top. Get on the shelf and step on the button. This will spawn a bomb for you to pick up. Head to the window on the left that’s marked with the blast icon and it will blow up on contact.

Once you destroy the window, head outside and walk to this ramp. Now, this is going to be tricky. You will need to walk backwards to get up the ramp and into the area behind the ramp. Once inside, you will have to do the same thing again.
However, there are reports that walking backwards doesn’t work, and that you need to move to the right and jump continuously to progress. Use both methods just in case.

Once you’re out, you will then have to cross this part where blades will deal damage to you and kill you if you get hit by them. You won’t have to rush, as they are not moving that fast. However, you just need to be careful to not get hit.

Make your way to this edge of the platform to continue moving forward.

When you reach another X that you need to move, you will have trouble because you are not able to jump up and move it the next time. However, there is a button that summons a bomb. Press the button and you will be able to spawn a bomb. Pick it up and hold it up while moving towards the X. This will cause the platform to move, allowing you to progress.

You will have to lose the bomb to progress, but you will shortly be able to grab another one because this one is required to throw at the button in front of you to proceed.

With the button now pressed, you can go back to the platform where you got the bomb. This time, go to the edge where you can see a pink platform below you. Drop down and carefully maneuver around it until you land in front. You can then take a zipline back to a new area with spinning blades.

Here, we’re going to the edge where you can use a swing to get to where you need to go. Jump to the swing and use it to get across.

You will then have to climb up a red tower. You need to make it to the top, so try not to fall off. At the top, you will have to progress to go back to the first area with the spinning blades.

Once there, you can now access this newly opened area, which is essentially a teleporter that will take you to the last floor.

Floor 5
In the last floor, the entire area is now being flooded with water. Which means that if you fall into the water, the whole floor resets. You will need to be quick and agile as you move around, but also cautious so that you don’t fall off.
The first section is easy, just keep moving forward without falling into the water until you reach a crack in the wall that takes you outside.

Keep moving until you reach this ledge. You will need to drop down (not jump) and move forward until you automatically start climbing up the ladders.

Once you climb up, you will then have to jump to the left to use the zipline. But once you start using it, immediately jump to the platforms on the left. Bear in mind that these platforms have exclamation points, meaning they will disappear as soon as you land. Be sure to start jumping and moving forward to get to safety.

At the end of the zipline, jump to the right where there is a platform and a wall with an X on it. Approach the wall and start pushing it forward.

When the platform stops moving, jump to the left and continue moving.

Be careful as you reach this section of the area, as there are two platforms that will make you fall down if you’re not careful. Remember to jump immediately once you land on the first platform and then keep jumping on the pipe.
Under the pipe is a bounce pad, which you will need to use. Align yourself while jumping on the pipe and once you are aligned correctly, stop jumping and you will fall to the bounce pad.

While in the air, move left and land on the ramp. You need to start moving when you are launched from the bounce pad to get enough time to land on the ramp.

Keep moving forward until you need to jump on the spinning wheels. Aim your jump correctly and land on it. Keep jumping and move counterclockwise to the swing that’s at the end and use it to continue moving forward.

From this point onward, you will need to ride a couple of ziplines that will take you up to the roof. It’s pretty straightforward from this point.

At the top, you will have to approach the cannon. Interact with it and wait until it launches you to the next location.

You will end up in a hallway with a room. Approach the table in the middle and you will win the game.

That’s all you need to know on how to beat the Steeple of Triple Black Diamonds in Juke’s Towers of Hell. Did this guide help you understand how to beat this complicated tower? Let us know in the comments below.
If you want to learn more about the game, you can check out our guide on the Present of Slime location that shows you where you can find some sweet Christmas goodies in JToH.