After finishing Part 1 of the trilogy, are you excited for Part 2? I heard there’s leaks going around of the main character dying and halfway through the game, you control the character that killed them (yes, I’m referencing The Last of Us Part II). Moving away from that little joke, Part 2 of the Dune-Entombed Fecundity is just as long as the last one, so you better prepare yourself for some reading because this guide is going to be full of words and pictures that will help you finish this quest easily.
- Genshin Impact – Dune-Entombed Fecundity Part 2
- Go to the Place Azariq Mentioned
- Open the Cabin Door and Go Inside
- Activate the Giant Machine’s Energy System
- Enter the Control Cabin
- Check on the Condition of the Machine’s Interior
- Restore Power to the Left Arm
- Enter the Cave through the Machine’s Arm
- Activate the Ancient Mechanism
- Look for the Passage to Proceed
- Proceed Deeper
- Connect the Junctions Part 2
- Soulferry
- Open the Door
- Go to the Deepest Part of Mt. Damavand
Genshin Impact – Dune-Entombed Fecundity Part 2
In Part 2, there are 14 main objectives that we will be covering as we go along. Those are:
- Go to the Place Azariq Mentioned
- Open the Cabin Door and Go Inside
- Activate the Giant Machine’s Energy System
- Enter the Control Cabin
- Check on the Condition of the Machine’s Interior
- Restore Power to the Left Arm
- Enter the Cave through the Ancient Machine’s Arm
- Activate the Ancient Mechanism
- Look for the Passage to Proceed
- Proceed Deeper
- Connect the Junctions Part 2 (Connect the Junctions Harder)
- Soulferry
- Open the Door
- Go to the Deepest Part of Mt. Damavand
Go to the Place Azariq Mentioned

When you start the quest, your first objective is to find the place Azariq mentioned. This is easy, as the location is marked on your map.

Simply head to the area and you will know that you have reached the area because the game will show a cutscene.
Open the Cabin Door and Go Inside

After the cutscene ends, you will need to enter the giant machine through what seems to be an arm(?) Once through, you will need to open the cabin door, as it is locked. To do that, you will need to find 3 orange crystals that are hidden away inside the room. The first one can be found easily, as it is out in the open.

The second orange crystal can be found hiding behind some boxes.

The last one can be found hiding in the sand. Once you have all 3 crystals, head to the front of the door and you should see what looks like slots to place the crystals in. Do that, and the door will open.
Activate the Giant Machine’s Energy System

When inside, you will get the objective to activate the giant machine’s energy system. Just like the cabin door, you will need to use the orange crystals. There should be one right in front of you.

Pick it up and go to this door and open it. Inside, there will be another orange crystal. Pick that up as well. Once you have it, go back outside and pick up the orange crystal you placed in the slot.

Head to the bottom part of the machine and you should see another door that is locked. This time, you will need to place 2 crystals here. Luckily, you should have some at this point. Place it in the slots and the door will open, revealing a third crystal. Just like last time, pick it up and exit, then pick up the 2 crystals.
Now that you have 3 crystals, it’s time to head to the bottom level. Find this slot on the floor in the middle of the room and the lift will activate. Don’t worry, you can leave the crystal here.

Once you reach the bottom level, there will be another crystal in a slot that powers the lift. Take it, and you will have 3 crystals again.

Now that you have 3 crystals again, you will need to place each crystal into these machines. This will help power the energy system. Once you have placed a crystal into each machine, the giant machine will then be powered up.
Enter the Control Cabin

Now that you have the giant machine all powered up, you can now take the lift up to the top level. Before you do that, you need to set the lift to go to the top level. To do this, you need to go up to the slot on the ground and set it to the second option, then you can take it up.

Once back up the top level, the control cabin should be the spherical room with stairs leading up to it. Go inside to complete the objective.
Check on the Condition of the Machine’s Interior

When inside the control cabin, you will need to activate the machine. Inside the cabin, there is a prompt that you can activate that will trigger a cutscene that basically causes something, making the large machine damaged.

Something is happening to the giant machine, and another cutscene will trigger. This is basically just a whole cutscene fest, so you don’t really need to do much.
Restore Power to the Left Arm

Eventually, you will get a new objective to restore the power to the left arm. To do that, you will need crystals again. Look to your left and you should see a crystal on the catwalk.

Pick up the crystal and head to the machine on the left. This will power up the machine, but not enough. You need to power up the other machine on the other side of the room.

Exit the room and look to your right. You should find a crystal there that you can pick up.

Go to the other machine and place the crystal inside. The machines are now powered on and the arm is working again, which means you should return to the control room and open the passage.
Enter the Cave through the Machine’s Arm

Go back inside the control room and open the passage. There, a small cutscene will play of the passage opening, which leads us to the next objective.

Exit the control room and jump down. On one of the doors, you can exit and reach the cave through the machine’s arm.

Once you exit the arm, you can see the cave in sight. Make your way to the cave next.

Inside the cave, you will find a water pump and more. The objective will then change now that you are inside the cave.
Activate the Ancient Mechanism

Once inside, you will see a mechanism that you can interact with. Activate it in order to proceed deeper into the cave.

Once activated, a small cutscene will play and you can freely move after it. Go to the door on the other side of the room and activate the cube mechanism to open the door.
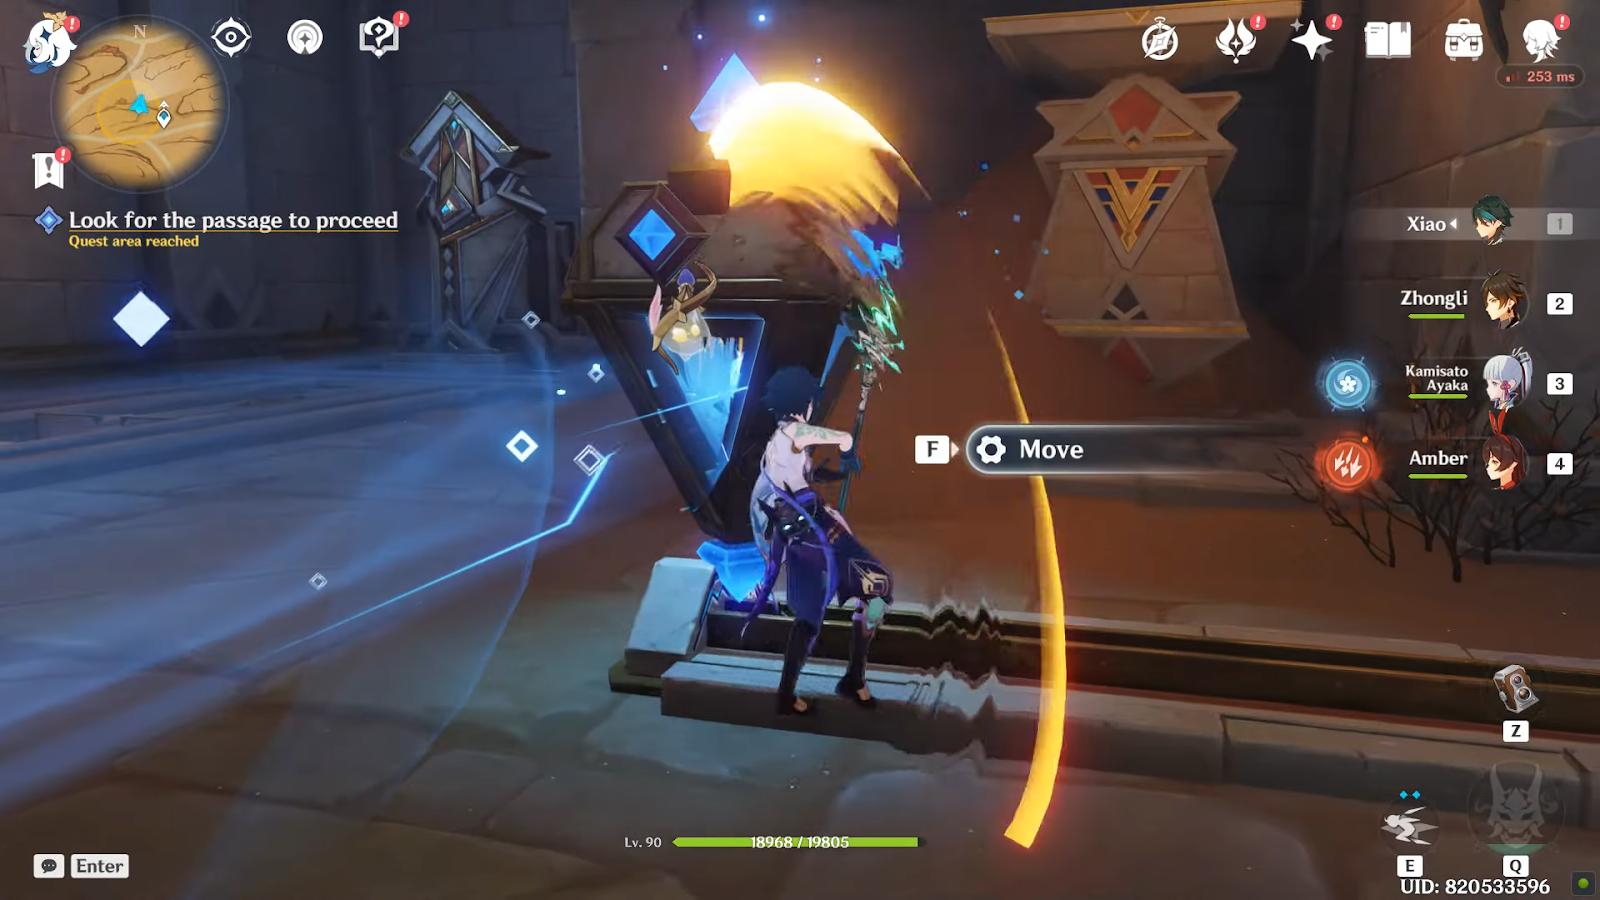
Look for the Passage to Proceed

After the small cutscene, you will need to look for the passage to proceed. Go to the shiny thing on the platform here and interact with it. Once it starts moving, follow it.

The shiny thing will lead you to the second floor. There, you can find a large cell. Turn it on and have the beam hit the sand on its left, which reveals a mechanism.

With the mechanism in the open, interact with it and sand will start pouring out, which is nothing to worry about as its part of the puzzle.

Next, move the large cell forward.
After the large cell stops, hit it multiple times until the beam hits the sand behind it.

With the beam facing the other way, head to the mechanism and turn it on. There, the sand will flow into the thing on mechanism on the left, powering it up. This will also open a passage way back on the bottom floor.

Go to where the large mechanism was and jump down. You’ll find a chest there and a door that leads back out to the bottom room.

Once back where the others are, head to the now open passage way. Inside, you should find a mechanism that should connect the junctions together.

After the junctions have connected, head deeper into the mountain, as the door is now open.
Proceed Deeper

From here, you just need to keep going deeper into the mountain. Nothing much happens here until you reach the bottom.

Once you reach this area, a cutscene will play out, and you will get a new objective to connect the junctions.
Connect the Junctions Part 2

Connecting the junctions is basically the same thing as the first time, but there are some changes made here. Head through the door first and find the large cell. Move the cell until it reaches the other side of the room and the beam is facing the sand, which eliminates it and reveals a cube mechanism to open the door.

Go in the room and you will find two more large cells. Hit the first one (the one that isn’t covered in sand) until the beam faces the cell that is actually covered in sand. This will free it from its sandy prison, allowing you to hit the second cell until the beam comes out and it eliminates the sand next to it, revealing a mechanism.

Interacting with the mechanism will connect the first set of junctions, which also opens a new passage. Head back to the first room and you will see a new passage is open for you to go through.

Go through the passage and it should lead you down some stairs. At the bottom of the stairs, there should be another one of those lights that lead you to places. Release and follow it.

It will then enter another one of those things that holds them, in which you need to release it again.

Once you have released the light again, it will exit the room and out into the area you started in. It will keep going until you reach the mechanism. Once it does, you will then have to activate it to connect the last set of junctions.
Soulferry

Once the junctions have been connected, go up the stairs.

Keep going up until you see a large door. There, you will need to interact with the cube mechanism and open the door.
Open the Door

When you reach the area, you will find another of those lights. Release it and follow it.

Once the light is in those holders again, go down these stairs to find another one of those Lilopaur’s fragments.

Now, you need to open the door. The cutscene ends and you need to interact wit this console and open the door (no, this isn’t the door the objective is talking about).

Once the door opens, you will see a cell pointing to the right. Rotate the cell so that it points to the left.

The barrier will go down and you can get the light released from the holder.

Once the light has been released from the holder, go back to the cell and rotate it so that it faces right again. This will prevent the light from disappearing when it approaches the holder near the large, cube thing that’s spinning.

Once it reaches the holder, interact with the light to release it and follow it again.

Follow it all the way up until it reaches the holder in the main room. There, you should have two lights ready. You need to release both at the same time (not literally, just release one and release the other one quickly). This will unlock the cube mechanism that opens the door. Be warned that enemies will enter the area when the light arrives, so deal with them first.
Go to the Deepest Part of Mt. Damavand

Now that the door is open, you will need to head deeper into the mountain.

There will be a large hole in the middle. Just drop down or glide down safely to avoid fall damage.

You should then find a mysterious mechanism here. Activate it and more sand start pouring out.

This is to activate the mechanism in the middle. Just like last time in Part 1, you will need to defeat monsters while defending the mechanism to escape. Here, you will need to defeat 9 monsters this time.

With the enemies defeated and the mechanism being able to open the door, you can now exit the mountain and complete Part 2 of Dune-Entombed Fecundity.