Update 4.4 has arrived in Genshin Impact after a long wait. It officially introduces the new area, Chenyu Vale – as well as lots of new content like World Quests, characters and more. In this guide, I try to cover all the guidance that you’ll need on exploring the new patch 4.4’s content in Genshin Impact.
Chenyu Vale Update 4.4 Complete Guide
The Update 4.4 has added quite a lot of content for players to experience. I’ve provided a Table of Contents below to organize all the new content for you – from new Characters, materials, exploration, the Chenyu’s Blessing of Sunken Jade questline (Act 1 – 4), World Quests and more!
- New Characters & Materials (Ascension)
- Exploration
- How To Reach Chenyu Vale
- How to Unlock Chizhang Wall Gate
- How to Unlock Chenyu Vale Upper Vale Underground Teleport Waypoint
- How to Unlock Carp’s Rest
- How to Unlock Rainjade Oblation
- All 50 Spirit Carp Locations
- Update 4.4 Fishing Guide – New Points
- All Chenyu Vale Keys Locations & Puzzles
- All Chenyu Vale 4.4 Luxurious Chests Locations
- How To Unlock the Spirit Carp Turn In Location
- All 4.4 Update New Recipe Locations
- Chenyu’s Blessing of Sunken Jade (Act 1-4)
- Other World Quests & Resources
- Investigate the Stone Shrine Quest Guide
- Collect the Scattered Adeptal Energy Quest
- Collect the Spirit Orbs (3)
- Shrouded Vale, Hidden Hero
- Silently the Butterfly Crosses the Valley
- Treasure Hoarder’s Warehouse
- Giant Jadestone Turtle
- Liyue Local Legend
- A Wangshan Walk To Remember
- Scrolls and Sword Manuals of Guhua
- Our Chenyu Vale Trek
- ncestor’s Mystery
- All Update 4.4 Hidden Achievements
New Characters & Materials (Ascension)
Xianyun Guide | How To Play, Best Artifact, Weapon Builds, Team Comps
Xianyun is an off-field support character who can provide healing and Plunging Attack buffs. You can also make her more useful by giving her artifact sets as well as weapons with supportive passives.
Her Burst is a team-wide heal that also increases allies’ jump height, and provides Adeptal Assistance stacks that give Plunging Attack Damage Bonuses depending on Xianyun’s ATK stats.
For her talents, your priorities will be Burst > Skill. Xianyun almost never uses her attack talents, so there is no reason for you to upgrade it.

Since Xiao is the only Anemo character in the game that uses a Plunge attack, you’ll want to have Xiao in most of Xianyun’s team comps.
Energy Requirements
To make sure that all of your rotations go smoothly, you’ll want to have enough Energy Recharge. Having your Burst available whenever you need it is very important since Xiao will lose his health over time when he activates his Burst.
If you are using her weapon, which is Crane’s Echoing Call, the ER requirements will be lower compared to other weapons. Having characters like Xiao or Faruzan and Faruzan C6 will also determine your energy levels.
Here are the Crane’s Echoing Call Energy Requirements. Keep in mind that this is only when Xiao uses at least 8 Plunging Attacks from his Burst duration.
- Xiao: 140–150%
- Xiao + Faruzan: 130–135%
- Xiao + Faruzan (C6): 100%

For the other weapons, go with the following Energy Recharge stats. The stats may be a little bit higher, but you can always make up for it with the ER stats from Favionius weapons, for example.
- Xiao: 200–210%
- Xiao + Faruzan: 185–195%
- Xiao + Faruzan (C6): 120–130%
Artifact Stats
Now that you know the Energy Recharge requirements, you’ll want to have Energy Recharge as sub-stats so you don’t have to sacrifice your main stats.
Your stats priority is ER% (Until Requirement) > ATK% > Flat ATK > EM > Crit. Keep in mind that her Plunging Damage buffs cap at 4500 ATK, so never go above this number.
- Sands: ATK% or Energy Recharge
- Goblet: ATK%
- Circlet: ATK%
Artifact Sets
In fact, there are no best Artifacts Sets for Xianyun. However, depending on your team comp, there are multiple options that you can use.
- 4-piece Viridescent Venerer: This set is useful if you need some elemental shreds for your team. Even for a team with Xiao, Furina, and Faruzan, you can still increase Furina’s damage thanks to the Shred.
- 4-piece Ocean-Hued Clam: The OHC set is a universal set for all characters that can heal in the game. Since Xianyun has a team-wide heal from her burst, she can deal decent damage from the set’s passive.
- 4-piece Noblesse Oblige: This is a great way to boost the damage of your DPS characters. Overall, this is a great option as long as no one else on your team is holding it.
- 4-piece Song of Days Past: The set is a worse alternative you can use compared to the Ocean-Hued Clan set. 4-piece OHC always performs better in terms of the damage and it outweighs the damage that SoDP provides.


Weapons
- Crane’s Echoing Call: This is Xianyun’s best-in-slot weapon. It gives you a lot of ATK base stat (741), a Plunging Damage boost, and lowers the energy requirement.
- Favonius Codex: If you do not have a Faruzan C6, using this weapon is also decent as it helps the energy recharge requirements.
- Oathsworn Eye: It has a good Base ATK and decent ATK% secondary stat. The weapon’s passive also helps her lower the energy requirements by 40%, which is another great alternative.
- Memory of Dust, Skyward Atlas, Cashflow Supervision: These are 5-star weapons that have high base ATK, letting her reach the ATK stat that she needs for the damage buffs.
- Thrilling Tales of Dragon Slayers: Its low Base ATK makes Xianyun’s Plunging Attack buff considerably worse, but its passive’s massive ATK% buff to Xiao makes up for the loss.


Team Recommendations
Xianyun is an amazing support for Xiao. She offers a strong Plunging Attack buff and can help regenerate energy for Xiao and Faruzan. A team of Xiao, Xianyun, Faruzan and a flex slot like Furina or Bennet can be great options.

Your second team option can be a Geo shred team with Xianyun, Xiao, Zhongli, and Albedo. Zhongli helps create a shield to prevent interruption and Albedo deals great off-field damage.

Your last team option is with Gaming. If you do not have Xiao, you can always use the 4-star Pyro Claymore Gaming.
He deals okay damage with his Plunge attacks and you can pair him with a Hydro application from Furina or Xingqiu for the reactions.
Keep in mind that if you use this team, you’ll need a lot more energy recharge for Xianyun. This means that you may have to sacrifice some of her ATK stats, lowering the effectiveness of her buffs.

Solitary Suanni Boss Location (Xianyun Ascension)
The Solitary Suanni boss is located in the Chenyu Vale. However, the boss can only be reached by using a Teleport Waypoint in the Statue of The Seven. I’ll provide more detailed instructions below.
To reach the Solitary Suanni World Boss, you’ll want to head towards the Statue of The Seven located to the Northwest of Chizhang Wall.
Then, head towards the direction that we’ve drawn for you in the image below and get into the cave.

This is a layered map of the way inside the cave. Keep following along the path and you will eventually reach the World Boss.
Keep in mind that there may be some monsters along the way, but you can just ignore them and keep going deeper inside.

Your second method is to take the Teleport Waypoint to the South of Chizhang Wall. This is a quicker way to get to the Boss if you have already unlocked it.

Once you have teleported to the Waypoint, you’ll be able to see the floating stars that you can interact with. By pressing the interaction key (T by Default), you will teleport to the star.

Keep pressing T (by default) to teleport to the star and you’ll finally reach the boss.

After a short while, you will eventually reach the boss.

Solitary Suanni Boss Important Mechanics
The Solitary Boss has a few mechanics that you’ll want to know to win against it more easily. The first one is when the boss enters the Hydro Form:
- The Boss will surround itself with water. You can counter it by using a Cryo Element user. Applying Cryo will freeze the boss.
- When the Boss is frozen, you can use Pyro, Electro, Geo, or Claymore to break the ice. After the ice is broken, the boss will be weakened and enter the knocked-down state.
- If you attack the boss with Geo or Claymore, you will also receive an achievement.

The next form the boss enters is the Anemo Form. During this will, the boss will create 3 Spiritwind Pearls. You can use a Pyro/Hydro/Cryo/Electro Elemental Skill, Catalyst, or Bow attack. Make sure you destroy the 3 Pearls using the same element.
If you have successfully destroyed all 3 Pearls, the boss will be stunned for a short duration. During this time, you can use your strongest attacks to defeat it.

Clearwater Jade Location | Xianyun Ascension Material
There are up to 84 Clearwater Jades you can collect. As you explore the world, you can collect 70 Clearwater Jades from random locations around the map.
The remaining 14 Clearwater Jades are in two different locations. You can find 9 of them by interacting with the shattered structures around Yaodie Valley and the other 5 at the Yilong Wharf merchant Fengtai.
In the image down below, you will be able to see all the Clearwater Jade Locations.
70 Clearwater Jade Locations


This is the layered underground map to help you navigate your way into different caves.

As you gather the Clearwater Jades, make sure you use a Claymore character. There are also many characters that are really good at breaking these jades such as Razor or Zhongli with their elemental skills.
To move quickly between areas, you can use the following characters:
- Kazuha/Kaeya: They have passive talents that decrease sprinting Stamina consumption for your own party members by 20%. This makes it great for you to run around without spending too much stamina, and travel a much further distance.
- Anemo Elemental Resonance: With two Anemo characters on the team, you can decrease Stamina Consumption by 15%, increase Movement Speed by 10%, and shorten Skill Cooldown by 5%. If you are exploring the map, make sure you have this Resonance as it makes traveling feel much better.
- Movement Abilities: Xianyun, Kazuha, Xiao, Sayu, or Scaramouche have amazing movement abilities that let you travel through many different terrains.
- Kokomi: She has a passive talent that decreases your stamina consumption when you are swimming. If you need to cross a large pool or river, consider using her at the party.

5 Clearwater Jades – Yilong Wharf Merchant
Do you know that you can also get the Clearwater Jades at the Fengtai Merchant at Yilong Wharf? Every week, you can buy up to 5 Clearwater Jades from him.
If you’re too lazy or do not have enough time to find all of the Clearwater Jades in one go, you can visit this merchant instead. For example, if you plan to gather all the materials in two weeks, then you can actually get up to 10 from him.
To find his shop, teleport to the Yilong Wharf Waypoint. Then, head in the direction that we have drawn for you in the map below.

You can get the Clearwater Jades for 1000 Coins each, which is extremely cheap to get.

9 Clearwater Jades – Shattered Structures
In the map below, you will be able to see all the locations of the collapsed structures around Yaodie Valley that you can interact with to receive 9 Clearwater Jades.

In the image below, you’ll see how the structure looks. Once you get near it, you can interact to hit it and receive a lot of the ores, including 3 Clearwater Jades for each structure.

That’s how you can find all the Clearwater Jades in Genshin Impact. You’ll need a total of 168 Clearwater Jades to ascend Xianyun to the last level. With 84 Clearwater Jades on each map, you’ll want to wait at least 2 daily resets, or every other day to wait for the items to respawn.
To speed up the process, you can always join other players’ worlds and ask them if you can get their materials. People in the community are very nice so they will give you the materials most of the time!
Gaming Guide | How To Play, Best Artifact, Weapon Builds, Team Comps
Gaming is an on-field Plunging Attack DPS who prioritizes using his Elemental Skill to deal strong Plunging Attacks. Once he uses his Burst, he enters a special state to increase his damage even further.
Since he is a Pyro DPS, you’ll want to pair him with support characters that can provide damage buffs. You can also utilize reaction damage like Reverse Vaporize to boost the numbers even more.

Gaming’s special state summons the Suanni Man Chai. It deals damage to an enemy and returns to Gaming, resetting his skill cooldowns as long as he is above 50% Max HP. This is when healers and shielders become really important.
The cooldown reset effect lets him use from 4 to 6 Plunging Attacks during his Burst duration. Keep this in mind so you can plan your rotations.
Talents
When it comes to his Talent Priority, you’ll want to go with his Skill, then Burst, Then Normal Attack. All of his talents are all necessary for his damage, so you’ll eventually level all of them.
If you are using C6 Bennet and Xianyun, you’ll want to prioritize his Normal Attacks over his burst. This will help you deal more damage using your Pyro-infused attacks.
His Air of Prosperity Talent gives him extra damage on his Plunging Attacks, so try to maintain yourself above 50% as you fight your enemies.

Energy Requirements
If you have Gaming C4, his Energy Recharge requirements will be lower thanks to the refund effect.
- C0-C3: 180–190%
- C4-C6: 150–160%
When you are also using Bennet on the team, he can also perform the role of generating energy particles to help lower the requirement.
- C0-C3: 150–160%
- C4-C6: 125–135%
Artifact Sets
- 4-piece Marechaussee Hunter (MH): When current HP increases or decreases, CRIT Rate will be increased by 12% for 5s. Max 3 stacks. While he does not benefit from the Normal & Charged Attack Damage, he can stack the 4-piece effect really fast. With a 36% Crit Rate increaes, you’ll only need 64% for maximum Crit Rate.
- 4-piece Crimson Witch of Flames (CW): Increases Overloaded and Burning, and Burgeon DMG by 40%. Increases Vaporize and Melt DMG by 15%. Using Elemental Skill increases the 2-Piece Set Bonus by 50% of its starting value for 10s. Max 3 stacks. This set’s effect is also something he can stack easily, increasing his Pyro damage. If you want to use this set, it may be the most efficient use of Resin to farm another domain and get pieces from the Strongbox.

Artifact Stats
When you are playing Gaming, make sure you reach the ER requirements first. After that, focus on Critical Rate & Damage. You can also add some EM for the reaction damage if you are not playing a Mono Pyro team.
- Sands: EM, ER or Attack.
- Goblet: Pyro DMG Bonus.
- Circlet: Crit Rate or Crit Damage.
Weapons
When it comes to his weapons, consider using some of these options:
- Serpent Spine: This is Gaming’s best-in-slot weapon, even at R1. When you have this weapon, an ATK buffer like Bennet and a shielder is very necessary. If you do not have a shielder, the weapon loses a lot in terms of damage.
- Verdict, Redhorn Stonethresher, Beacon of the Reed Sea: These are great weapons with Crit main stats and decent ATK sub-stats. Most of the weapons’ passives are useless on Gaming so you’ll mostly want them for the numbers.
- Rainslasher: Rainslasher is a powerful option in Gaming’s Vaporize Teams.
- Wolf’s Gravestone, Song of Broken Pines, The Unforged: These Claymores are great weapons that boost Gaming’s attacks.
- Tidal Shadow: This is his best free-to-play option. Gaming can maintain a consistent uptime with its passive on his self-healing effects.

Recommended Team Comps
Here are some best characters that you can use to form a team with Gaming:
- Bennet: Bennet’s attack buffs is amazing on Gaming or any characters that use the stat. If you are using C6 Bennet, pay attention to his combos since it can mess up the Vaporize reactions. You won’t have this problem if you are using a Mono Pyro team.
- Xianyun: She is a great character that can increase the Plunging Attack damage of Gaming. If you are using 4-piece Viridescent Venerer on her, she can provide the elemental shred that boost his damage.
- Healers: Healers are important to help him maintain his passives and damage buffs. You’ll want to have Bennet and Xianyun on the team ideally. Other options are Kokomi, Kuki Shinobu, and Jean. You can also consider Sayu for the heals and resistance shred, but use her with Bennet to maintain the healing effects.
- Off-Field Supports: If you change characters during Gaming’s special duration, he will lose it. This is why you’ll want to use all the off-field character abilities before switching to him. Some off-field suports you can use are Furina, Xingqiu, Yelan and Fischl.
Now that you know the basic rules for forming a team, here are some suggestions:
- Gaming — Furina — Xianyun — Bennett: This team is a good team you can use with Xianyun. The team provides a lot of damage buffs and healing that Gaming needs to perform well in battle.
- Gaming — Xingqiu — Sucrose — Bennett: If you do not have Furina or Xianyun, this is a good free-to-play option. Xingqiu can provide great Hydro application and healing, and Sucrose can provide the EM as well as elemental shred to boost his reaction damage.
- Gaming — Furina — Fischl — Bennett: Fischl is also another option with the Electro-charged and Overloaded reactions.
- Gaming — Rosaria — Layla — Xianyun: This is a Cryo team with Layla and Rosaria who can provide Gaming with critical rate buffs as well as a shield. The healing from Xianyun will also help Gaming keep up his passives for more damage.
- Gaming — Kaeya (C6) — Xianyun — Bennett: With Kaeya C6, you can have enough Cryo application for your team rotations. This leaves you with more space for you to use Xianyun, Bennet or other characters in the team.
- Gaming — Bennett — Xiangling — Kazuha / Xianyun: This is an example of the Mono Pyro team. Kazuha or Xianyun can provide the elemental shred as well as damage bonuses for Gaming.
How To Upgrade
As for Gaming’s upgrades, you can get his Ascension material from the Iron Viscount in Fontaine. As well as other materials from the All-Devouring Narwhal World Boss.

Exploration
How To Reach Chenyu Vale
To unlock the Chenyu Vale, players must finish the Prologue Act 3 Archon Quest Song of the Dragon and Freedom. So, you can get started unlocking Teleport Waypoints. Once you get here though, you can unlock the teleport waypoints and fast travel to Chenyu Vale in the future.
Getting to Chenyu Vale
To get to Chenyu Vale, you will have to finish the Prologue Act 3 Archon Quest Song of the Dragon and Freedom. You must go through a few quests starting with the main one.
As a new player, getting to this part of the game may take you some time, so just go through the missions at your own pace.

Once finished, you will get to enter the Chenyu Vale region without Paimon stopping you. By then, you can enter Chenyu Vale and trigger Chenyu Vale’s questline of Genshin impact.
I’ll explain in detail how to get full access to the Chenyu Vale region below and which questline you need to start.
Start the Qiaoying of the Sacred Mountain Main Quest
To start, go to the quest location of the Qiaoying of the Sacred Mountain. This is a main quest so you should have it on the roster of quests already.

Once you start it, you will enter a new character Fujin’s Adeptal Domain.
When starting this quest, the Traveler will encounter the Adeptus Fujin, who was once a giant gold carp who took a human form. You will speak with her for a bit and she explains that the soil and waters are declining.
As the traveler you (as usual) don’t get a choice to say no and end up being enlisted to help Fujin perform the Rainjade Rite to restore Chenyu Vale. Players will then unlock a new mechanic to help get around the area.
I’ll talk about this new mechanic and what they do below.
Golden Carp’s Leap
Players can now see pearls of water scattered throughout Chenyu Vale. Use these to transform into a Golden Carp fish and enter them. Now, you can cross the mountains and rivers of Chenyu Vale without spending stamina and wasting time.
This travel feature is a lot like the sigils in Sumeru.
Now that you have spoken to Fujin and have been enlisted in this new quest, you can leave her domain with your newly attained Adeptal Energy.

How to Unlock Chizhang Wall Gate
Chizhang Wall can be found within the Southern Mountain of Chenyu Vale, just north of Mt. Xuanlian. In this location, you will find a locked gate that you can open for various rewards.
The first thing you have to do is interact with the diffuser right in front of the gate. This will give you some hints on how to open it.

Western Zone
Head just slightly southwest of the map from the diffuser to reach another section of Chizhang Wall. Defeat the enemies here and interact with the inactive Ruin Hunter, then destroy it once it goes live.
This will remove the iron bars it once stood on and reveal a chest that you can claim for a few freebies. Beside it will be a pillar piece. Interact with it to take it with you.

Now, go up the stairs and place it in platform on the middle part just beside the last flight of steps. Make sure to align the piece properly, as it can be a bit janky to place.

Now, turn around and walk back down the stairs. To the northeast, you should see the next pillar for the puzzle, conveniently marked with a golden icon. You can pick it up from a distance.

This piece belongs to the platform on top of the stairs. You should see it behind the locked chest. Again, make sure that it is aligned properly so that it automatically snaps into the correct spot.

Finally, the third piece is just down the multiple flights of stairs to the east. Once you pick that up, go and place it on the last platform at the base of the stairs leading up to the chest.
After that, the diffuser behind the chest should become interactable. Do this and you will get the Fragrant Wood “Chizhang” key item, and the precious chest will be unlocked.

Eastern Zone
For the next part of the gate puzzle, fast travel back to the Southern Mountain teleport waypoint. After that, just jump down to the west, where you will see multiple platforms just like the ones from the previous zone.
After defeating all of the enemies in this area, there will be a pillar piece right on the ground out in the open. Pick this one up first and place it on the platform just beside it.

This will open the gate right behind the platform. Inside will be another pillar piece that you have to pick up. After picking it up, place it on the platform directly behind you, just opposite the previous one.

Now, pick up the first pillar that you used to open the gate and place it on the platform just above the stairs behind the second pillar.
This will open yet another gate behind you, which will contain a third pillar piece. Run inside and trigger the traps to clear the way, then pick up the piece.

This piece will go on the base of the stairs leading up to the diffuser. Line it up properly to form a ruined archway.

Now, pick up the second pillar piece from earlier and put it on the platform at the middle of the stairs, just ahead of the archway.

Finally, pick up the first pillar piece and place it on the last platform at the tip of the stairs, just in front of the diffuser.

This will open up the diffuser, which will give you the Fragrant Wood “Huangcong” key item. A precious chest will also open up right behind it.
Opening the Gate
Now that you have both of the fragrant wood items, head back to the diffuser in front of the locked gate at Chizhang Wall. Submit both of the fragrant wood pieces and the gate should open right up.
Once you go inside, you will face a Ruin Grader that will activate to your right. After defeating it, you will gain access to multiple chests inside the room.

How to Unlock Chenyu Vale Upper Vale Underground Teleport Waypoint
To keep a long story short, you only need to meet two prerequisites in order to unlock the Upper Vale Underground Teleport Waypoint, in addition to traveling to Chenyu Vale. Basically, you have to complete the following quests first in this order:
At a certain point towards the end of the second quest, you will find yourself within an underground archive. After completing the quest, you will unlock Shrouded Vale, Hidden Hero.
From here, the quest objective will be to merely “Keep moving”, so just follow the quest marker on your map. Basically, you will be heading southeast and proceeding through the linear cave.

Don’t forget to grab the Precious Chest along the way for some free rewards, including a few primogems. Continue down the path headed north.
Just halfway down the stairs, the Upper Vale teleport waypoint should be right in front of you. Walk up to it and interact with it to unlock the waypoint for future use.

And that is pretty much all you have to do in order to get this waypoint in Genshin Impact’s latest update. From here, you’re free to continue the quest by walking down walking down the stairs or start an entirely different chain by doing Qiaoying of the Sacred Mountain!
How to Unlock Carp’s Rest
Simply put, Carp’s Rest can be found within the Mt. Laixin area of Chenyu Vale. In order to get there, you have to complete a quest chain known as Chenyu’s Blessings of Sunken Jade.
The following quests will have to be completed in the given order:
- Qiaoying of the Sacred Mountain
- Floating Jade, Treasure of Chenyu
- An Ancient Sacrifice of Sacred Brocade
- The Cloud-Padded Path to the Chiwang Repose – To get this, you have to skip 1 in-game day after the previous quest.
Once you get The Cloud-Padded Path to the Chiwang Repose, you will be tasked with ascending the summit of Mt. Laixin. This can be found within Chiwang Terrace, directly west of Chizhang Wall.

Upon reaching the marked location on the map, you will have to speak with Lingyuan. After the short dialogue sequence, you will finally be tasked with entering Carp’s Rest.

Simply walk forward until you see a golden carp icon on the large green obelisk-like object floating in the air. Press the button prompt (T button for PC players) in order to get launched into Carp’s Rest.

Once you press that button and load into the next area, that’s pretty much it! Interact with the floating object in front of you to proceed deeper into the cave until you reach a viewpoint.
Here, you can complete the quest and unlock the Rainjade Oblation. Check out our guide about it to learn more about this offering system!
How to Unlock Rainjade Oblation
Before you can get to the Rainjade Oblation, you will have to complete a series of world quests in the new area, Chenyu Vale. This quest chain is called Chenyu’s Blessings of Sunken Jade.
The chain you have to complete starts with Qiaoying of the Sacred Mountain. Eventually, after progressing through the series, you will be able to start The Cloud-Padded Path to the Chiwang Repose.

Once you get this quest, you will be tasked with going to Carp’s Rest. After the dialogue with the Lingyuan at Chiwang Terrace, just run forward and look up at the floating green object.
You should get a button prompt at the bottom right corner of your screen. Press this (T button for PC players) to launch yourself into the next zone.

Once the game has loaded back in, you will find yourself in Carp’s Rest with the teleport waypoint inside automatically unlocked for you.
Activate the floating object right in front of you to enter through the cave and just follow the linear path through it.

At the end of the cave, you will be in a large clearing where the waypoint for the next quest objective, “Look for Fujin”, will be pointing you towards.
Simply walk over to the quest marker to trigger a cutscene, which will end in you unlocking the Rainjade Oblation.

The Rainjade Oblation Rewards
This offering system will require you to collect Spirit Carps, and we have a guide for the location of all 50 Spirit Carps in Genshin Impact.
Every five Spirit Carps will raise the Rainjade Oblation’s level by 1, and it has a total of ten levels. You will receive various rewards for leveling it up, but the order of these is different for each player.
In total, maxing out the Rainjade Oblation will get you the following rewards:
- 500,000 Mora
- 100 Mystic Enchantment Ore
- 2,000 Adventure EXP
- 1 Northlander Billet Trove
- 2 Philosophies of Gold
- 2 Philosophies of Diligence
- 2 Philosophies of Prosperity
- 1 Rainjade Statuette: Tender Discourse
- 1 Chenyu: Rainjade Rite
- 4 Acquaint Fate
- 2 Intertwined Fate
As you can see, it is definitely something worth leveling up with how little effort you need to actually complete it. So, get out there and start collecting the Spirit Carps!

All 50 Spirit Carp Locations
Before we begin the hunt, make sure that you have unlocked the Rainjade Oblation offering system first. If you need help getting there, check out our guide on how to unlock Carp’s Rest first!
Also, in order to gain access to the entire collection, there are a few prerequisites that you have to meet:
- Complete the Chenyu’s Blessings of Sunken Jade quest chain, which begins with Qiaoying of the Sacred Mountain.
- Unlock the Rainjade Oblation in Carp’s Rest, as mentioned above.
- Solve the Treasure Hoarders Warehouse puzzle.
- Solve the Chizhang Wall puzzle.
- Complete A Wangshan Walk to Remember.
- Finish the Scrolls and Sword Manuals of Guhua quest.
- Finally, complete the Shrouded Vale, Hidden Hero quest.
There are 50 total Spirit Carps scattered all throughout the Chenyu Vale. All you have to do in order to collect them is to simply walk over them, but it can be a bit tricky to find all of them without a guide.
Also, this guide is routed in a way that you can sometimes collect multiple in an incredibly fast pace. So, read one to two entries ahead so you don’t miss an immediate transition to the next.
Spirit Carp #1
Start your search at the Statues of the Seven – Geo teleport waypoint at Upper Vale, Liyue. Upon teleporting here, you should see a yellow boat sail straight ahead of you. Head over to that spot.

Jump onto the boat and climb all the way to the top of the sail in order to get the first Spirit Carp of the journey.

Spirit Carp #2
Next, teleport to the waypoint just northwest of where you are, highlighted in the map below. Upon teleporting there, immediately turn to the northeast and start running.

As you run along the cliff, you should be able to spot the second Spirit Carp on the tip of a building just below you. Glide your way there and try your best to land on top of it.

Spirit Carp #3
The next one is in Qiaoying Village to the northeast of where you currently are (technically you should be in the village already). Teleport to the waypoint there and the third Spirit Carp should be visible already.
It is right on top of the giant tea pot that has a tree surrounding it. Just climb up to the top to grab the carp.

Spirit Carp #4
The fourth Spirit Carp is just to the north of the previous one, on top of the large building. Simply jump off the tea pot and scale the building up north to reach it.

Spirit Carp #5
For the next carp, teleport to the waypoint just to the west of Qiaoying Village. Head northwest into the Treasure Hoarders tunnel, which will be blocked if you didn’t do the prerequisite.

The fifth Spirit Carp should be immediately to the left upon entering the cave to the Treasure Hoarders Warehouse. You can’t possibly miss it.

Spirit Carp #6
After grabbing the previous one, climb out of the cave and head straight north. There, you will be facing two Ruin Golems.
Upon defeating them, the path ahead should open up, and to the left will be a spider web that you need to destroy. Right behind this web is the sixth Spirit Carp.

Spirit Carp #7
Teleport to the same waypoint to the west of Qiaoying Village. Instead of going north, this time you’ll be heading southwest.

There, you will see a building with geo particles all around the roof. Glide over to the location and utilize the Golden Carp’s Leap ability to shoot yourself on top of the building and collect all the geo particles.
After collecting all of the geo particles, a glowing object will appear at the tip of the building. Activate it and you will be shot up into the sky, directly onto the seventh Spirit Carp.

Spirit Carp #8
After nabbing the previous one, immediately glide to the southwest, where you can see the eighth Spirit Carp floating on the air.
You won’t be able to reach it this way, but you need to land under it anyway. On the ground, you can activate Golden Carp’s Leap once more.

From there, aim to the sky and shoot yourself into the next Golden Carp. Then, use that to launch yourself straight into the Spirit Carp right behind it.

Spirit Carp #9
From the previous spirit carp, run straight up the hill directly to the northwest. At the top, you will find a small statue that you can interact with.

Upon interacting with the statue, you will be able to shoot an orb that will let you activate Golden Carp’s Leap.
Right above a tree in front of you is the ninth Spirit Carp. Shoot an orb nearby so that you can launch yourself into the air and grab it.

Spirit Carp #10
The prerequisite for this one is the Shrouded Vale, Hidden Hero quest. Teleport to the underground waypoint south of where the previous one was, and use Golden Carp’s Leap on the orb just ahead.

From there, just aim upwards and you should see the tenth Spirit Carp floating above the center of the room. Just launch yourself toward it and grab it.

Spirit Carp #11
For the next one, teleport to the waypoint northeast of where you currently are. Once there, turn to the north and you should see the 11th Spirit Carp floating on the air.

To reach it, you have to use Golden Carp’s Leap on the orb to the right of the waypoint. Then, aim above to the left to launch yourself towards another orb. Finally, just launch yourself straight at the carp below.

Spirit Carp #12
Now teleport to the waypoint directly to your west. From there, simply jump down south towards the wooden pathway below.

There, you should see the 12th Spirit Carp hiding under a tree just beside the pathway. Hop right off the path to grab it and prepare to move to the next one.

Spirit Carp #13
Teleport to the same waypoint as the previous one, but this time, you have to head north up the stairs leading to the building you see in the distance.

Once you make it up the stairs, you should see two orbs to your right. Use these to activate Golden Carp’s Leap and launch yourself straight towards the 13th Spirit Carp.

Spirit Carp #14
Immediately after grabbing the previous carp, turn to your right and glide down onto the small island directly ahead of you. The 14th Spirit Carp should be right on top of the tombstone on the island.

Spirit Carp #15
Next, teleport to the waypoint just north of the Yilong Wharf, which is directly west of where the previous carp was. Turn east and you should see the 15th Spirit Carp on the tip of the ship’s sail.

All you have to do is glide down towards it and climb to the top to grab it. This is just like the very first carp, only on a much bigger vessel!

Spirit Carp #16
After that, teleport to the same waypoint as earlier. This time, you will be heading north, towards a building straight ahead. Right in front of that building is a challenge altar that you need to activate.

Complete the time trial by activating the Golden Carp’s Leap and following the trail of geo particles all the way up the building. Opening the reward chest will summon yet another orb, which you can use to launch yourself to the tip of the building, where the 16th Spirit Carp is.

Spirit Carp #17
Immediately after snatching the previous carp, continue to fly towards the mountain to your southwest. There, you will spot yet another orb that you can use Golden Carp’s Leap on.

Seelie #1
Just ahead of this orb is a set of enemies that is surrounding a seelie. Defeat them and escort the seelie to a pillar just beside where the enemies spawned.

Seelie #2
Next, kill the enemies up north surrounding one of the little statues that you can use to shoot orbs. After clearing them, shoot an orb up high to reach the seelie above the tree.
Keep repeating this process until it voluntarily goes down onto one of the statues around the sealed chest below.

Seelie #3
The final seelie is just under a tree directly to the northeast. Once you get there, it will hide in one of the holes. Just investigate all three of them and it should pop right up, then guide it back to the chest.

After guiding all the seelies and unlocking the chest, an orb should appear right behind it. Use this to launch yourself straight up into a set of floating platforms.
From here, you’ll have to do a lot of platforming and activating Golden Carp’s Leap a couple of times to reach the platform at the very top, where the 17th Spirit Carp is.

Spirit Carp #18
For the next one, teleport to the waypoint at the tip of Mt. Mingyuan, which is just to the south of where you grabbed the previous carp.

From here, turn to the southeast and just glide downwards. The 18th Spirit Carp is floating above a tree, and you just need to glide towards it to get it.

Spirit Carp #19
Teleport back to the same waypoint on Mt. Mingyuan, but this time, go directly to the south. The 19th Spirit Carp is right above a building that you can simply glide towards.

Spirit Carp #20
Next up, teleport over to the waypoint south of Mt. Mingyuan. From there, jump down to the west. Keep going directly west and you should see the 20th Spirit Carp hidden under a tree.

Spirit Carp #21
Teleport back to the previous waypoint, but this time, turn towards the south. You will have to head up the mountain straight ahead.
At the tip of the mountain, stand beside the statue to gain a significant jump boost. Then, jump straight up into the air to grab the 21st Spirit Carp.

Spirit Carp #22
For this next one, fast travel to the waypoint just west of Mt. Lingmeng. You will be heading up the mountain to the south.

From here, use the Golden Carp’s Leap on the orb right above you and launch yourself towards the next one at the top of the mountain. Then, fly straight towards the 22nd Spirit Carp right in the air.

You won’t be able to reach it just yet. Instead, you have to do a puzzle right below it. Grab the Sacred Simulacrum sitting beside one of the platforms to start.
Sacred Simulacrum #1
Upon picking up the first Sacred Simulacrum, it will give you a hint about wanting to face the forest. Place it on the platform facing directly south, highlighted below.

Sacred Simulacrum #2
Next, grab the second Sacred Simulacrum leaning against the tree right in front of you. Place it on the platform facing the west.

Sacred Simulacrum #3
Finally, pick up the last Sacred Simulacrum just leaning under the previous platform and place it on the final empty one to complete the puzzle and spawn a Luxurious Chest.

After opening the chest, an orb will appear right behind it. Use this to activate Golden Carp’s Leap and fly towards the 22nd Spirit Carp directly above you.

Spirit Carp #23
While standing on top of the platform where the previous carp was, face the southwest. You will have to glide down to the structure highlighted below. Investigate the glowing object to spawn an orb.

Activate the orb to trigger a challenge, where you simply have to follow a trail of geo particles across the air. After this, a cave will open up and reveal the 23rd Spirit Carp.

Spirit Carp #24
After leaving the cave where the previous one was, use Golden Carp’s Leap on the orb straight ahead. Fly to the right until you can see a cave below you.

Drop down to enter the cave, and the 24th Spirit Carp should be right there in the middle of the small pond inside.

Spirit Carp #25
Next, teleport to the waypoint just to the south of Mt. Lingmeng. From here, use the orb to launch yourself towards another one straight above.

From the second orb, aim to the right and fly towards the ruined structure. Drop down to its base and you will see a challenge that you can attempt.

Upon starting the time trial, use the orbs to fly to the top of the structure. You don’t have to successfully complete the challenge.
Once you reach the point between the two structures, aim downwards behind you to fly into the hole of the structure that you just flew up from. The 25th Spirit Carp is right inside this little gap near the tip.

Spirit Carp #26
Next, fast travel to the Statues of the Seven – Geo just to the west of Chizhang Wall. The 26th Spirit Carp is right out in the open to the north of the waypoint.

Spirit Carp #27
Teleport back to the same waypoint as the previous one, then run southeast towards the ruin (this should be familiar if you completed the Chizhang Wall gate puzzle). Grab the Rust-Worn Key from the puddle on the eastern corner of the ruin.

With the Rust-Worn Key on hand, you can use it to open the gate just beside the spot where you found it. After opening it, just jump to grab the 27th Spirit Carp.

Spirit Carp #28
The next one is conveniently located near the previous carp. Simply climb up the hill to the west just outside of the room you just opened. Use the orb in the distance to fly towards the 28th Spirit Carp.

Spirit Carp #29
Speeding up the process even more, from the previous carp, just turn left and fly towards the first orb yousee. Use this to reach the next orb, then aim to your right and fly towards the 29th Spirit Carp.

Spirit Carp #30
Continue dropping down after grabbing the previous carp and you will eventually see a cave where the 30th Spirit Carp is floating. Just glide towards it or use one of the nearby orbs to fly straight at it.

Spirit Carp #31
After that, fast travel to the waypoint directly to the east of Chizhang Wall. From there, head west towards Chizhang Wall and use the orb below to launch yourself into the 31st Spirit Carp in the middle of the archway.

Spirit Carp #32
This one is straight ahead from the previous carp. Simply enter through the previously locked gate of Chizhang Wall and climb one of the pillars there to reach the floating 32nd Spirit Carp.

Spirit Carp #33
Next, teleport to the Statues of the Seven – Geo to the northeast of Teatree Slope. Follow the road going southeast until you can see a waterfall to your right. Jump down towards the green orb.

Launch yourself upwards into another orb above the waterfall. From here, turn east and fly towards the 33rd Spirit Carp, which is right there up in the air.

Spirit Carp #34
After grabbing the previous carp, immediately turn around and activate the same orb you used to get up here. Now, turn to the southwest and launch yourself towards another green orb.

From the second orb, launch yourself up the mountain to your left. At the top of the mountain, you have to shoot several Floating Anemo Slimes.
After clearing them and opening the chest, a wind current will appear in front of it and this will shoot you upwards into the 34th Spirit Carp.

Spirit Carp #35
Next up, fast travel to the teleport waypoint at Yaodie Valley. From here, activate the orb above the giant jar right in front of you. The 35th Spirit Carp is right inside the jar, so just cancel out and fall inside.

Spirit Carp #36
Now, fast travel back to the same waypoint as the previous one, but this time, head south towards the cave.

At the end of this tunnel, you will see another green orb. Activate Golden Carp’s Leap and follow the trail of orbs down the cave system. At the last orb, turn around and the 36th Spirit Carp should be right there.

Spirit Carp #37
For this next one, continue through the cave from where you grabbed the previous carp. Once you reach the clearing, you will see another green orb that you should activate.
From there, launch yourself above the tree to your right. As you fly up, you should be able to spot yet another green orb up top, which you should fly towards.

After activating this orb, turn left and you should spot the 37th Spirit Carp inside one of the hanging jars. Just launch yourself towards it to get it.

Spirit Carp #38
After grabbing the previous carp, jump out of the hanging jar and turn left. Use Golden Carp’s Leap on the next orb you see down there.

From the orb, launch yourself towards the right where you will be able to spot the 38th Spirit Carp behind a large spiderweb. Break through the web and climb the stone formation beside the carp to get it.

Spirit Carp #39
For the next one, teleport to the waypoint just west of Yaodie Valley. Head south towards the ruined tower that is just ahead.

Inside this ruined structure is a pinwheel. Switch over to an Anemo character to wind it up and use the wind current to fly straight up into the 39th Spirit Carp.

Spirit Carp #40
After nabbing the previous carp, turn to the west and start gliding towards another orb. Use it to launch yourself towards the statue straight ahead, which will give you a jump boost to reach the 40th Spirit Carp above it.

Spirit Carp #41
Next, fast travel to the waypoint east of Chizhang Wall. After that, start gliding towards the ruined structure directly to the south.

Inside the ruined structure is a pile of rocks that you have to break. Upon destroying this debris, you should be able to grab the 41st Spirit Carp right in front of you.

Spirit Carp #42
Now, fast travel back to the previous waypoint, but this time, head southeast towards a cave that you can drop down on from straight above.

Continue to drop down carefully and you will eventually see the 42nd Spirit Carp floating in the air. Just slowly glide towards it before you hit the ground.

Spirit Carp #43
For this next one, fast travel to the waypoint south of Yaodie Valley. Immediately after teleporting, turn right and head towards the statue that will let you shoot orbs.

By default, the statue should be aiming right on top of the 43rd Spirit Carp. Simply shoot an orb above it and start flying towards it.

Spirit Carp #44
For the next one, fast travel to the waypoint at Mt. Xuanlian. Immediately drop down and start gliding towards the green orb to the side. You should see the 44th Spirit Carp right above it. If you can’t catch it on the way down, use the orb to launch yourself up.

Spirit Carp #45
Return to the previous waypoint and take the green orb to the south. Then, launch yourself towards the next orb to the right, and then use that to fly towards the 45th Spirit Carp above the gazebo straight ahead.

Spirit Carp #46
After grabbing the previous carp above the gazebo, fly towards the green orb that you used to get up here. This time, launch yourself up the cliff to the west and climb all the way to the top.
Once you reach the top of this mountain, you will see a statue and the 46th Spirit Carp way ahead of you in the air.

Use the statue to get a jump boost. Upon jumping, you can then activate a green orb above that will let you fly straight towards the one right beside the Spirit Carp.

Spirit Carp #47
Before launching yourself out of the green orb where you claimed the previous carp, aim down to the northwest. You should be able to see the 47th Spirit Carp in the distance.

If you miss it while gliding after launching, don’t fret. There’s a statue below just slightly north of the carp. You can use this to shoot an orb right above the carp to grab it.

Spirit Carp #48
As we’re nearing the end, teleport to the waypoint southwest of Mt. Xuanlian. From there, run straight towards the cliff to the northwest. There should be a statue right on top of it.

Use the statue to shoot an orb straight up in the sky. Then, upon activating Golden Carp’s Leap, face directly to the north, where you will see the 48th Spirit Carp. Launch towards it to get it.

Spirit Carp #49
For the penultimate carp, fast travel to the waypoint just west of Chiwang Terrace. Immediately turn around and fly to the green orb. Aim downwards and you should see the 49th Spirit Carp on a floating island.

Spirit Carp #50
For the last one, teleport back to the previous waypoint and run straight towards the green obelisk that will take you to Carp’s Rest.
Do not activate Golden Carp’s Leap. Instead, keep approaching the obelisk and a translucent golden bridge should appear. Cross this bridge and keep looking to the right. You should eventually spot the final carp below.

Just jump off the bridge and start gliding towards it. Once you grab it, congratulations, you can now max out the Rainjade Oblation offerings in a single go!

Update 4.4 Fishing Guide – New Points
First, you will need to travel to Chenyu Vale, the new region added in the latest update of Genshin Impact. There is a total of two new fishing points in this update, and they can be found in this new zone.
In addition to this, a new fish called the Jade Heartfeather Bass was also added to the game. It looks like a heart, and it is likely to be caught in the new points.

Teatree Slope Fishing Point
The first of the new fishing points can be found within Teatree Slope. This cozy little spot is just slightly northwest of the teleport waypoint in this zone. A challenge can also be found further ahead across the river.

Far South Fishing Point
The fast travel waypoint to the west of Huaguang Stone Forest and directly south of Chizhang Wall will lead you to the Southern Mountain of Chenyu Vale. The second new fishing point is to the southwest of it.

All Chenyu Vale Keys Locations & Puzzles
In total, there are five keys that you can collect around the Chenyu Vale region of Genshin Impact. Each of them unlocks certain chests or locations, some of which require two keys to open.
To make your search easier, ensure that you have unlocked every fast travel waypoint in Chenyu Vale. This will allow you to easily access the important spots, and these are going to be used as a reference when we give you directions.
Forgotten Keys 1 & 2
Fast travel to the waypoint east of Mt. Lingmeng, and head straight down to the road southwest of you. Here, you will find a locked chest and a mound of dirt a few steps behind it. Walk up to this dirt and investigate it.
This will get you Forgotten Key (I), and treasure hoarders will spawn all around you and try to attack you. Get rid of them quickly to proceed to the next step.

After clearing the area, continue along the road to the east until you reach the highlighted part of the map below.
You will see another object that you can investigate on the ground. This will get you Forgotten Key (II), which won’t spawn treasure hoarders like the last one.

Now return to the spot where the locked chest and first key was. With both keys on hand, you can now unlock the chest, which will grant you various rewards, including 10 Primogems.

Strange Key
Next up, travel to the waypoint just south of Mt. Mingyuan, and then run all the way down the cliffs to the southwest. Defeat the treasure hoarders in this area and grab the Strange Key from the ground.

Now go back to the waypoint you previously went to and run southwest until you see a locked cage beside a chest.

Upon unlocking the cage using the Strange Key, grab the Sacred Simulacrum that was inside. Run southeast until you spot a glowing platform that you can place the Simulacrum on.

Placing the Simulacrum on the platform will spawn a Precious Chest to the left, which will give you various rewards, including 10 Primogems just like earlier.
Ancient City Key
For this one, travel to the waypoint directly east of Chizhang Wall. Here, walk towards the locked gate and step over to the right of the two pots. Now turn left and activate the object (T button for PC players) to open the gate.

Inside the structure is a chest that contains the Ancient City Key and a Chizhang Map quest item that will give you a hint to your next destination.
Travel to the waypoint just southeast of Chizhang Wall and run directly to the south to reach the marked location below.
Inside the ruined structure will be yet another locked gate, which you can open with the Ancient City Key. Past the gate are three chests that will give you all sorts of freebies.

Wangshan Hall Backup Key
For this one, you will have to start the A Wangshan Walk to Remember world quest. We have an extensive guide on how to complete it.
Basically, you just have to progress through this quest and you will eventually be given the Wangshan Hall Backup Key. This is all a part of the quest chain, so continue the series from there once you get it!

All Chenyu Vale 4.4 Luxurious Chests Locations
It goes without saying, but before you begin this guide, you should be able to travel to Chenyu Vale first and (hopefully) unlock all of the teleport waypoints through exploration.
A lot of these will also require you to complete certain quests, in order to get all the Chenyu Vale Luxious Chests. For the sake of convenience, I’ll be linking to our other guides for more detailed steps while also trying to give you a quick summary.
#1. An Ancient Sacrifice Chest
For this one, you will need to advance to the 3rd part of the Chenyu’s Blessing of Sunken Gate quest line.
This quest is called An Ancient Sacrifice of Sacred Brocade, and we have a detailed guide on how to complete it.
Halfway through this quest, you will be tasked with collecting three spirit orbs. We also have a guide on how you can find all of them.
After that, you will have to use your adeptal energy to activate the Spirit Orb. After completing these steps, a Luxurious Chest will spawn right beside the gazebo.

#2. Shrouded Vale, Hidden Hero
Just like the previous one, you will have to progress through a different quest chain for this chest. This one will only reveal itself near the end, so strap in and get ready to do the following:
- Start with A Wangshan Walk to Remember.
- Complete Scrolls and Sword Manuals of Guhua.
- After that, you will immediately start Shrouded Vale, Hidden Hero.
Once you get the prompt to “Keep moving”, just follow the quest markers all the way down the cave until a cutscene starts. Complete the trial, which involves fighting various waves of enemies.
After that, the quest is still not over, but the Luxurious Chest will spawn somewhere in the arena you are currently standing on.

#3. Chizhang Wall Gate Puzzle
For this one, you will need to complete a fairly lengthy puzzle that involves mixing and matching pillars on top of platforms in two different zones.
The steps required to complete this are a bit too long for me to explain here, so check out our guide on how to unlock the Chizhang Wall Gate first.
Basically, you have to complete two different puzzles to acquire two pieces of Fragrant Wood. This will be used to open the locked gate in Chizhang Wall.
After that, you have to defeat a Ruin Grader hiding just behind the gate to unseal the Luxurious Chest in the middle of this previously locked room.

#4. Jade Fragments (Chizhang Wall Puzzle)
After completing the puzzles and getting the chest behind the gate at Chizhang Wall, there is actually another one that you can get following this.
First, fast travel to the waypoint on an island west of Chizhang Wall. From here, run straight towards the structure to the northeast and grab the jade fragment on the ground.

Next, fast travel over to the waypoint at Carp’s Rest. If you haven’t unlocked this zone yet, check our guide out on how to unlock the Carp’s Rest.
From the waypoint, turn around and follow the cave to the northwest. The second jade fragment will be right on the ground just before the waterfall.

With these two pieces, return to the Chizhang Wall gate where you picked up the previous chest. Behind the last chest’s location is a floating Ancient Jade Pendant that you can interact with.
Submit the two jade fragments and it will transform into a portal that you can enter. After teleporting to the next zone, run straight forward and interact with the mural to spawn the Luxurious Chest.

#5 and #6. Chasing Butterflies
For these next two chests, you will have to progress through the quest called Silently the Butterfly Crosses the Valley.
We have an extensive guide on how to complete this quest that will get you through all of the steps needed to finish it. At the end, you will pick up an Ancient Tree Branch, which will spawn a Luxurious Chest below.

Although the hard part of the quest is done by this point, you will be tasked with going back to Adeptus’s Repose. Jump down and open the chest before investigating the butterflies on the water.
This will teleport you to Adeptus’s Repose. Interact with the medicine jar immediately to your left and submit the Ancient Tree Branch to it.
Doing this will trigger a cutscene, and a hidden vault will unlock nearby. Run straight towards it to the northeast and you should find yet another Luxurious Chest right there.

#7. Chiwang Terrace
For this one, go to Chiwang Terrace and clear all of the enemies surrounding this zone highlighted below. Three large translucent Sacred Simulacrums should spawn around a stone circle on the ground.
Set the game time to 14:00 and hit one of the simulacrums. This will spawn a Luxurious Chest in the middle of the small stone circle.

#8. Simulacrum Puzzle
Fast travel to the waypoint southwest of Mt. Lingmeng, and then climb the cliff directly south. At the top, you will be faced with a puzzle involving three Sacred Simulacrum.

The solution here is fairly simple, and you actually have to complete this if you plan on getting all 50 Spirit Carps (specifically #22 in the linked guide) in the update.
First, take the Sacred Simulacrum that is leaning out in the open to the east and put it on the platform facing south. Both are highlighted below for your convenience.

Next, take the Sacred Simulacrum that is leaning under a tree and place it on the platform that is facing to the west.

Finally, grab the last Sacred Simulacrum, which is just under the western platform, and put it on the only remaining spot. Completing this simple puzzle will spawn a Luxurious Chest nearby.

#9. Time Trial Chest
After completing the previous puzzle, head on over to the southwest corner of the cliff and glide towards the giant ruined structure straight ahead.
There, you can investigate a golden light on the ground to spawn an orb that will let you start a time trial. Complete this trial by following and collecting the trail of Geo Particles. At the end, you will get a Luxurious Chest as a reward.

#10. Jade Turtle Puzzle
For this one, you have to travel over to a small island to the northeast of Yilong Wharf. There, you can complete a puzzle involving a Giant Jadestone Turtle.
We have a more in-depth guide on how to complete this puzzle. Basically, you have to feed a giant turtle and climb on top of it. As you ride the turtle, a Luxurious Chest will spawn between some smaller turtles nearby.

#11. Yet Another Simulacrum Puzzle
For this last chest, head over to the waypoint west of Qiaoying Village and run to the ruins northwest. Here, you will be doing another puzzle involving Sacred Simulacrums.

Grab the first Sacred Simulacrum that is on top of the table right ahead of you. Next, place it on the platform to the left from the base of the stairs.

Next, take the Sacred Simulacrum leaning on the stairs just behind the one you placed. Put this one on the opposite platform to the right of the base of the stairs.

Now go and take the pillar piece on the left side of the altar, right on the ground behind the first Sacred Simulacrum. Place this on the upper left platform.

Finally, turn around and grab the last arched pillar piece and place it on the final platform on the upper right. After that, a few waves of enemies will spawn, and a Luxurious Chest will appear on the altar after you defeat all of them.

How To Unlock the Spirit Carp Turn In Location
To unlock the Rainjade Oblation aka Spirit Carp Turn In, players have to complete 3 connected quests and a separate world quest.
This is to fulfill all the prerequisites to get the Clouded Padded Path To The Chiwang Repose. This quest is what’s going to give you access to the Spirit Carp to the turn in location.
I’ll talk about these quests in more detail below.

Complete the Qiaoying of the Sacred Mountain
This is the first quest you have to finish. This is a really easy world quest to finish because it serves as an introduction to Chenyu Vale.
To start the quest, just enter the Chenyu Vale region and have a conversation with the Adeptus Fujin. You will get access to the Adeptal Energy mechanism and can now interact with puzzles and mechanics in Chenyu Vale.
SIDE NOTE: Read our dedicated guide on Qiaoying of the Sacred Mountain here to get the full comprehensive guide for this quest!
Once you finish this quest, you will get access to the second quest you need to finish.

Complete the Floating Jade Treasure of Chenyu
The Floating Jade Treasure of Chenyu quest is the second sub-quest you have to finish.
Here, players will have to solve a few puzzles as they explore Chenyu Vale. There will be a stone shrine puzzle in Jademouth, and players will have to collect Scattered Adeptal Energy in Chenlong Cleft.
You can read more about what this quest has in store in our dedicated Chenyu’s Blessing of Sunken Jade Guide, but the gist of this mission is that there is a tea problem in the valley, and (as usual) the Traveler is the only one who can stop it.
Finishing this quest will unlock the last quest needed to get to the Rainjade Oblation.

Complete the An Ancient Sacrifice of Sacred Brocade
This third quest is the next in a series of quests under Chenyu’s Blessing of Sunken Jade plot line. Now, players follow in Little Mao’s footsteps and we get closer to revealing just who his Adeptus friend is.
In this quest, there will be only one puzzle that you have to solve, which includes collecting Spirit Orbs scattered across Mt. Xuanlian. Players can turn these orbs at the Pavilion for a Golden Carp reward too.
Apart from this puzzle, the quest is fairly straightforward. There will be a boss fight with Lingyuan but it shouldn’t be a problem.
Once you’re done with this quest, you’ll be close to unlocking the Spirit Carp turn in location.
Progress through A Wangshan Walk to Remember
This last quest will be another lengthy questline, but luckily you only need to finish the introduction quest to get the turn in location.
Here, you will need to head to Huang the Third in Yilong Wharf. This quest is where players can unlock the fabled secrets of the Guhua Clan, and you can check out our comprehensive guide to the Wangshan Walk to Remember quest here.
The trials in this quest are really simple, and don’t require any preparation. Once you’re done, you’re almost there!
Finish The Cloud-Padded Path to the Chiwang Repose
Now that you’ve finished all 3 quests, you’re done with the prerequisites for the Rainjade Oblation.
Head to Chiwang Terrace and enter Carp’s Rest. If you haven’t unlocked it yet, we have a dedicated guide on how to Unlock Carp’s Rest here!

Once you enter, go through the dialogue with Lingyuan and use your Adeptal Energy on the Votive Rainjade. Talk to Fujin and you will unlock the Rainjade Oblation.
NOTE: For those who are experiencing issues because they completed the ‘Wangshang Walk to Remember’ quest before obtaining Chenyu’s Blessing of Sacred Jade, simply skip a day in-game, and the quest should load properly.
Congratulations! You can now turn in your Spirit Carps here. There are 50 Spirit Carps scattered around the map, so try and find them all to get all the rewards.
All 4.4 Update New Recipe Locations
Before we start, please note that not all of these brand new recipes in Update 4.4 can be found by finding them and talking to specific recipes.
- Honey Char Siu
- Deep Fried Doublecrips & Braised Meatball
- Jadevein Tea Eggs, Chenyu Brew, & Tea Smoke Squab
- Fine Tea, Full Moon
- Guhua Fish & Lamb Soup
- Character Specific Recipes
- Future Recipes
In fact, some of the other recipes require you to have a certain character unlocked and ready for use before you can get the recipe. Once you do have that character unlocked, you will then need to use that character to cook with a certain recipe to unlock a new recipe.
To make things easier to ready, we will separate the recipes that require a character to cook from the recipes that requires talking to an NPC.
Honey Char Siu
The first to find is the Honey Char Siu recipe. This recipe can be found by talking to Chef Mao, the boss at Wanmin Restaurant in the Liyue Harbor.

Deep Fried Doublecrisp & Braised Meatball
The second one can still be found in the Liyue Harbor. This time, you will need to go to the center of the town and look for an NPC named Licai.

She will be standing in front of the doors of a restaurant. Talk to her and she will give you the Deep Fried Doublecrisp and Braised Meatball recipes.

Jadevein Tea Eggs, Chenyu Brew, & Tea Smoke Squab
The next recipe are actually 3 recipes: Jadevein Tea Eggs, Chenyu Brew, and Tea Smoke Squab. These can be found at the Yilong Wharf by talking to an NPC named Lianfang, the street food vendor.

Talk to the NPC and you will be able to get the three recipes from her.

Fine Tea, Full Moon
The next recipe is the Fine Tea, Full Moon recipe, which can be found by completing the Chenyu’s Blessing of the Sunken Jade quest chain. It is a very long quest chain that will take some time to do so.
If you need some help completing this quest chain as fast as you can, check out our in-depth guide that shows you everything you need to do for the Chenyu’s Blessing of the Sunken Jade quest chain.

Guhua Fish & Lamb Soup
The next recipe you can find is the Guhua Fish & Lamb Soup. This recipe is a completion reward for doing the Shrouded Vale, Hidden Hero world quest.
Just like with the last recipe, you will need to complete a long series of quests in order to get this recipe.
If you need help getting the recipe, make sure to check out our guide on completing the Shrouded Vale, Hidden Hero quests.

Character Specific Recipes
For the next set of recipes, these are recipes you can get by cooking specific recipes with specific characters. There are only two of these dishes, and the first one is the Yummy Yum Cha recipe. You can get this dish by cooking the Honey Char Siu dish with Gaming.
Speaking of Gaming, here’s a detailed guide on Gaming – including his best artifact and weapons!

The last recipe we can unlock is the Encompassing Gladness, which can be created once you use Xianyun to cook the Braised Meatball recipe.

Future Recipes
Now these recipes, on the other hand, are currently not available in the game. These recipes are event exclusive recipes that are not yet available. If you want to know what the events are, what recipes they have, and when will it be live, here is the information you need:
- Vibrant Harriers Aloft in Spring Breeze Event – February 5, 2024
- Eight Treasure Duck
- Receiver of Friends From Afar Event – February 21, 2024
- Trembling Strings and Rushing Reeds
- Humbly Enough
- Right at home
- The Palace Jewels

Chenyu’s Blessing of Sunken Jade (Act 1-4)
The Chenyu’s Blessing of Sunken Jade questline is divided into 3 Acts, as well as a 4th Act (Epilogue). I’ve provided a detailed walkthrough for everything you’ll need regarding the 4 Acts below!
Qiaoying of the Sacred Mountain (Act 1)
Starting Act 1: Qiaoying of the Sacred Mountain quest from Chenyu’s Blessings of Sunken Jade World Quest is as easy as stepping foot into the new Chenyu Vale area.
Here’s a summary of what to do during this quest:
- Use your adeptal energy to leave the mountain.
- Go to Qiaoying Village.
- Go to teamaking workshop.
- Leave Qiaoying Village.
- Follow the Golden Carp.
- Solve the puzzle.
I was gliding into the area when my character was suddenly transported Melusine-village style (but green). You’ll find yourself in the humble abode of the Adeptus Fujin.

Use your adeptal energy to leave the mountain
She apologizes for rudely pulling you into her house. The Adeptus gently explained that she needed your help to investigate the imbalance of local water and soil. Oh, no, an emergecy threatens the fine quality of Chenyu Vale’s tea production!
Please note: This is where you are introduced to the Adeptal Energy mechanism. This is a unique mechanism is Chenyu Vale where you ride on Golden Carps to places, almost like Sumeru’s Four-Leaf Sigils.
After this sequence, you will be immediately sent very close to the Statue of the Seven (as shown in the screenshot above) of Upper Vale. So that’s convenient!

Go to teamaking workshop (Fine Tea, Full Moon Recipe)
Keep walking and there will be another cutscene as he explains that the tea situation is very dire. In Old Luo’s words, “No tea may be sold until the quality problem is solved.”
After speaking his thoughts on the tea problem, he asks you to visit the teamaking workshop up north. While heading up here, you can get some Chenyu Adeptea (really, Hoyo?) growing here. There’s also a Waypoint to unlock.
Up North, another sequence begins as a serious discussion about the tea problem takes place. Somehow, it ends with us having to test teacake made from two different batches of tea leaves. This confirms that the issue is not in the machine, but the tea itself.

Here, you’ll get the Fine Tea, Full Moon Recipe after concurring to the Grandpa’s sly convincing that we do have something to do at Yilong Wharf. Keep walking after leaving the village until you reach the indicated area.
Follow the Golden Carp
You’re going to have to use the Adeptal Energy mechanic here. After pressing T, launch yourself towards the Golden Carp with LMB on PC, or just click on the area on your device.

Clear the area from the Treasure Hoarders here. Now, you need to solve the puzzle. Which is actually easy, as you just need to make all the rocks shine equally. Do this by pressing T which will let you carry the rock, and then move to where the unlit rocks are.
Fujin reappears afterward and after chatting with you as you agree to help her, a certain figure appears to be watching you from afar.

Continue walking ahead, flicking on another three Waypoints while you’re at it. Upon entering the wharf, another dialogue takes place. We finally meet the technician, Hautemontagne.
After talking to Little Mao, you both decided to set off together as the little boy seems to know a lot about Chenyu Vale’s nature.
And with that, we’ve finished “Qiaoying of the Sacred Mountain” quest in Genshin Impact! I’ll see in the next Act, “Floating Jade Treasure of Chenyu Guide.”
Floating Jade Treasure of Chenyu (Act 2)
Previously, we’ve confirmed that the problem of reduced tea leaves quality in the region has been due to the imbalance soil and water condition. One might not fully understand what they mean by this, but after speaking to Little Mao, we might just have a clue as to how to fix it.
Here’s a summary of “Floating Jade Treasure of Chenyu” quest:
- Follow Little Mao.
- Try entering the waterfall.
- Explore the domain.
- Clean the mural.
- Go to watchtower at Yilong Wharf.
- Board the bamboo raft and go to the Jademouth.
- Go to the Jademouth.
- Investigate the stone shrine (2).
- Go back beneath the jade.
- Try using your adeptal energy.
- Jump into the whirlpool.
- Follow the carp.
- Collect the scattered adeptal energy (4).
- Return to the Votive Rainjade.
Follow Little Mao out of Yilong Wharf
After speaking to Hautemontagne and Little Mao in Yilong Wharf, head back out of the port city to the east. Then, just south of where the NPC for “Temporary Acclimatization” World Quest at the bottom of the waterfall is where you need to go.
As you approach the waterfall, Little Mao will point out the breakable rocks. Break the rocks to reveal a platform. Use Adeptal Energy by pressing T to bring it up, revealing an entry through the waterfall.

Enter the domain and explore it. Little Mao will appear next to you, so all you need to do is follow him and interact with the claw marks on the way up. Not far is where the mural’s at.
Clean the moss-covered mural with your Adeptal Energy (T). Little Mao will then tell you all about the pass of Qiaoying Village and how rituals of past used to grant them prosperity through the soil.

Follow Mao to return to Yilong Wharf and arrive at the watchtower. Just keep walking straight and another dialogue will take place. Little Mao will be your guide in explaining where the river flow and what the Jademouth is.
Now you know where to go, so it’s time to board the bamboo raft that’ll take us there. Just approach the small dock and talk to Bosu. A lot of lore is revealed as we ride through the river and talk about Rex Lapis and a certain great white snake.
Unlocking Chenlong Cleft
We’ll then arrive at the Waypoint for Jademouth that you can flick on now. Walk up the hill to get a good view of the Jademouth. Little Mao explains that we need to investigate the Stone Shrines to the northeast and southwest.

To the southwest, ride on the Golden Carp’s Leaf to reach your target location faster. You’ll be introduced to the Jade Incense Cauldron mechanic. TL;DR, aim your adeptal energy in a straight line from one end to another to flick on as many incense as possible.

Now go to the other side and stand behind the incense diagonally opposite from the other cauldron. Throw your Adeptal Energy and it’ll lit up everything. Once you do, it’ll unlock the Stone Shrine for you to activate.
To the northeast, ride the Golden Carp’s Leaf and clear out the Treasure Hoarders. After 3 waves, you’re done and then turn on the Stone Shrine on this side. Easy!
Go back to where Little Mao is with the Waypoint. Little Mao suggests we use our Adeptal Energy to stir the whirlpool. Easy, just look up and then use your Adeptal Energy at the giant jade hanging there. The whirlpool will appear.

Ride the Golden Carp’s Leaf to reach the center of the whirlpool. Just launch yourself in the general direction of the middle of the whirlpool and glide down into Chenlong Cleft. We will meet another Golden Carp here. Follow it. Don’t miss the common chest!

The carp will lead you to a Waypoint and then pass that, where the Votive Rainjade. Fujin explains that she needs it removed because it’s been growing too large. And to do so, we need to collect 4 scattered adeptal energy.
Collect the Scattered Adeptal Energy (4)
These adeptal energies are rather mischievous. You’ve going to have to keep an eye on them because they’ll keep jumping around before you can send them off. Below are the locations of all the scattered Adeptal Energy to collect.

- Adeptal Energy #1 is just right below the Votive Rainjade surrounded by 2 Hilichurls. Interacting with this will suddenly enlarge the other bell ruins. The furthest one is where you can find the Adeptal Energy. Fun fact: one of them give you a lot of artifact fodders!

Then, Simply interact with the energy by pressing T to send it to the Rainjade.

- Adeptal Energy #2 is right next to the first one. Press T to begin the chase. Just follow this floating mist as it stops a few times and transforms into a boar. It’ll provide two Golden Leaf’s Carp throughout the chase to make things easier. Also, you can just ignore all the enemies on the way, except for the final boar. Along with the Adeptal Energy, you’ll get a Precious Chest as well.
Take the Golden Carp’s Leaves to make your way back to the center.
- Adeptal Energy #3 is to your right when you’re back to the center. A seelie is trapped in this hilichurl camp, so clear it out. Let the seelie out and it’ll summon its friends to reveal the Adeptal Energy below. Easy chest and energy.

- Adeptal Energy #4 is just beyond the third one. Keep walking past the seelie’s house to an area with submerged pyro totem puzzle. Use your Adeptal Energy to bring them out of the water and lit them before they submerge back. This will bring up the energy and the chest.

Take the Golden Carp’s Leaves to make your way back to the center.
Now we can return to the Votive Rainjade. After the dialogue, the Votive Rainjade will shrink and we’re now ready to continue to the next act of the World Quest. Talk to Mao to let him know you’re ready to go.
This also concludes the “Floating Jade Treasure of Chenyu” act of Chenyu’s Blessing of Sunken Gate World Quest in Genshin Impact. Here’s guide for the 3rd Act, An Ancient Sacrifice of Sacred Brocade!
An Ancient Sacrifice of Sacred Brocade (Act 3)
The quest begins after we follow Little Mao to Fogbank River. Little Mao will guide us through and here’s a summary of what to do:
- Go to Fogbank River.
- Follow Little Mao.
- Take care of the nearby miasma (3).
- Check the cavern.
- Follow the Golden Carp.
- Prepare for the Rainjade Rite (2).
- Talk to Fujin.
- Go to Adeptus’s Repose.
- Take care of the nearby miasma (3).
- Check the clues nearby.
- Examine the mural.
- Go to Mt. Xuanlian.
- Explore Mt. Xuanlian.
- Collect the Spirit Orb (3).
- Use your Adeptal Energy to activate the Spirit Orb.
- Go back to look for Fujin.
- Talk to Fujin.
- Climb the sacred mountain.
- Accompany Fujin & take care of the nearby miasma.
- Calm Lingyuan down.
- Escort Little Mao back to Qiaoying Village.
Before starting the quest, we suggest that you go flick on the Statue of the Seven in the Southern Mountain. This will make navigating around easier during the “An Ancient Sacrifice of Sacred Brocade” quest.
Go to Fogbank River
Once you arrive at Fogbank River, a cutscene will begin, revealing Little Mao’s friend, Bluey. He tries to assure us that Bluey is friendly. I’m not very convinced, though.
After that, follow Little Mao into the cave. As you continue through the cave, you’ll have to face several hilichurls. The first bunch are normal ones guarding a chest.
But the second one introduces the Miasma. This is a battle mechanic where you have to focus on clearing the leader to shutdown the Miasma. Once you kill it, press T on the tree to shut it down. For this specific situation, you have to shutdown 3 of them.

Once you’re done, you get a Precious Chest and a pathway leading to the cavern. You’ll see a similar mural from the second Act, so use your Adeptal Energy to clear the mural. More lore drop ensues.
This is where Fujin will appear, checking in on the group since the miasmas were thick. Follow Fujin’s Golden Carp as she instructed.
Preparing the Rainjade Rite
We’ll arrive at the location where Rainjade Rite is performed. After reminiscing the past a little bit, she asks for your help to prepare for the Rainjade Rite. Bless Fujin because we can now walk on water around this area.
For the one on the top, just approach the small box on the ground to reveal a floating platform. Step on it and then ride up the current, look to your side to find another platform. Land on it and press T to reveal more platforms.

No need to walk all the way there, just press T on the Golden Carp’s Leaf since it’s within range anyways. Then launch yourself to where the Sacred Simulacrum is, i.e., the owl statue. Press T to grab it, then fly all the way back to the shiny pedestal. Press E to place the Sacred Simulacrum on the pedestal. That’s one preparation done!

For the other one on the bottom, you have to bring home this Seelie. There will be two Hydro mimics on the way back. Once it’s home, it’ll reveal the Sacred Simulacrum. Press T to grab it and press E to place it on the pedestal.

Now, you’re ready. Go back to Fujin and talk to her. She will try to initiate the ritual but found out not even the full ritual was enough to make up for her lack in power. So now we have to also help her recover that and head to the Adeptus’s Repose.
Entering the Adeptus’s Repose
The Adeptus’s Repose is located in Yaodie Valley, just west from Bishui Plain or south from Upper Vale. When you approach this area, you will have to clear the Miasma 3 times again. Like before, just kill the leader and you can immediately clear the Miasma by pressing T while looking at the tree.
When you enter the cave, you’ll have to start working on puzzles again. Start by placing back this Sacred Simulacrum back to its pedestal.

Now press T again to grab the same statue back and go deeper into the cave. Go up the stairs next to the small study area and place it there. It will then give you a hint on what to interact with: a stone slate.
And by that, he meant this one with familiar characters drawn on it.

Once you’re here, approach the Fujin and the mural to initiate the conversation. A lot more of lore drop here, so we won’t spoil you! She then sends you back to the area before this. Press T on the stone slate now to summon the Golden Carp Fish.
Collect the Spirit Orbs (3)
Next up is Mt. Xuanlian. You can use the Waypoint in Yaodie Valley and then just walk along the river to the south for a minute to reach this area. Unlock the Waypoint for Mt. Xuanlian and keep walking until you reach the pavilion with 4 Carp Statues.
Here, you’ll need to find 3 Spirit Orbs as they will be necessary to find the Golden Carp. And along with this, you’ll have to solve Jade Cascade puzzles.

Spirit Orb #1 is right next to the pavilion. Jump down a little to find the orb here locked behind a Jade Incense Cauldron mix with Jade Cascade puzzle. Press T on the giant hairpin that was left behind by Fujin and then move it to the other floating platform to weigh it down.

Then stand behind the incense here. Press T to retrieve the Adeptal Energy and lit up the incense. Look to your other side and stand behind the incense again to the other cauldron. This will unlock the Spirit Orb that you can retrieve by using your Adeptal Energy!

Spirit Orb #2 is to the north from here. You can ride the Golden Carp’s Leaf and drop to the bottom where the Jade Cascade puzzle is. Simply move the hairpin to the other side and then place the Sacred Simulacrum statue on the floating platform. Then, grab the Golden Carp Statue and move it to the platform directly below the hairpin. And you’re done!

Spirit Orb #3 is a walking distance to the east from here. Similar to the second one, simply move the hairpin to the other side and place the Golden Carp Statue on its platform under the hairpin. Now you can retrieve the Spirit Orb.
Now return to the pavilion and use your Adeptal Energy to activate the Spirit Orb inside the statues. Fujin will materialize and talk to you all more about her past. Afterward, teleport and follow her back to where the rite will take place. Talk to her to initiate the ritual that will remove the fog and reveal Mt. Laixin.
Lingyuan Boss battle (Solitary Suanni)
Ride on the Golden Carp portal that’ll bring you to the Waypoint easily. Then, accompany Fujin who’s now back to the form of a Golden Carp. Clear out the miasma as you make your way up with Fujin. One Golden Carp ride a few more meters of walking we’ll finally arrive.
Get ready to fight some Xuanwen beasts, the new enemies added along with the update 4.4.

Continue following her all the way up Chiwang Terrace. Don’t forget to open the Waypoint.
Get ready for several waves of hilichurls here as you protect Fujin. Don’t forget to use Adeptal Energy to remove the miasma which will instantly remove the enemies.
Afterward, it’s time for the boss battle: Lingyuan. And as usual in Genshin Impact, “An Ancient Sacrifice of Sacred Brocade” boss battle is an easier version of the original Solitary Suanni boss.

Bring cryo/pyro characters like Gaming or Ayaka as it will stun her during her charging. On the other hand, you cannot deal as much damage with hydro and anemo characters.
Once you win the fight, we’ll finally be able to have a talk with “Bluey” or rather, Lingyuan. After much talking, we have to send back Little Mao to Qiaoying Village.
We have saved the tea predicament of Chenyu Vale! This also concludes the third act of the Chenyu’s Blessing of Sunken Gate World Quest, “An Ancient Sacrifice of Sacred Brocade” in Genshin Impact. But we’re not done yet–stay tuned for the epilogue!
The Cloud-Padded Path to the Chiwang Repose (Act 4)
To initial “The Cloud-Padded Path to the Chiwang Repose” quest, you have to go to the next day in-game time. Paimon will inquire about Fujin’s health and ask us to go visit her at Chiwang Terrace.
- Speak to Lingyuan.
- Go to Carp’s Rest.
- Enter Carp’s Rest.
- Look for Fujin.

Lingyuan may look aloof and all, but as we reach the terrace, we find her just standing there. She couldn’t get into Carp’s Rest and wanted to check on her, so she asked for our help. She totally wasn’t waiting for us to help her because we have her Adeptal Energy that allows us to enter Carp’s Rest.
Anyways to enter her space, get as close to the floating Votive Rainjade and press T. We’ll immediately be transported to her home. The Waypoint will also be unlocked automatically and with this, we’ve permanently unlocked Carp’s Rest.

Head to the middle area and after talking to her, you unlock the Rainjade Oblation. This is a mechanic players will be familiar with as it’s akin to the Oculus but is instead referred to as the Spirit Carp. There’s a maximum amount of 50 Spirit Carps (and here’s how to find all 50 Spirit Carps!).
For some more extra cuteness, talk to Lingyuan who’s just next to the Rainjade Oblation here.
With that, you’ve cleared “The Cloud-Padded Path to the Chiwang Repose” quest and unlocked the Votive Rainjade in Genshin Impact.
Other World Quests & Resources
Investigate the Stone Shrine Quest Guide
There are two stone shrines in the northeast and southwest of Jademouth, as shown in these locations. Investigating these areas will require you to solve some simple puzzles along the way. And we’ll show you how to work them out!

Southwest Stone Shrine
You can reach down south easily via the Golden Carp’s Leaf and then just launch yourself to the puzzle area.

This mechanic is called the Jade Incense Cauldron and can only be fired up using Adeptal Energy. You need to lit up all 4 incenses, not to be confused with the cauldrons.
You need to fire up the cauldron first by pressing T. Once you do, now head to the opposite corner diagonally from you and stand behind the incense. Press T again to call the Adeptal Energy back so it passes through two incenses and lit them up.
Quickly shift to other corner opposite from the other cauldron and then press T again to shoot your Adeptal Energy. This will lit up the other two incenses. You’ve unlocked the Stone Shrine in the southwest!

You only have 1 Adeptal Energy charge–if we don’t do it this way, we won’t be able to keep all of them lit in time. Press T on the shrine to finish investigating this side and grab your chest.

Northeast Stone Shrine
Again, you can ride the Golden Carp’s Leaf. Don’t forget that you can launch yourself out from one leaf, and then press T again once you’re in range to the next leaf.

This one is easy. Just clear the Treasure Hoarders out and you’re good. There are 3 waves of Treasure Hoarders to clear with two minibosses on the last one, but nothing too hard. Interact with the Stone Shrine, grab your chest, and you’re good to go!
With this, you’ve finished “Investigate the Stone Shrine” quest from the “Floating Jade Treasure of Chenyu” in Genshin Impact.
Collect the Scattered Adeptal Energy Quest
To start the “Collect the scattered adeptal energy” quest, players have to enter a clearing hidden inside a whirlpool. Once you trigger this quest, you can collect the Adeptal Energy by solving puzzles and interacting with objects scattered throughout Chenlong Cleft.
You can collect the Adeptal Energy in any order, but to make things easier for you, follow the order given here for convenience.
I’ll give you a guide to collect all the Adeptal Energy below.
Adeptal Energy Location 1
The first location will be a glide down from the quest start point.

Glide to the northwest area of the map and you’ll find a group of Hilichurls digging into the dirt. Defeat them and interact with the glowing area to trigger the first puzzle.

Once you interact with the glowing area, three more will appear over the large metal artifacts scattered around the area. Interact with them to collect the Adeptal Energy.

Adeptal Energy Location 2
From the first location where you got the first Adeptal Energy, you’ll see a glowing orb. Get close to it and follow it, and it will morph into a boar.

Keep following it. It will speed up but just keep on its trail. Enemies will spawn as you follow the boar but you can easily defeat or choose to ignore them.

Eventually, the boar will become an enemy called the “Beast of Fuyu”. Defeat it to trigger the next adeptal energy to spawn. This will be the second Adeptal Energy in the quest.

Adept Energy Location 3
From the location of the second Adeptal Energy, these glowing orbs will spawn which you can use to quickly travel back to the starting point within the quest area. Use these to save yourself the trouble of walking all the way back.

These glowing orbs will take you to an area with Hilichurls guarding an imprisoned seelie. Defeat them and free the seelie.

Follow the seelie and two more will appear. These three seelies will start to drain the water – follow them into the newly drained portion of the cave and the third Adeptal Energy will appear. This is the third Adeptal Energy needed for the quest.
Adeptal Energy Location 4
Once you jump down to where the seelies are, keep following them. They’ll eventually go into their resting places, so just keep following the path from where they left off. You’ll also get an Exquisite Chest from them too!
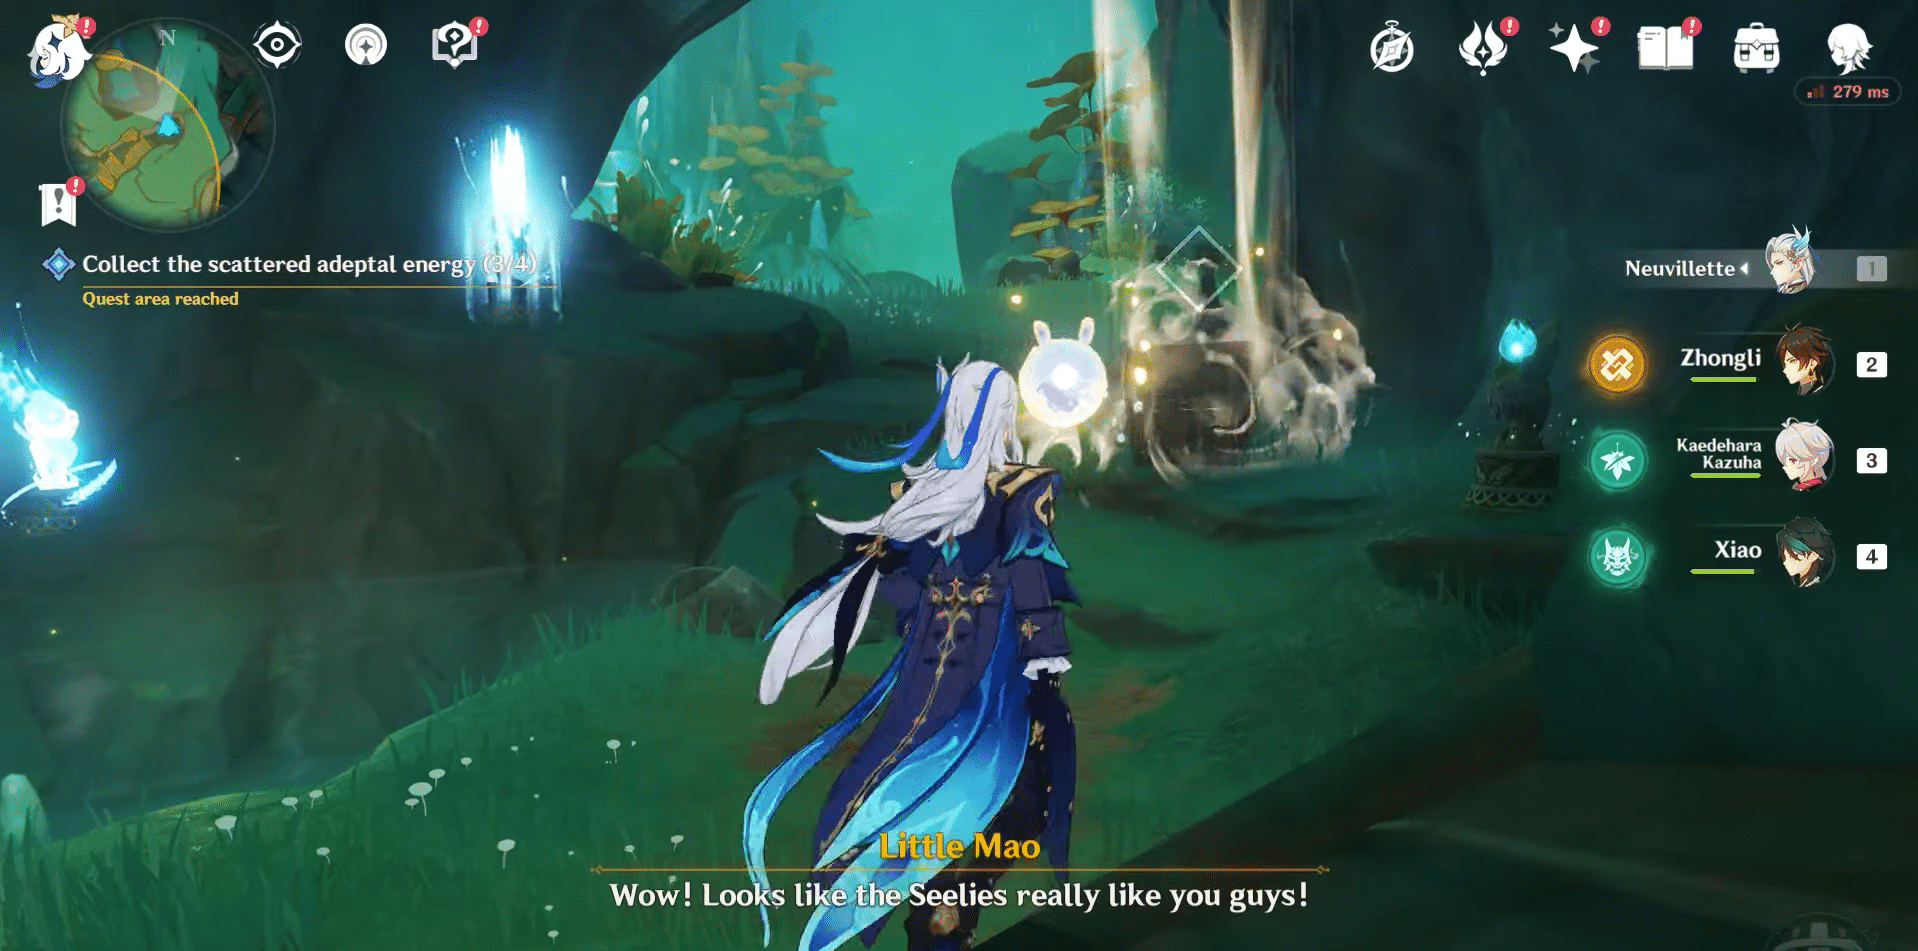
You’ll encounter Pyro monuments in the area. Put Amber or any other ranged Pyro character into ur team and shoot them. Both of the monuments will be underwater but you can easily lift them out with the interaction key.

Once both Pyro Monuments are lit, an Exquisite Chest will rise from underwater. Interact with it and you’ll have all four Adeptal Energies.
Now that you’ve collected them, you can return to Votive Rainjade and progress further with the quest. Congratulations!
Teleport to Fujin using the nearby teleport waypoint and Fujin will show you how the device works. Little Mao will decide to meet Bluey, which will trigger the final part of Chenyu’s Blessings of Sunken Jade quest chain.
Collect the Spirit Orbs (3)
To collect the Carp Spirit Orbs (3), you will need to explore Mt. Xuanlian. There will be three Spirit Carp statues you have to activate with Adeptal Energy. The location of each statue will be marked on the map for your convenience.
First Spirit Carp Location
The first Spirit Carp location can be reached by gliding down from the teleport point.

You’ll notice a Jade Incense Cauldron puzzle beside the locked Spirit Carp statue. To solve this puzzle, you have to light up all the censers using Adeptal Energy.

To start, jump towards the floating boulder with a deactivated Cauldron atop it. Then, use your Adeptal Energy to interact with the other Cauldron behind it. This will activate the Cauldron beside you.
Then, jump back to the boulder where the Spirit Carp statue is, and activate the censers using the Jade Incense Cauldron located on a wooden ledge across you. Align the censers and the cauldron before activating it, to light them all at once!

This will activate the first locked Spirit Carp statue.
Second Spirit Carp Location
You can use the glowing orbs throughout the map to teleport to the next location.

Get the Jade Cascade from above the marker location. This will also remove the flow of Sacred Spring from the cascade and will elevate the platform below it.

A text prompt will appear from the Sacred Simulacrum asking you to move the waterfall away. Move the Jade Cascade to the slot just beside it using your Adeptal Energy. Once done correctly, the Sacred Spring should gush down the incomplete Spirit Carp statue below it!

This will unlock the second Spirit Carp statue.
Third Spirit Carp Location
This third spirit carp is the hardest to miss. It will be right beside Mt. Aocang to the lake located east of the map.
Getting this one is simple. Beat the Hilichurls and move the Jade Cascade to the slot beside it. This will activate the Spirit Carp statue below it, for you to collect the last Carp Spirit Orb!

Shrouded Vale, Hidden Hero
To get to the “Shrouded Vale, Hidden Hero” quest, you must complete the Scrolls and Sword Manuals of Guhua quest. All this quest requires is walking and fighting, so this guide will be short and sweet. Here are the objectives that you must accomplish. I’ll provide more detailed instructions below.
- Investigate the mechanism.
- Complete the trial.
- Investigate the ancient sword.
Quest Location
If you’re finished with Scrolls and Sword Manuals of Guhua, great! You can go straight to this next quest from where you are.
Likewise, if you’ve finished Scrolls and Sword Manuals of Guhua and have left already, don’t worry. Just go back to Wangshan Hall and head to the chamber pictured below.

There will be a marker for the final quest location, but before you head there, explore the chamber. You’ll find multiple chests and low-value artifacts you can collect.

On the way to the marker, there will also be a teleport waypoint you can unlock. At the marker, you will find a mechanism surrounded by water.
A cutscene will play where you and Paimon discuss how Huang the Third probably didn’t know this chamber existed, leading you to believe that you found the real Guhua Treasure Chamber.

The Mechanism
Inspect the mechanism. A dialogue option will open where you have the choice to leave or touch the mechanism – touch it and a single hydro slime will appear. Insulting how much the hall underestimates the traveler.
Of course, things aren’t so simple. Defeat the slime and you’ll have to go through multiple waves of Hilichurls while having to avoid waves of energy that deal huge damage.

Survive these waves, and the last phase of the trial will be two Geovishaps. Once you defeat them, the water level will drop, and a Luxury Chest will appear. From here, follow the next marker on your map.
The Ancient Sword
Keep following the path. If you think you’re lost, there will be markers that will light the way along the path.

At the end of the path, you’ll find the Ancient Sword. It will be lodged into the ground overlooking the sea, and a cutscene will play where you and Paimon read the ancient inscription left by a Guhua clan swordmaster from long ago.
Unfortunately, you can’t keep the sword, but you do get a recipe for some traditional Guhua clan Fish and Lamb soup. Neat!
You also get rewards for completing the quest itself. These include x20 Primogems and x25000 Mora.

Silently the Butterfly Crosses the Valley
In order to start the Silently the Butterfly Crosses the Valley quest in Genshin Impact, go to the cave across from Adeptus’ Repose in Yaodie Valley. There will be a Seelie by the entrance who will direct you to the necessary quest area.

Upon entering, you will quickly encounter a Sacred Simulacrum that attempts to frighten you into departing the area. As the stone statue is a familiar sight in Chenyu Vale, you will naturally be unfazed by the Simulacra’s attempt to scare you.
The Sacred Simulacrum, realizing its efforts are in vain, will instead ask you to assist in chasing every butterfly into the medicine jar in order to restore the Ancient Tree’s ability to bloom.

Chase the Butterflies
Once you have had your conversation with the Carefree Simulacra, go up to the butterfly nearby and release it to fly to the gigantic medicine jar at the top of the cave.

After that, you will get an objective for chasing butterflies. In order to chase all the butterflies into the medicine jar, you need to locate five different colored butterflies in the area.
Green Butterfly
The first one is in a tiny cave to the southeast. You can find its location by highlighting the objective. When you reach there, you are going to see that the butterfly is stuck behind a barrier.

In order to remove the barrier, you are going to need to solve a very simple puzzle. For the first step, simply turn around, take the cauldron in front of you, and place it on the platform to the left.

Doing this will unlock the barrier next to it. Pick up the next cauldron inside of it. Then, turn around and place the cauldron on the platform to the left of the butterfly.

After that, pick up the cauldron you used first and place it on the platform to the right of the butterfly.

Then, the barrier that was keeping the butterfly will be gone, and the butterfly will fly into the jar by itself. Don’t forget to follow it as it goes, because it will reveal a chest for you on its way.
Pink Butterfly
Head east and find the pink butterfly! This one will require you to follow the butterfly around and try to catch it. It will fly away when you try to catch it for the first couple of times, but you will eventually get it. Here is a list for each location where you are going to find the pink butterfly:
- Within the large vase.
- Beside the large vase on the lowest stalagmite.
- Above the stalagmite is the large vase.
- South or southeast of the starting point.

Orange Butterfly
Next, navigate your way to find the orange butterfly. You are going to encounter a huge spider web on your way. Simply use the ability to destroy it.

Inside, the area is filled with Hilichurl equipment and exploding flowers. Destroy everything and eliminate every spawning enemy. After you get rid of each foe, the butterfly will appear; follow it to reveal a treasure chest.
Yellow Butterfly
Once again, check out your map and head to the location you need to go to. There, you will see a waterfall and a sacred simulacrum.
Pick up the sacred simulacrum and place it on the stalagmite right next to it. Doing this will release the yellow butterfly, and it will fly on its own.


Blue Butterfly
Head to the direction of the waterfall and interact with the Golden Carp’s Leap. Look to your left, and you will notice a time trial challenge on the ground near a waterfall.
Here, you are going to need to collect 18 Geo Particles within 80 seconds to finish the challenge. When you finish it, the challenge route will lead you to the butterfly.

Talk to the Sacred Simulacra
Once you release each butterfly, go back to the Sacred Simulacra. After you talk to it, it will reveal the big ancient tree.

Investigate the Tree
Turn around to see the gigantic tree. Then, go closer to it. There, you are going to find an ancient tree branch.

Treasure Hoarder’s Warehouse
The Treasure Hoarder’s Warehouse is a hidden place you can go to in Genshin Impact. This place is located to the northeast of Mount Lingmeng. There are two entrances you can use to get there.

If you try to walk to the Hoarder’s Warehouse directly, you are going to see two guards on your way. Therefore, we do not recommend you use the route below.

Because of that, you can try to get there by using the second entrance. However, in order to access the warehouse, you are going to need to get a key.

Treasure Hoarder’s Warehouse Key
You are going to find the Treasure Hoarder’s Warehouse Key in a chest that is protected by a Ring Guard. In order to find this guard, you should travel to the northwest side of Qiaoying Village in Chenyu Vale.

The Ruin Guard is going to be very close to the second entrance of the warehouse. Go to the exact location we marked above. There, you are going to see a locked chest and the Ruin Guard. Defeat it to unlock the chest.
Once you unlock the chest, it will drop the key for you. In this case, the key is named Ruin Machine Core.

After you get the Ruin Machine Core, go back to the second entrance and place it on the mechanic. Doing this will awaken another Ruin Guard. Once you defeat that one too, you will be able to get inside the Treasure Hoarder’s Warehouse.
Inside the warehouse, you are going to find three chests that you can loot.
Common Chests
The two chests you are going to find are common chests. One of them will be located near the entrance you used, and the other one will be close to the other entrance of the cave.
The first common chest will give you three Fine Enhancement Ore, Traveling Doctor’s Silver Lotus, Lucky Dog’s Hourglass, and Hunter’s Bow.

The second common chest will give you a Lucky Dog’s Eagle Feather, a Traveling Doctor’s Handkerchief, and two Adventurer’s Experiences.

Precious Chest
The precious chest will be in between the two common chests you found. This one will unlock after you defeat every enemy inside the cave. It will give you three Mystic Enhancement Ore, Dull Blade, Exile’s Flower, Lucky Dog’s Hourglass, and Fillet Blade.

Giant Jadestone Turtle
Jadestone Turtles are thick-shelled reptiles. Like their counterparts throughout Teyvat, they move slowly and have a gentle attitude.
According to legend, the first people who lived in Chenyu Vale saw a gigantic turtle that was more majestic than all the mountains combined and gave it the name Gui in the distant past.
Though the veracity of such stories cannot be confirmed, modern Jadestone Turtles are still capable of growing into amazing giants.
How to Unlock Jadestone Turtle
In order to unlock the Jadestone Turtle in Genshin Impact, you should first go to the north-east of Yilong Wharf in Chenyu Vale. There, you should complete a little quest to activate them.
Check out the image below to see the exact location you need to head to.

There, go closer to the beachside and find the Ancient Stone Tablet with a glowing light on it. You are going to need to interact with it.

After interacting with the stone, go up the little hill right next to it. There, choose the “Feed” option and toss raw meat, fowl, fish, or another meat product into the glowing yellow light to trigger the cutscene.

Once you do that, a giant turtle will appear right in front of you. Jump on top of it and try to touch it a little.
After touching the big, giant Jadestone Turtle, it will start swimming and take you somewhere else. Do not leave it until it reaches its destination. It is going to be a short trip anyway.

There, you are going to see that a couple of turtles have spawned. One of them has the jade crystal, and others are just cute turtles. You might also see a chest next to them.

Once you complete the cutscene to activate the turtles, they will appear and stay in this location. They are going to keep staying in that area even if you leave. The jade on the turtle will spawn every 48 hours.

Giant Jadestone Turtle Drops
As we mentioned, some turtles will have a jadestone on their backs. When those turtles spawn, you should walk up to them and break off these jades to help them with their itch. These jades are named Clearwater Jades.
Clearwater Jade is a Chenyu Vale-specific material used to ascend Xianyun in Genshin Impact 4.4.

Liyue Local Legend
In order to find the new Local Legends for Liyue in Genshin Impact, you should travel to Chenyu Vale, Southern Mountain. You are going to find it to the northeast of the mountain.
SIDE NOTE: Meanwhile, if you’re not yet familiar with all the Local Legends in Fontaine, make sure to check out our dedicated guide for them as well.
Feel free to check out the image below to see the exact location of the local legend.

On the battleground, you will encounter two Geo Vishapov, the Lords of the Chizhan Mountains, Yiji and Tianyu. These enemies are the new local legends in the game.

Lords of the Chizhan Mountains
It is crucial to have characters with shields and, ideally, healing in your team when trying to defeat them. Because these monsters have cryo and pyro elements, very high HP, and the ability to knock you down.

Unlike the Lord of the Chizhang Mountains, Tianyu, the Lord of the Chizhang Mountains, Yiji has a strong resistance to Pyro damage. Both monsters have average Cryo resistance attacks and a little more against everyone else, but they are weak against the Geo element.

To defeat the Lord of the Chizhang Mountains, you must practically destroy both Yiji and Tianyu. Attempt to hit both targets equally, or be ready to dispatch the second foe as soon as one of the Geo Beasts’ health is nearly gone.
You will need to hit the almost-dead enemy again because some of his HP will be restored if you do not have enough time to defeat another opponent.

While Tianyu stays back and damages Cryo with projectiles fired from a distance, Yiji engages in close-range fighting. This is a piece of important information to keep in mind throughout the battle.
Yiji and Tianyu Attacks
Their first attack is to strike in front of you and deal Cryo or Pyro damage in a specific area. After that, they jump and then growl. Following that, they ball up and roll in the direction of the active character, bringing them to the ground.

They shoot projectiles, creating a cryo or pyro field that occasionally deals damage. Standing close to one another, they shoot elemental streams in various directions.

Team Combinations for the Battle
- Itto
- Gorou
- Albedo
- Zhongli
Because the enemy has no resistance to the Geo element, a mono-elemental unit is an excellent choice for battle. With Gorou’s buffs, Itto deals the majority of the damage. Albedo makes a pocket hit. Zhongli offers a shield in addition to striking with his final blow.
- Neuvillette
- Furina
- Cookies
- Zhongli
Even at C0, Nevillette is capable of responding to opponents’ elemental statuses on his own and is able to fully utilize his passive ability. Furina offers buffs and launches pocket attacks. Zhongli and Cookie provide assistance.

Rewards
Upon defeating the Lords of the Chizhan Mountains, you are going to receive a couple of good rewards for your hard work. These rewards are:
- 5 primogems (for achievement)
- Fragile, Strong, or Fossilized Remains: A means of improving weaponry, such as the five-star Memory of Dust and Vortex Vanquisher, the four-star Dragonbone sword, the three-star Black Brush, and the prototypes: Archaic and Starlight.

A Wangshan Walk To Remember
The “A Wangshan Walk To Remember” World Quest involves a ton of dialogue that you’re probably going to skip through. The gist is that you need to complete two trials to be able to enter the Guhua clan’s Wangshan Hall.
These trials will test your skill as a fighter and will eventually give you access to the Arcane Archive, which is a location you will need for a future quest.
Here is a comprehensive guide for this quest line.

Quest Sequence
Generally, these are all the tasks that make up the “Wangshan Walk To Remember“ World Quest.
- Go to Wangshan Hall
- Follow Huang the Third to the site of the trial
- Learn about the rules for the trial
- Complete the trial!
- Follow Huang the Third to the site of the next trial
- Open Wangshan Hall’s gates
- Enter Wangshan Hall
- Tour Wangshan Hall with Huang the Third
- Speak with Huang the Third and go to the next location
- Tour Wangshan Hall with Huang the Third
- Speak with Huang the Third and go to the next location
- Tour Wangshan Hall with Huang the Third
- Talk to Huang the Third

The First Trial
The first trial will be close to Wangshan Hall. This will be marked on your map so you won’t have to go through the trouble of finding it.
Once you make it to the site of the trial, Huang the Third will show you the Plumwatcher Piles, which are unremarkable stone pillars that have seen better days. Huang the Third will then tell you the conditions of the trial: step on the stone pillars in the order he specifies.

This trial isn’t very difficult. Just jump onto the pillars that are marked as fast as possible. You can also use characters like Xiao and use his skill to move faster. Keep in mind though, that doing this will sacrifice precision for speed.
You’ll be allowed to climb up the poles so don’t worry about landing the jump perfectly each time.

Congratulations! Huang the Third will compliment your technique and you can move on to the next trial. This is the Martial Trial, so be prepared to fight.
The Second Trial
The second trial is the Trial of Spear and Sword, which really isn’t as impressive as it sounds. Here, Huang the Third pulls out some dummies and you’ll be asked to defeat all the dummies in red within the allotted time. Note that you shouldn’t hit any dummies in blue or you have to repeat the trial.

Once you accomplish this, Huang the Third will be impressed with your skills. Now you can follow him and see the inside of Wansgshan Hall for yourself.
Tour Wangshan Hall
Now that you have access to Wangshan Hall, well, it’s up to you to decide if the trials were worth the trouble.
The hall is old and filled with old fighting dummies and weapons. Even the Traveler notes that the hall has seen better days, but Huang the Third is convinced that the domains of the Adepti pale in comparison.

You’re given a quick tour of the hall. Again, there’s not much to see except for some old equipment. You can also offer some incense at the memorial of the Guhua clan’s founder, after which, you are taken to the Arcane Archives, which will be locked behind a gate.
You won’t be allowed to enter because only Guhua disciples are given access to this corner of Wangshan Hall, but you can find out more about that in the Scrolls and Sword Manuals of Guhua quest that comes after this quest line.
Scrolls and Sword Manuals of Guhua
To complete the Scrolls and Sword Manuals of Guhua World Quest, you will need to do the following:
- Open the gate to the Arcane Archive
- Go and search in the central chamber
- Open the hidden room by killing the spider
- Read through Guhua’s Notes
- Complete the Archive puzzle (by swapping books correctly).
Open the Arcane Archive Gate
The Scrolls and Sword Manuals of Guhua quest begins right after the A Wangshan Walk to Remember World Quest. At the end of that quest, you will have received a key to open the gate from Huang the Third, when you reach the cave.
You’ll actually need to use this key almost immediately when you’re starting the quest.

Use this key to open the gate that leads into the Arcane Archive.

Go to Central Chamber (Arcane Archive)
After the gate opens, the path ahead is pretty straightforward, just follow it ahead. On the sides, you’ll see some glowing books that you can interact with for some extra lore.
After some walking, you’ll see a prominent central chamber of the Arcane Archive. Make your way towards it but be careful! Don’t spend too long swimming inside the water. You’re not in Fontaine anymore.

Open the Hidden Room (Guhua’s Notes)
When you reach the central chamber, you’ll basically need to complete a puzzle. However, before starting to solve the puzzle, we recommend that you first open the hidden room nearby. You’ll be able to recognize it by a spider and giant web covering it.
Just shoot the spider to kill it, and the web will be removed revealing the hidden room.

Inside the hidden room, you’ll see a pile of books that you can interact with. These are Guhua’s Notes, and you can go through them as they’ll provide you with the necessary hints you need to complete the quest.

Just keep pressing the Continue Reading option and eventually you’ll arrive at the hint. The highlighted blue parts of the message are basically the hints. When they refer to eyes, they mean that you need to use Elemental Sight to understand the puzzle.

Solve the Puzzle (Swapping Books)
Now you can return to the central chamber and start the puzzle. Activate your Elemental Sight to get a lay of the land. You will notice that there are different colored books, alongside different color compartments.
You will need to swap books around and match the colored books with their respective compartments. Here’s the sequence that you’ll need to follow:
- Swap the Purple book from the Red compartment into the Purple Compartment
- Swap the Red Book from the Green compartment into the Red Compartment
- Swap the Green Book from the Orange compartment into the Green Compartment
- Swap the Orange Book from the hidden shelf into the Orange Compartment.

The tricky part here is actually locating the Orange book, as it is in a hidden location. It is on the shelf that is towards the gate of the Arcane Archive (where you entered from). Look in that direction with your Elemental Sight, and you should be able to notice it.
Swap it into the compartment and a small cutscene will play. The water in the area will lower and the quest will complete. But don’t think it’s over yet! There’s still the Shrouded Vale, Hidden Hero quest that will unlock almost immediately, related to the water that you just lowered.
But we’ll leave that to you to discover for yourself!

Our Chenyu Vale Trek
To complete the Our Chenyu Vale Trek Quest, you will need to do the following:
- Finish the Prerequisites for this quest
- Go to Hezhe Post in the Yilong Wharf Area
- Talk to the Fangju NPC and obtain the quest
- Go to the Four Scenic Locations
- Take Photos using Kamera Gadget at the right time and conditions
- Submit photos to Fangju NPC.
Finish the Prerequisites
Before you can proceed with getting the Quest, you’ll first need to complete the Prerequisites. You can actually check out these Prerequisites by visiting the Ms. Yu NPC near the Liyue Harbour.
Over here, you’ll be able to see that you need to do the The Roaming Abode Quest.

In turn, you’ll need to do the Threefold Expectations Quest for that one. So, basically all of this will lead back to the Qiaoying of the Sacred Mountain (Act 1) Quest, which will allow you to go through all of these.
So, make sure you’ve taken care of these Prerequisites so that you can actually get this quest.

Go To Hezhe Post and Talk to Fangju (Yilong Wharf Area)
Once you’re ready to actually do the quest, make your way to the Yilong Wharf Area. You can easily teleport there by using the marker on the map.

Once you teleport there, immediately turn around towards the dock. Once you reach the docks, turn towards the right.

From here, make your way up the stairs to the second floor. If you look at the minimap, you’ll actually be able to make out the Blue Quest Marker. Keep going up until you see the NPC with the blue marker on top of them.

The NPC is Fangju, and she’ll be sitting behind a desk.
Talk to her, and she’ll give you the Our Chenyu Vale Trek Quest. She’ll task you with taking photos at four locations through the area. You’ll be submitting these photos to her after you’re done, for a photography contest.

Our Chenyu Vale Trek All Photo Locations
The four locations where you’re tasked with taking photos will appear on your map. You can see the four markers, giving you a pretty good idea of where to go. However, each area will present it’s own unique challenges.
So, we’ll go through the locations in the order shown below. Keep in mind that the order is not important – but this is likely the fastest way to get it done.

Photo Location #1 – Tranquil Jademouth
Starting off, we’ll be using the closest Teleport Waypoint to the Jademouth photo location marker. It is indicated below.

Once you spawn, all you need to do is just glide towards the photo location. You can even use the golden glowing points to make teleporting to the location faster.

When you arrive at the indicated spot, you’ll be given a notification that you need to take the picture at the right time. In this case, you’ll need to take the photo between 08:00 and 10:00 in in-game time. You can easily do this by setting the wait time to any time between this interval.
The reason for setting the time is so that you can get the ideal scenic view for your photo. You can easily do this by accessing the Time option in the Paimon Menu.

Once those requirements are fulfilled, pull out your Kamera gadget and take the picture at the angle shown below. You’ll have completed your first photo for the quest!
The Requirements for the photo angle are:
- Take a picture of the Jademouth and the pearl mounted on it.
- The picture should be taken between 08:00 – 10:00.

Photo Location #2 – Mt. Xuanlian
Next up, we’ll be going to the closest Teleport Waypoint again to the marker near Mt. Xuanlian, as shown below.

After you spawn, you’ll notice that the marker is well above where you are. You can use the golden floating orbs to teleport all the way up – there will be more than a few that will lead up.

Once you’re up on the hill, go ahead a bit and you’ll notice a cry for help! There will be enemies swarming an NPC named Akai. You’ll need to kill all of these enemies and save him.

After a small cutscene, where he thanks you for saving his life, you can now take the photo at the designated spot. Make sure that you set the time between 17:00 and 18:00.
After you’re done admiring the beautiful sunset, you can take out your Kamera and take the second photo of this quest.
The requirements for this picture are:
- Take a picture of Mt. Xuanlian (must be in view)
- The picture should be taken from 17:00 – 18:00.

Photo Location #3 – Lotus Pond Beneath the Moon
Next up, we’ll be going to the Teleport Waypoint near the Teatree Slope area. The Lotus Pond is in the vicinity of this location, as shown below.

Once you spawn, turn towards the North East direction. Basically, you just need to head towards the marker when following the Chenyu Vale photography quest objective.

When you make your way towards the marker, you’ll see some monsters near the photo taking area. You’ll need to kill all of them.

After you’ve killed all of the monsters, you’ll now be able to go to the spot for taking photos. It will be glowing again. However, before you take the photo make sure to set the time between 19:00 and 20:00.
You can take the picture in the angle shown below. Just one more to go now!
The requirements for this picture are:
- Take a picture of the Lotus Pond (must be in view)
- The picture should be taken between 19:00 – 20:00.

Photo Location #4 – Guests of Qiaoying (Village)
For the last of our photos, we’ll be heading to the Teleport Waypoint that is right at the Qiaoying Village area in Liyue.

After you teleport there, you’ll see that it is quite a crowded area with lots of people. In this area, you’ll notice a girl standing right next to a pelican. Approach the girl and a small cutscene will play.
Take note of the pelican’s call after the cutscene ends. You’ll need to know that call to take the picture for this scene.

Once the cutscene is over, you can make your way towards the photo spot. However, you’ll need to set the time again. This time, make sure that it is between 15:00 and 17:00.

However, there is one last thing you need to do before you can take the photo. There is something missing in the scene and you’ll need to select the Call for Pelicans option.
After that, you’ll need to select the right option. If you were paying attention during the cutscene, you’ll know that the pelican made the call shown in the second option. After choosing the option, the pelicans will arrive in the scene.
Now you can take the picture at the angle shown below. All pictures are taken care of!
The requirements for this picture are:
- Take a picture of Qiaoying Village (must be in view)
- The picture should be taken between 15:00-17:00.
- There must be a pelican on the water in the picture (after calling it)
- There must be 2 Emerald Ducks in the picture.

Submit the Pictures and Complete Quest
Now that you have all the pictures, it is time to return to Fangju at Hezhe Post. You can do this by teleporting to the Teleport Waypoint at Yilong Wharf.
After interacting with her, make sure to select all four pictures and submit them to her.

Once you submit the pictures, she will tell you that you will need to wait for a day. After that, you can follow the marker to the area where the photography contest is taking place. Here, you’ll see all your hard work being displayed for all to set.
Additionally, you will receive a four star ‘Our Chenyu Vale Trek’ Album Quest Item, which contains a variety of pictures that you can go through. You will also get some Primogems as a reward.

Make sure that you visit Ms. Yu if you care about your Reputation. Here, you can Claim the Our Chenyu Vale Trek mission since you completed it. Doing so will also net some additional Reputation!
And there you have it, you completed the Our Chenyu Vale Trek Quest. Quite a long one but you got there.

ncestor’s Mystery
In order to get the Ancestor’s Mystery achievement, you need to unlock the Chizhang Wall Gate and collect jade fragments by completing Blessing of Sunken Jade. After opening the gate, you can head inside and fight the Ruin Grader to get access to the room he is protecting.

There, you are going to see an Ancient Pendant. However, it is missing some parts. You need to use the jade fragments you have at this point. Once you put in the fragments, the mechanism will activate and teleport you inside.

Once you are inside, use your ability to clear the mural. Doing this will earn you the Mural Veil and A Ruined Tale achievements. It will also reveal a chest for you to loot.

After looting the luxury chest, your job there will be pretty much done, and you will have completely solved the Ancestor’s Mystery puzzle.
All Update 4.4 Hidden Achievements
In this list, we’re going to show all the hidden achievements that are just way out of the left field. Enjoy!
“What About Sliced Meat Now?”

Head to the north of the Chenyu Vale, on the shore just outside Yilong Wharf to find this Ancient Stone Tablet. It has a long poem about nature and particularly, fauna. It asks for “offerings of meat,” so head up the slope and feed some Raw Meat/Fowl/Shrimp/Fish to the sea.
Watch the magic comes by. Literally.

You can get some more Clearwater Jades from doing this achievement as well. Don’t stop here! Jump on it and “try to touch” to get it to bring you to its babies!
Up the Bishui
Up the Bishui is an achievement where you have to take the full trip up or down the Bishui River. Think of it like the full canal trip in Fontaine. You can do it by talking to Bosu or Sun Rao.


Tell them you want to ride the bamboo raft to Yilong Wharf/Qiaoying Village. Sit back, relax, and enjoy the songs.
Long Days in the Realm Within
Find a table with teacups in these areas where you have to solve the puzzles. Pour the tea to finish each of the puzzle. There’s a total of 4 areas:

- Teatree Slope: Guide 4 crystalflies to the teacup area. (cutscene)

- North of Qiaoying Village: Break the crates that are up the stairs behind the ruin wall. Ride the Golden Carp’s Leaf to get to your Precious Chest.
- Chizhang Wall: Dig up the teacups. Don’t forget to also taste the tea to unlock the Precious Chest!

- West of Solitary Suanni: Approach the rocks until they vanish. There are 3 rocks, the middle one is the only that spawns the teacups.
Secret Miracle

You need to clear 3 Hilichurls camps closes to this point right here. Make sure all 3 Sacred Simulacrum are in this spot, and then wait until it’s 14.30. Stand right in the gorge inside the Chiwang Terrace.
When the shadow of a carp passes through, you’ll get a Luxurious Chest and the achievement!
“Wanna Learn? I’ll Teach You!”

You have to first clear A Wangshang Walk to Remember World Quest. Head to this area in Mt. Lingmeng near Wangshang Hall. Kill the Stonehide Lawachurl and then relog to spawn another Lawachurl. If you haven’t done the quest, the Lawachurls won’t spawn.
Kill the second one and then a third one, and you’ll get the achievement.
Five Blades Return to Wangshan

Yet another one that you can get after A Wangshang Walk to Remember World Quest. You end the quest with one of the blades and an inscription to read. Find another 4 in these locations and read the inscriptions to get your achievement. (The other 4 locations shown above.)
At the Construction of the Endless Wall

If you’ve found this map and have no idea what this means, cheers. If you don’t, don’t worry about it.
Head to the west of Chizhang Wall where you’ll find a ruin here with Jade Incense Cauldron locking the door. Open that door to get the Ancient City Key and Chizhang Map. This is a map that indicates where you need to go to get your loot.
The loot is to the south of Chizhang Wall. Refer to the picture below for the exact location. There’ll be a locked door which you can open with the key. Grab your loot and your achievement!

The Carp Leaps, Heaven’s Gates Open

This area up in the mountains just southwest from the Solitary Suanni is where you can find 3 Seelie puzzles. Finish them all and open the chests so you can send the floating platform to the middle.
Then hop on the Golden Carp’s Leaf which will bring you to the water. Hop on the next one and just let it flow until you reach your destination!
Good as New

There are 7 ruined areas you need to check for Good As New achievement, despite the achievement saying that there are 6.
All of them share the same type of puzzle where you have to place the Sacred Simulacrum and other pieces back in place.
Non-Hidden Backup Energy Source

Near the reconstruction site from Good as New achievement in the north is a cave blocked by a Ruin Guard. You need a Ruin Machine Core which you can get a little further to the north after clearing out the Ruin machines.
And that sums up the complete guide for the Update 4.4 of Genshin Impact. If you have questions or concerns, feel free to leave them in the comments section below.