
With Windows 11 being on the horizon, many gamers out there are getting ready to see what kind of performance they would be getting with it, as well as how to optimize to get the best performance. We’re going to be focusing more on the latter, as it appears that Windows 11 might well be better optimized for gaming. Whatever the case may be, this is a Windows 11 Nvidia optimization guide for best performance!
Nvidia Optimization Guide for Best Performance – Windows 11
At the time of writing, some GPUs don’t yet have drivers for the latest version of Windows, but your regular Windows 10 driver will get the job done it seems like.
Time needed: 8 minutes
However, to download the official Nvidia driver for Windows 11, it is quite easy, if it has been released:
-
Navigate to the Nvidia’s official driver page.
-
Select Product Type, Series, and language.
-
For operating system, choose Windows 11, if it isn’t released yet, choose Windows 10.
-
Also, use Windows Driver Type – Standard.
-
Download the latest driver for your GPU with the name – Game Ready Driver.

After the driver finished downloading, simply launch the setup file. It will take a couple of minutes to install, and after that, you should be able to access the Nvidia Control Panel.
3D Settings
With the control panel, you can then tweak the 3D settings of your GPU. This will give you a substantial boost of performance.
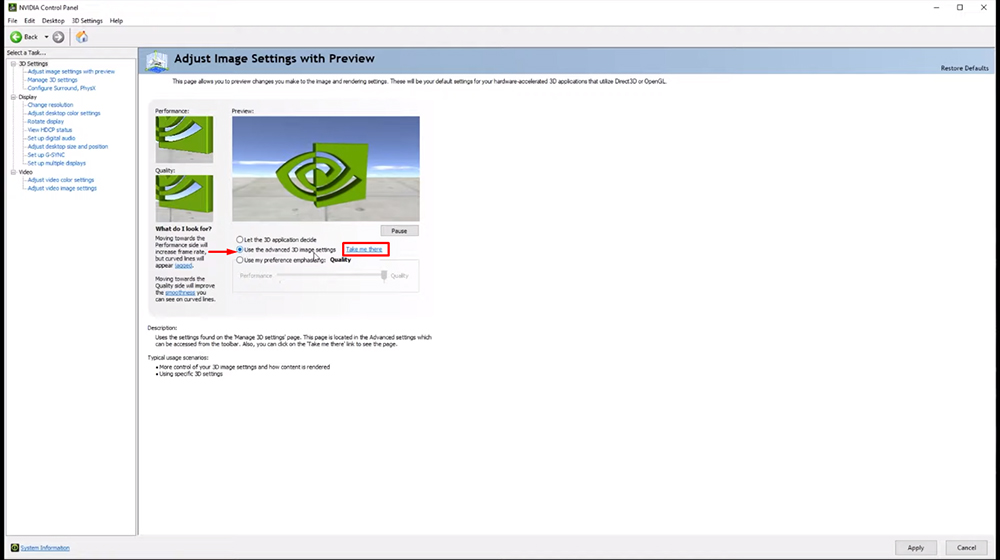
To open the Nvidia Control Panel, right-click on your desktop, and click on it. Then, here are some tips to optimize the 3D settings:
- Click on 3D settings on the left, and then click on ‘Use the advanced 3D image settings’ and press ‘Take me there’.
- Then, set all of your settings there to the following:
- Image Sharpening: Sharpening Off, Scaling disabled
- Ambient Occlusion: Off
- Anisotropic filtering: Application-controlled
- Antialiasing FXAA: Off
- Antialiasing Gamma Correction: On
- Antialiasing Mode: Application-controlled
- Antialiasing Transparency: Off
- Background Application Max Frame Rate: Off
- CUDA – GPUs: All
- DSR – Factors: Off
- DSR – Smoothness: Off
- Low Latency Mode: On
- Max Frame Rate: Off
- Monitor Technology: G-Sync – if available
- MFAA: Off
- OpenGL Rendering GPU: Auto-select
- Power management mode: Prefer Maximum Performance
- Preferred Refresh Rate: Highest Available
- Shader Cache: On
- Texture Filtering – Anisotropic sample optimization: Off
- Texture Filtering – Negative LOD bias: Allow
- Texture Filtering – Quality: High Performance
- Texture Filtering – Trilinear optimization: On
- Threaded Optimization: Auto
- Triple buffering: Off
- Vertical Sync: Off
- Depending on your GPU you might not have all or have more options than the ones mentioned above, so if that is the case, simply skip over the others and leave as default.
Display Settings
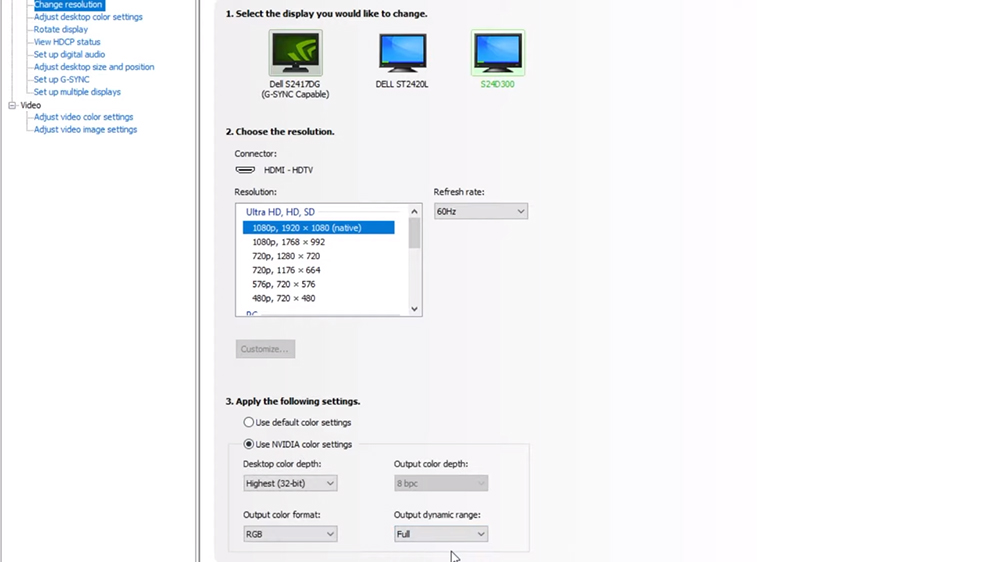
Head over to the display tab on the left, more specifically, left-click on Change Resolution. This page is really important, especially if you use a high refresh rate monitor.
For each of your monitor here, make sure you’re running the highest supported resolution and refresh rate. If you select the incorrect settings, the monitor might go black for a bit, but don’t worry, simply wait for 15 seconds and it should be back to normal.
This is unusual as the highest supported settings for you monitor will be given, and nothing else which isn’t supported from your monitor will be given.
As for the last part of the display settings, click on ‘Use NVIDIA color settings’ instead of the default color settings. Again, set the highest possible here, and ‘Full’ Output Dynamic Range.
Do all the things mentioned above to all the monitors if you have multiple monitors plugged in. Then, simply hit Apply, and accept the changes if you’re satisfied.
G-Sync
This is a really important setting, and G-Sync monitors have a big impact on performance these days. However, this is only available for those that have G-Sync monitors.
To know if you have it available, click on ‘Set up G-SYNC’ on the left. If you can enable this feature, then great, that is all that you need to do. If it is unavailable though, skip this step.
For those that have it, make sure to enable it for windowed and Fullscreen mode.
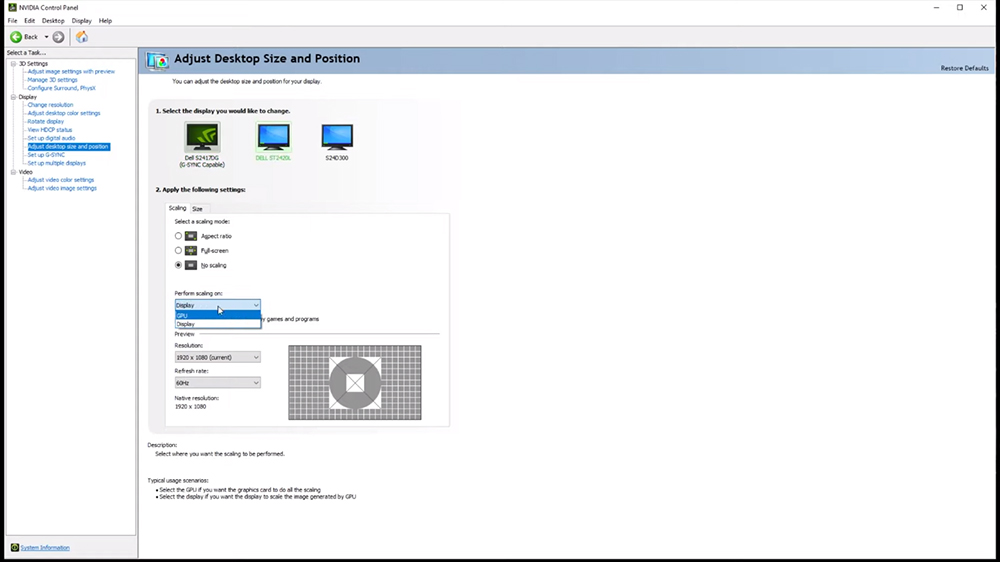
Adjust Desktop Size and Position
Navigate to ‘Adjust Desktop Size and Position’ in the Display tab on the left. Here, I recommend choosing ‘No Scaling’ for all of your monitors.
If you do have to use it, then select a Fullscreen scaling mode, and use your display to perform your scaling, instead of your GPU. Apply and accept the settings change.
As of this moment, there aren’t really any other ways to improve or increase performance through Nvidia’s Control Panel, but with new features being added to Windows 11 regularly, we might see a lot of features which might impact gaming directly.
READ NEXT : How To Install or Upgrade to Windows 11 Official Release


